
![]() Working with containers provides a lot of benefits. They are a lot faster to spin up and shut down than virtual machines. They run everywhere, which gives you the benefit of having the exact same environment locally as in production. And because they run everywhere, you can run them in any cloud or on-premises, which prevents you from being locked in by any hosting vendor.
Working with containers provides a lot of benefits. They are a lot faster to spin up and shut down than virtual machines. They run everywhere, which gives you the benefit of having the exact same environment locally as in production. And because they run everywhere, you can run them in any cloud or on-premises, which prevents you from being locked in by any hosting vendor.
My preferred way to run containers is in Azure. And Azure provides a lot of options to run containers in the cloud, each with their own features, pricing and complexity. The simplest way to run a container in Azure is with the Azure Container Instances service.
Azure Container Instances allows you to run a container without provisioning virtual machines or having to use container orchestrators like Kubernetes or DC/OS. Container Instances are useful when you just want a container without orchestration.
Let’s get started! I’m going to show you how to run an application in a container locally and then publish that to Azure Container Instances. I’ll do this using Docker containers. To get started on Windows 10, you need the following:
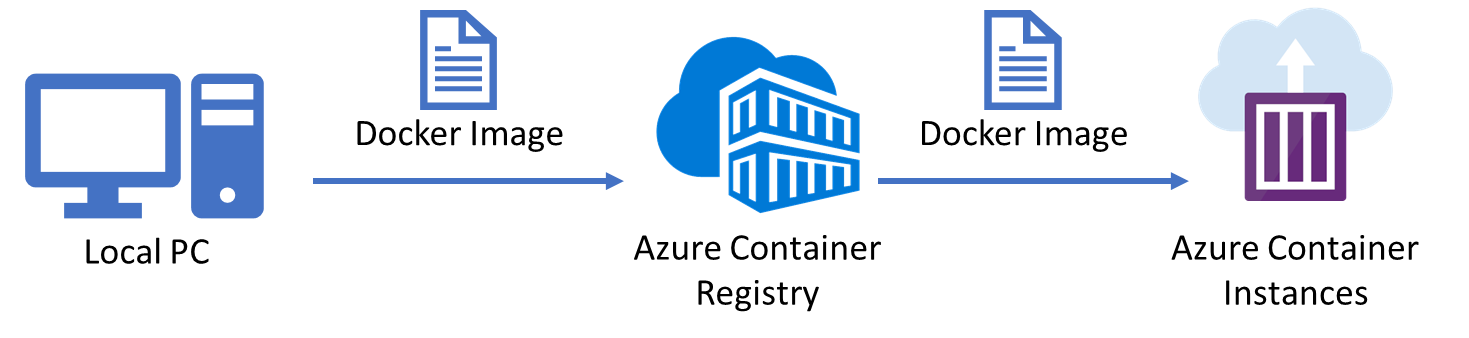
To get a local container into Azure Container Instances, I need to first put it into an intermediary repository that can be accessed by Container Instances. This can be Docker Hub or something else, like the Azure Container Registry. This is a place that houses container images. This would make our workflow look like this.
I already have an ASP.NET Core application and want to run it in a Docker container. Visual Studio makes this easy for us. Once you have your ASP.NET Core project opened, you can just add Docker support by selecting it from the project menu in Visual Studio. Alternatively, there is a checkbox to enable Docker support for new ASP.NET Core projects.

Once you do, the resulting solution looks like this:

There’s now a new project, called docker-compose. This contains the Docker compose files that will build the image for your web application. Also, there is a Dockerfile file in the web application. This is the actual Docker file that is used to build the Docker image. When you open it, you see that it is based on the microsoft/aspnetcore:2.0 image and adds the application to it. Also, you’ll see that the application is exposed to port 80.
FROM microsoft/aspnetcore:2.0
ARG source
WORKDIR /app
EXPOSE 80
COPY ${source:-obj/Docker/publish} .
ENTRYPOINT ["dotnet", "WebApplication4.dll"]
You need to do one more thing in order to build and run the application locally. You need to change the local Docker server to run Windows-based containers. Find the Docker server running on your machine in your applications tray (near the clock), right click on it and click Switch to Windows containers, which I already did (that’s why it says switch to Linux containers in the image below). Unfortunately, this will result in a restart of your system.

That’s it! Now build and run your solution and you’ll see that the web application will be built, the docker image will be composed, and the application will run locally in a Docker container.
We now have the application running in a container on our local machine. Now, we need to get this image somewhere so that it can be used by the Azure Container Instances service. We’ll put it in Azure Container Registry, which is a private container repository, hosted in Azure. It is nothing more than a storage space for containers.
First, we’ll create an Azure Container Registry:
The Create container registry wizard appears:
And now the registry will be created. Once it is done, we can move on to the next steps.
In order to publish the local Docker image to the registry, we want it to be a release version of the application. So first of all, change the build configuration of the application to Release. A handy way of making sure this works, is to navigate to the Configuration Manager when right-clicking the solution file, and selecting the release configuration. Once that is done, build the solution again.

Open a command prompt to see which images are available after the build. Type in the following in the command prompt:
docker images
This results in a list of local docker images, like this:

In my case, the webapplication4 image is the one we want. The one tagged latest was just added after the release build. Now we need to push this image to the Azure Container Registry. In order to do that, we first need to login to the container registry, like this:
docker login CONTAINERREGISTRYURL -u CONTAINERREGISTRYNAME -p CONTAINERREGISTRYPASSWORD
You can find this information in the Access Keys tab of the Container Registry. Here is what this looks like for me (don’t bother to try these credentials, I’ve deleted the repository already).
docker login barriescontainerregistry.azurecr.io -u barriescontainerregistry -p DEen2rwlgnYM2sT7W/y57MKNU8iyTqZk+
After logging in, we need to tag the image before pushing it:
docker tag webapplication4 barriescontainerregistry.azurecr.io/demos/webapp4
Now that we have created the tag, we can push the image to the registry:
docker push barriescontainerregistry.azurecr.io/demos/webapp4
That’s it. The image is now in the Azure Container Registry and can now be used by the Azure Container Instance service.
[adinserter block=”33″]
The image is now in the Azure Container Registry. Let’s create a new Azure Container Instance with the image to see if it will run in the cloud.
The Container Instance will now be created. When it is done, you can find an IP address in its overview in the Azure Portal.

When you navigate to that address, you’ll see the ASP.NET Core application that is exposed on port 80.

The steps I took to build the container image, push it to Azure Container Registry and get it running in Azure Container Instances are a bit much, if you ask me. First of all, I would love to see the tooling evolve to provide us a first-class Visual Studio experience to build images locally and push them to where they need to be – I’m confident that Microsoft will deliver on that.
And secondly, these steps should ideally be automated. You can use something like Visual Studio Team Services to perform the application build steps and compose the image and then push it to Azure Container Registry and to Container Instances. You can read how to do this in the tutorial here. The article describes pushing to Azure Container Services instead of Container Instances, but the concepts remain the same.
Azure Container Instances is a simple mechanism to run a container in Azure. You’ve seen that I didn’t have to set up any container orchestrators or clusters nor did I even have to do anything with VMs.
I think that the abstraction level of the Azure Container Instances service is just right. The tooling to push things to it is not where I would like it to be, but then again, I’m not a big fan of command-line programming, so this might not be a problem for you.
Also, the service is still in preview and needs some more robustness around the management and monitoring of the containers that are running. Currently, you don’t really have any insights into how things are doing and if and what you can do about it when things are failing. Surely, this will evolve as Microsoft pushes this service into general availability. However, this service is definitely worth checking out.
Stackify Retrace supports containers as part of its Continuous Application Improvement solution.
Stackify's APM tools are used by thousands of .NET, Java, PHP, Node.js, Python, & Ruby developers all over the world.
Explore Retrace's product features to learn more.
If you would like to be a guest contributor to the Stackify blog please reach out to [email protected]