
I’ve always dreamt of being able to do facial recognition in one of my apps, but it always seemed too difficult to do. Facial recognition is complicated, it is something that much smarter people than me come up with.
Now, with Azure Cognitive Services, I can easily add facial recognition to my app by just calling an API. Plus, I can add lots of other clever functionality, like sentiment analysis and text translation. I can use all of these things through the Cognitive Services APIs, which I just spin up and use – no need to worry about keeping them up and running or secure – Azure does that for me.
There are many Cognitive Services, which all do something unique. The list of services keeps growing. At the moment, these APIs are available:
| Vision | Speech | Language | Knowledge | Search |
| Computer Vision | Translator Speech | Language Understanding Intelligence Service | Recommendations | Bing Autosuggest |
| Emotion | Custom Speech | Translator Text | QnA Maker | Bing Video Search |
| Video Indexer | Speaker Recognition | Text Analysis | Academic Knowledge | Bing Entity Search |
| Face | Bing Speech | Web Language Model | Entity Linking Intelligence Service | Bing Image Search |
| Video | Bing Spell Check | Knowledge Exploration | Bing Web Search | |
| Content Moderator | Linguistic Analysis | Custom Decision | Bing News Search | |
| Custom Vision | Bing Custom Search |
Some of these services are in preview, others have been generally available for a while. They do things like facial recognition, text translation, spell checking, voice recognition, create QnAs, sentiment analysis and so on. Besides these services, there are experimental services in the Cognitive Services Labs.
The way you use a Cognitive Service differs per service:
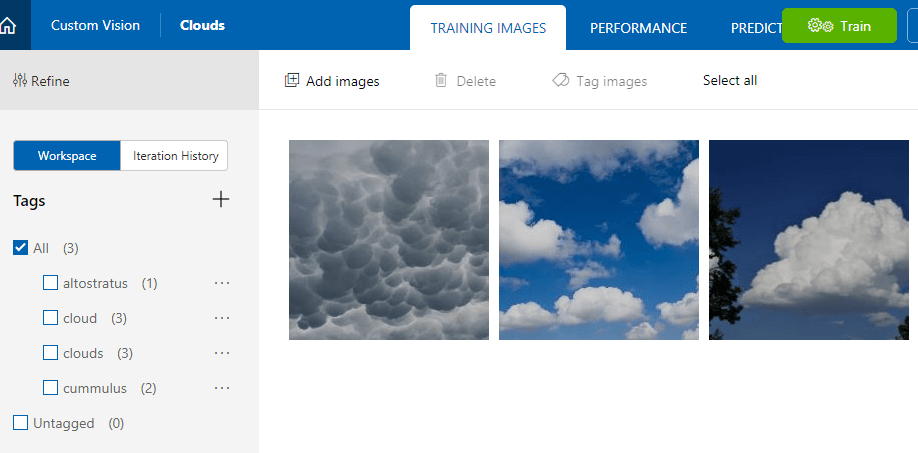
Also, some services can be used by just sending requests to them. Others, like the Custom Vision Service need to be trained first because they operate based on a data and intelligence model that you provide. In the case of the Custom Vision Service, you need to associate images with tags, like type of clouds in an image. Once you’ve done this for enough images, a machine learning algorithm is used to train the Cognitive Service to recognize what type of cloud a certain image is. When it is trained, it will recognize the type of clouds in images that you send to it.
Let’s use a Cognitive Service in an application. I’ll show you how to use the Emotion API to detect the emotion of a person in an image and display that on a web page using ASP.NET Core 2.0. I’ve put this little experiment on GitHub, so that you can explore what I’ve done.
You can feed the Emotion API an image and it will tell you where it detected faces in the image and which emotions they had. It plays by a certain set of rules:
Once you’ve posted your image to the API, it will return an array of rectangles and emotions of faces that it found. The rectangles are the position of faces that it detected. The data that it returns, comes in the form of a JSON document, like this:
[{
		"faceRectangle": {
			"left": 68,
			"top": 97,
			"width": 64,
			"height": 97
		},
		"scores": {
			"anger": 0.00300731952,
			"contempt": 5.14648448E-08,
			"disgust": 9.180124E-06,
			"fear": 0.0001912825,
			"happiness": 0.9875571,
			"neutral": 0.0009861537,
			"sadness": 1.889955E-05,
			"surprise": 0.008229999
		}
	}
]
The highest scoring emotion is the one that it detected with the most confidence. In the example above, that is happiness.
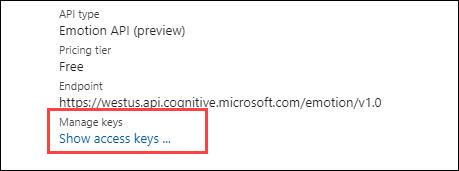
Alright, let’s get started. First of all, we need to spin up an instance of the Emotion API. We do that in the Azure Portal:
That’s it! The Emotion API will now be deployed. Once it is done, the only thing you need is to get the access key that we’ll use to authenticate when calling the API. You can get that in the overview blade of the Emotion API you’ve just created.
Alright, now to use the API in an application. I’ve created a new ASP.NET Core 2.0 web application and adjusted it slightly, by changing the Index page and removing the standard About and Contact pages.
I’ll highlight some pieces of code that show you how to work with the Emotion API. You can follow along by looking at the GitHub project.
First, I use JavaScript to post an image file from a file upload to the UploadImage action of the HomeController:
function imageIsLoaded(e) {
    resetCanvas();
    document.getElementById('myImgage').src = e.target.result;
};


$('#fileControl').on('change',  function (e)  {
	var  files  =  e.target.files;
	if (files.length > 0)  {
		var  data  =  new  FormData();
		data.append("file", files[0]);
		var reader = new FileReader();
		reader.onload = imageIsLoaded;
		reader.readAsDataURL(this.files[0]);
		$.ajax({
			type:   "POST",
			url:   '/Home/UploadImage',
			contentType:  false,
			processData:  false,
			data:  data,
			success:   function (result)  {
				upload(result);
			},
			error:   function (ex)  {
				alert('Emotion recognition failed')
			}
		});
	}
});
The imageIsLoaded function puts the image on the screen so that you can see it.
Once the image is posted to the HomeController, in the UploadImage task, I create a HttpClient object and put the request to the Emotion API together. The output that I get is similar to the JSON data that you saw earlier.
string output = string.Empty;

//get the image file from the request, I assume only one file

var fileContent = Request.Form.Files[0];

if (fileContent != null && fileContent.Length  > 0)
{
	var client = new HttpClient();
	var queryString = HttpUtility.ParseQueryString(string.Empty);

	// Request headers, include your own subscription key
	client.DefaultRequestHeaders.Add("Ocp-Apim-Subscription-Key",  "{ enter your subscription key }");

	var uri = "https://westus.api.cognitive.microsoft.com/emotion/v1.0/recognize?"  + queryString;

	HttpResponseMessage response;

	//copy the file into a stream and into a byte array

	using (var stream = new MemoryStream())
	{
		fileContent.CopyTo(stream);
		byte[] byteData  = stream.ToArray();

		using (var content = new ByteArrayContent(byteData))
		{
			content.Headers.ContentType = new MediaTypeHeaderValue("application/octet-stream");

			//post to the emotion API

			response = await client.PostAsync(uri, content);

			output = await response.Content.ReadAsStringAsync();
		}
	}
}
To use this yourself, you need to replace the “{ enter your subscription key }” string with the key that you’ve got from the Emotion API.
Another thing to note is that I first assumed that the MediaTypeHeaderValue should be whatever the value of the image is (e.g. image/png), but that results in a HTTP 415 response (Unsupported Media Type). The value should be application/octet-stream as I send the image in a byte array that I create from a Stream.
Next, I filter out the results, so that I only send the emotion with the highest confidence value back as a JSON string. And then I use the faceRectangle values to paint a rectangle over the face in the picture using the HTML canvas element. I also populate a div with the text of the emotion with the highest confidence value and place that under the rectangle using JavaScript.
var canvas = document.getElementById('myCanvas');
var ctx = canvas.getContext('2d');

function upload(json) {
	var result = JSON.parse(json);

	//draw rectangle around face
	ctx.lineWidth = "6";
	ctx.strokeStyle = "yellow";
	ctx.rect(result.faceRectangle.left, result.faceRectangle.top,
	result.faceRectangle.width, result.faceRectangle.height);
	ctx.stroke();

	//set emotion div and position it
	var d = document.getElementById('myEmotion');
	d.innerHTML = result.primaryEmotion;
	d.style.position = "absolute";
	d.style.left = 50 + result.faceRectangle.left + (result.faceRectangle.width / 4)  + 'px';
	d.style.top = (300 + result.faceRectangle.top + result.faceRectangle.height + 10) + 'px';
}
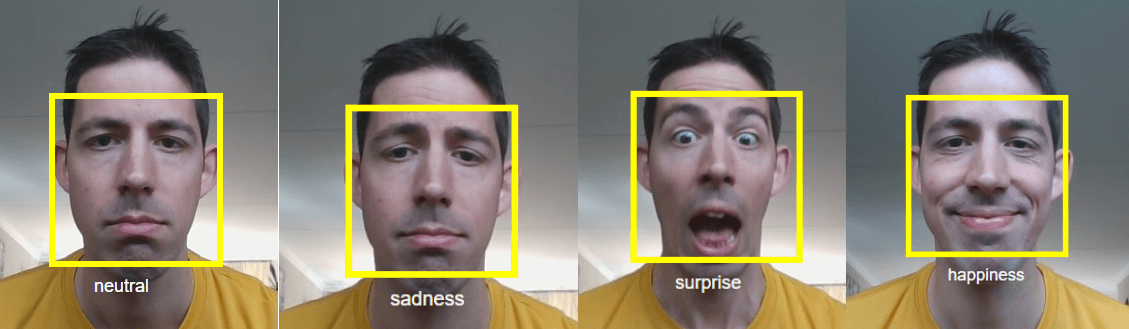
When you run it and upload an image with a face in it, it will display the image, paint a rectangle around the face and shows the emotion of the face. This looks something like this:
[adinserter block=”33″]
The Cognitive Services are very promising and some of them are already pretty mature and can be used in production scenarios. They can enhance your applications by adding new ways to interact with your users and by adding additional functionality.
These services are a perfect example as to why you should use the cloud and its intelligent services. You don’t want to build services like these yourself. I’m not even sure how I would go about building a service like the Emotion API. I imagine that it is really difficult to get something like that right. It’s probably fun to build, but it wouldn’t add much value as I can already just using them from Azure.
So use these services and focus on building things that matter. Don’t forget to continually improve your applications as well by using tools like Stackify Retrace, the only full lifecycle APM.
Stackify's APM tools are used by thousands of .NET, Java, PHP, Node.js, Python, & Ruby developers all over the world.
Explore Retrace's product features to learn more.
If you would like to be a guest contributor to the Stackify blog please reach out to [email protected]