Log4j2 is the updated version of the popular and influential log4j library, used extensively throughout the Java ecosystem for so many years. Version 2.x keeps all the logging features of its predecessor and builds on that foundation with some significant improvements, especially in the area of performance.
And of course, given how instrumental logging is for any application, both for audit and debugging purposes, choosing a solid logging library is quite an important decision.
In the following sections, we’re going to take a look at why the log4j2 library is a great choice for that decision and how we can use it in an application.
To start using log4j2 in your project, you simply need to add the log4j-core dependency. If you’re using Maven, you can add the following dependency to your pom.xml file:
<dependency>
    <groupId>org.apache.logging.log4j</groupId>
    <artifactId>log4j-core</artifactId>
    <version>2.8.2</version>
</dependency>
And if you’re working with Gradle, you need to add the dependency to the build.gradle file:
dependencies {
  compile group: 'org.apache.logging.log4j', name: 'log4j-core', version: '2.8.2'
}
Out of the box, log4j2 will automatically provide a simple configuration, if you don’t explicitly define one yourself. The default configuration logs to the console at a level of ERROR level or above.
To start logging messages using this basic configuration, all you need to do is obtain a Logger instance using the LogManager class:
private static Logger logger = LogManager.getLogger(MyService.class);Then you can use the logger object with methods corresponding to the log level you want:
logger.error("This is an error message");
A custom log4j2 configuration can be created either programmatically or through a configuration file.
The library supports config files written in XML, JSON, YAML, as well as the .properties format. Here, we’re going to use XML to discuss all examples primarily.
First, you can override the default configuration by simply creating a log4j2.xml file on the classpath:
<?xml version="1.0" encoding="UTF-8"?>
<Configuration status="WARN">
    <Appenders>
        <Console name="Console" target="SYSTEM_OUT">
            <PatternLayout pattern="%d{HH:mm:ss.SSS} [%t] %-5level %logger{36} - %msg%n"/>
        </Console>
    </Appenders>
    <Loggers>
        <Root level="INFO">
            <AppenderRef ref="Console"/>
        </Root>
    </Loggers>
</Configuration>
Let’s have a closer look at the tags used in this simple configuration:
It’s important to understand that the Root logger is mandatory in every configuration. As discussed, if you don’t provide one, it will automatically be configured by default with a Console appender and the ERROR log level.
In the log4j2 architecture, an appender is basically responsible for sending log messages to a certain output destination.
Here are some of the most useful types of appenders that the library provides:
To better understand how appenders work, let’s look at some configuration examples.
Logging everything into a single file is, of course, not ideal. It’s usually much better to roll over the active log file regularly – which is exactly what the RollingFileAppender does.
You’ll also be able to go beyond the basics with this type of appender and configure both a custom triggering policy as well as rollover strategy.
The triggering policy determines when the log file is rolled, meaning a new file is created, while the rollover strategy determines how the file is rolled.
As a quick example, let’s configure an appender that creates a new log file based on 3 policies:
The configuration will use the DefaultRolloverStrategy:
<Appenders>
    <RollingFile name="RollingFileAppender" fileName="logs/app.log"
      filePattern="logs/${date:yyyy-MM}/app-%d{MM-dd-yyyy}-%i.log.gz">
        <PatternLayout>
            <Pattern>%d [%t] %p %c - %m%n</Pattern>
        </PatternLayout>
        <Policies>
            <OnStartupTriggeringPolicy />
            <TimeBasedTriggeringPolicy />
            <SizeBasedTriggeringPolicy size="50 MB" />
        </Policies>
        <DefaultRolloverStrategy max="20" />
    </RollingFile>
</Appenders>
You can see just how flexible this style of configuration is, and how you can tune the exact semantics of your logging strategy – down to the last detail.
As the name suggests, this appender uses JDBC to write logs to a relational database.
For this configuration, you need to define a ConnectionSource, which can be either a JNDI Data Source or a custom ConnectionFactory. The logger uses the ConnectionSource to get JDBC connections, which is why it’s important to use a connection pool for better performance.
To configure the appender in the XML config file, you can use the JDBC tag:
<Appenders>
    <JDBC name="JDBCAppender" tableName="logs">
        <DataSource jndiName="java:/comp/env/jdbc/LoggingDataSource" />
        <Column name="date" isEventTimestamp="true" />
        <Column name="logger" pattern="%logger" />
        <Column name="level" pattern="%level" />
        <Column name="message" pattern="%message" />
        <Column name="exception" pattern="%ex{full}" />
    </JDBC>
</Appenders>
As you can see, the JNDI data source is simply specified using the jndiName attribute of DataSource tag. Along with the ConnectionSource, you can define the table and the columns to be used for storing the log data.
Finally, let’s have a look at the FailoverAppender; this defines a primary appender and a list of backups that will step in to handle the logging in case the primary one fails.
For example, you can configure a primary JDBCAppender, with a secondary the RollingFile and Console appenders in case a database connection cannot be established:
<Failover name="FailoverAppender" primary="JDBCAppender">
    <Failovers>
        <AppenderRef ref="RollingFileAppender" />
        <AppenderRef ref="Console" />
    </Failovers>
</Failover>
In a production environment, having a failover strategy for your logging mechanism is always a good idea.
While the appenders are responsible for sending log messages to a destination, the layouts are used by appenders to define how a log message will be formatted.
Here’s a brief description of some of the more commonly used layouts that log4j2 offers:
The first type of layout we’re going to look at is the PatternLayout. This is quite a flexible solution that gives you a lot of control over the final output of the log message.
The mechanism is primarily driven by a conversion pattern which contains conversion specifiers. Each specifier begins with the % sign, followed by modifiers that control things like width and color of the message, and a conversion character that represents the content, such as date or thread name.
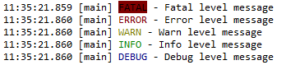
Let’s look at an example of configuring a PatternLayout that configures log lines to show the date, thread, log level and log message with different colors for different log levels:
<Console name="Console" target="SYSTEM_OUT">
    <PatternLayout pattern="%d{HH:mm:ss.SSS} [%t]
      %highlight{%level}{FATAL=bg_red, ERROR=red, WARN=yellow, INFO=green, DEBUG=blue} - %msg%n" />
</Console>
These specifiers are well worth understanding in detail, so let’s have a closer look:
The output will display the log levels with different colors:
You can read more about the full set of options for defining patterns in the log4j2 documentation on PatternLayout.
Logging data using the JSON format has some significant advantages, such as making the logs easier to be analyzed and processed by logging tools down the line.
To configure the JSONLayout in log4j2, you can simply define the corresponding tag:
<JSONLayout complete="true" compact="false"/>
Setting complete=true will produce a well-formed JSON document:
[
    {
        "timeMillis" : 1496306649055,
        "thread" : "main",
        "level" : "INFO",
        "loggerName" : "RollingFileLogger",
        "message" : "Json Message",
        "endOfBatch" : false,
        "loggerFqcn" : "org.apache.logging.log4j.spi.AbstractLogger",
        "threadId" : 1,
        "threadPriority" : 5
    },

    ...
]
To be able to produce JSON, you also need to add the jackson-databind library to the classpath:
<dependency>
    <groupId>com.fasterxml.jackson.core</groupId>
    <artifactId>jackson-databind</artifactId>
    <version>2.8.8.1</version>
</dependency>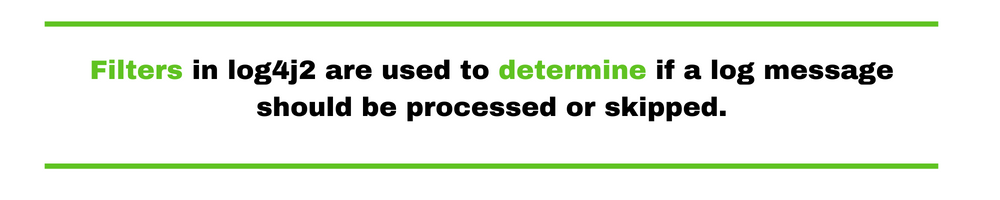
Filters in log4j2 are used to determine if a log message should be processed or skipped.
A filter can be configured for the entire configuration or at logger or appender level.
The library provides several types of filters that can be used:
You can, for example, control the rate with which the application is allowed to log data.
In order to do, you can set up a BurstFilter and apply that to INFO messages:
<Filters>
    <BurstFilter level="INFO" rate="10" maxBurst="100"/>
</Filters>
This will selectively ignore control the traffic of INFO level messages and below while making sure you’re not losing any of the more important messages above INFO.
In this case, rate defines the average logs messages that should be processed per second, and maxBurst controls the overall size of the traffic burst before the filter starts eliminating log entries.
Similarly, we can configure the appender only to accept log messages that match a specific regular expression:
<Appenders>
    <JDBC name="JDBCAppender">
      <RegexFilter regex="*jdbc*" onMatch="ACCEPT" onMismatch="DENY"/>
    </JDBC>
</Appenders>
Overall, this filtering mechanism can be used with great precision to make sure each appender in your overall logging configuration is tracking the right information. The ability to only log very specific and relevant information generally leads to very quick root cause analysis, especially in complex systems – especially when coupled with a powerful log viewing tool.
Besides the Root logger, we can also define additional Logger elements with different log levels, appenders or filters. Each Logger requires a name that can be used later to reference it:
<Loggers>
    <Logger name="RollingFileLogger">
        <AppenderRef ref="RollingFileAppender" />
    </Logger>
</Loggers>
To write log messages using this particular Logger, you can obtain a reference to it using the LogManager class:
Logger rfLogger = LogManager.getLogger("RollingFileLogger");
rfLogger.info("User info updated");
Another very common way to structure the hierarchy of these loggers is based on the Java class:
Logger logger = LogManager.getLogger(MyServiceTest.class);Lookups represent a way to insert external values into the log4j2 configuration. We’ve already seen an example of the date lookup in the RollingFileAppender configuration:
<RollingFile name="RollingFileAppender" fileName="logs/app.log"
  filePattern="logs/${date:yyyy-MM}/app-%d{MM-dd-yyyy}-%i.log.gz">
The ${date:yyy-MM} lookup will insert the current date into the file name, while the preceding $ is an escape character, to insert the lookup expression into the filePattern attribute.
You can also insert System properties values into log4j2 configuration using the format ${sys:property_name}:
<File name="ApplicationLog" fileName="${sys:path}/app.log"/>Another type of information you can lookup and insert is Java environment information:
<PatternLayout header="${java:version} - ${java:os}">
    <Pattern>%d %m%n</Pattern>
</PatternLayout>
You can find more details on the kind of data you can insert through lookups in the log4j2 documentation.
Besides configuration files, log4j2 can also be configured programmatically. There are a few different ways to do that:
Let’s take a look at how to configure a layout and appender programmatically:
Loggerj ctx = (LoggerContext) LogManager.getContext(false);
Configuration config = ctx.getConfiguration();

PatternLayout layout = PatternLayout.newBuilder()
  .withConfiguration(config)
  .withPattern("%d{HH:mm:ss.SSS} %level %msg%n")
  .build();

Appender appender = FileAppender.newBuilder()
  .setConfiguration(config)
  .withName("programmaticFileAppender")
  .withLayout(layout)
  .withFileName("java.log")
  .build();

appender.start();
config.addAppender(appender);
Next, you can define a logger using the LoggerConfig class, associate the appender to it, and update the configuration:
AppenderRef ref = AppenderRef.createAppenderRef("programmaticFileAppender", null, null);
AppenderRef[] refs = new AppenderRef[] { ref };

LoggerConfig loggerConfig = LoggerConfig
  .createLogger(false, Level.INFO, "programmaticLogger", "true", refs, null, config, null);
loggerConfig.addAppender(appender, null, null);
config.addLogger("programmaticLogger", loggerConfig);
ctx.updateLoggers();
Then, you can start using the logger as usual:
Logger pLogger = LogManager.getLogger("programmaticLogger");
pLogger.info("Programmatic Logger Message");
This style of fluent API can lead to a quicker development and iteration on more complex logging configurations because you’re now benefiting from the benefits of working directly with Java code.
However, given that XML can still be more readable and compact, you can often develop the configuration programmatically and then convert it to XML when everything’s done.
Try Stackify’s free code profiler, Prefix, to write better code on your workstation. Prefix works with .NET, Java, PHP, Node.js, Ruby, and Python.
The built-in log levels for log4j2 are:
In addition to these, you can also define a custom log level according to your application needs.
For example, to define this new log level, you can make use of the Level.forName() API – specifying the new level name and an integer that represents the place of the level in the log levels hierarchy:
Level myLevel = Level.forName("NEW_LEVEL", 350);To determine what integer value to use, you can have a look at the values defined for the other log levels in the log4j2 documentation:
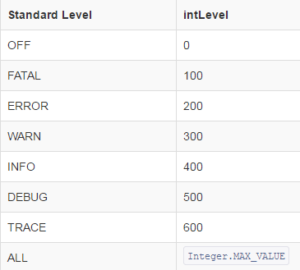
The 350 value puts the level between WARN and INFO, which means the messages will be displayed when the level is set to INFO or above.
To log a message at the custom level, you need to use the log() method:
logger.log(myLevel, "Custom Level Message");The equivalent XML configuration could be:
<CustomLevels>
    <CustomLevel name="NEW_XML_LEVEL" intLevel="350" />
</CustomLevels>
Then it can be used via the standard log API:
logger.log(Level.getLevel("NEW_XML_LEVEL"),"Custom XML Level Message");The new custom levels will be displayed in the same way as the standard ones:
11:28:23.558 [main] NEW_LEVEL - Custom Level Message
11:28:23.559 [main] NEW_XML_LEVEL - Custom XML Level MessageIf you’re migrating an application using the 1.x version of the library to the current 2.x version, there are a couple of routes you can follow:
Using the bridge is trivial. You only need to replace the log4j dependency with log4j-1.2-api library:
<dependency>
    <groupId>org.apache.logging.log4j</groupId>
    <artifactId>log4j-1.2-api</artifactId>
    <version>2.8.2</version>
</dependency>
While this is the faster method, it has the disadvantage of being limited in the type of configuration that can be converted.
The manual method is, of course, more work, but will eventually lead to a more flexible and powerful logging solution.
Here are some of the most common type of changes you’ll have to do:
In recent years, Log4j2 became a backbone for logging in many startups and enterprise grade software. A major security vulnerability called Log4Shell was found on December 9th 2021. The prevalence of Log4j2 combined with the vulnerability’s severity score (10 out of 10) caused a lot of stir in the IT world.
Organizations started rapidly and hectically patching their software to the first Log4j2 version that mitigated this vulnerability – 2.15.0. The vulnerability could have given an attacker full control of a software application from anywhere in the world. All that was needed was logging a malicious payload.
If you are using a Log4j2 version which is less than 2.15.0 we strongly urge you to update your software. Even if it requires refactoring some of the application code. In addition, note that this vulnerability might effect even the classical Log4j library, though this is less likely and since it has reached end of life in 2015 you should move away from it in any case.
Following the release of version 2.15.0 additional vulnerabilities were found. Though less dramatic then Log4Shell (moderate severity at most). The last one patched in version 2.17.0. You should always take care to routinly update your dependencies (and this is relevant to any dependency, not just SLF4J implementations) to the latest stable version. The current stable version for Log4j2 is 2.20.0
Log files are critical in any production environment, and choosing a good logging solution can be the difference between spending 5 minutes and spending a full day to understand a problem in production.
Log4j2 is a powerful and robust logging solution for modern Java applications, with a wide range of configuration options.
It allows for easy configuration of advanced logging best practices such as rolling files, different types of logging output destinations, support for structured logging formats such as JSON or XML, using multiple loggers and filters, and custom log levels.
Finally, when you need to go beyond manually analyzing log data, definitely check out the logging capabilities included in Retrace APM.
Stackify's APM tools are used by thousands of .NET, Java, PHP, Node.js, Python, & Ruby developers all over the world.
Explore Retrace's product features to learn more.
If you would like to be a guest contributor to the Stackify blog please reach out to [email protected]