
Even though REpresentational State Transfer, also known as REST, is often referred to as a protocol, it’s an architectural style. It defines how applications communicate over the Hypertext Transfer Protocol (HTTP). Applications that use REST are loosely-coupled and transfer information quickly and efficiently. While REST doesn’t define data formats, it’s usually associated with exchanging JSON or XML documents between a client and a server.
We’re going to use a simple service and a web browser to learn about the fundamentals of REST.
For this tutorial, you’ll need a system with Docker installed. You can find the instructions for your computer here.
First, follow the instructions and install Docker.
Then, once you’ve completed the installation, you can download and run our sample REST server.
Finally, start the server with this command:
$ docker run -p 8080:8080 -d -–name tutorial ericgoebelbecker/resttutorial

Unable to find image ‘ericgoebelbecker/resttutorial:latest’ locally
latest: Pulling from ericgoebelbecker/resttutorial
ff3a5c916c92: Pull complete
2b5d1cea6e31: Pull complete
d9ca82731633: Pull complete
20f20395d7e6: Pull complete
Digest: sha256:0969a50cbf9511d441c406e0c4e63ea1396aad4dde7729b92747dfae05ed32e2
Status: Downloaded newer image for ericgoebelbecker/resttutorial:latest
0d971fd363ebe82f9d14ddee84d40dd8f4d7ff42e92d06d07a343c096e4ee37b
$
Docker downloads the server image and runs it. The command tells it to make the web server available on port 8080.
If everything is working, you’ll see a web page like this:

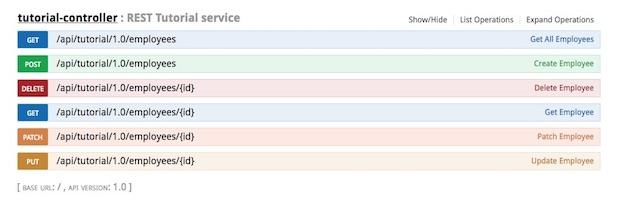
This is a Swagger page that documents the REST API published by this server. We’ll use it to demonstrate how REST APIs are consumed by applications.
Click on the word tutorial-controller toward the bottom of the page. It will expand, and you’ll see this:
Let’s try a simple request before we start examining each aspect of the API.
Next, click on the blue GET box under tutorial-controller.
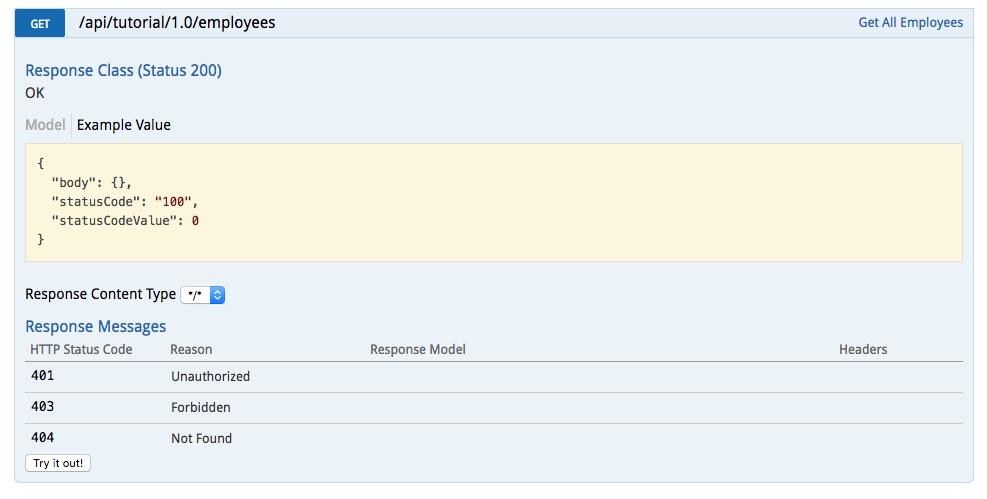
This is a description of the Get All Employees API method. The box documents the status codes it returns, content type, and API path. We’ll cover this in detail as we go. Let’s make a request.
Click the Try it out! button at the bottom right of the blue shaded area.
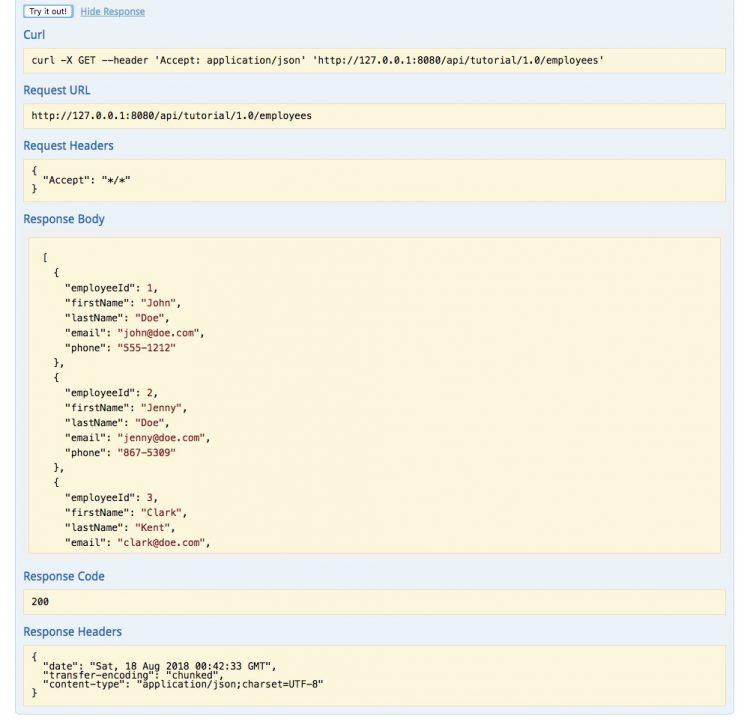
Swagger made an API request for us and provides a detailed description of the result. We see three employee records.
Let’s get to work!
The name REpresentational State Transfer implies exchanging data. The server acts as a data store, and the client retrieves and stores data. The server transfers object states to the client. The client can update these states too.
Most REST APIs implement CRUD: Create, Retrieve, Update, and Delete.
Go back to the Swagger page and click on the blue GET box so it collapses. Here’s a quick tip: at the top of the page, there is the List Operations option. Clicking there will collapse the operations into a list again.
Let’s look at the list of operations again.
On the left-hand side of the page we see GET, POST, DELETE, GET, PATCH, and PUT. These are HTTP methods that correspond to operations.
We can map these operations into CRUD.
We’ll cover each operation as we take a look at how REST APIs work.
Let’s add a new employee to the list.
First, click on the green POST box.
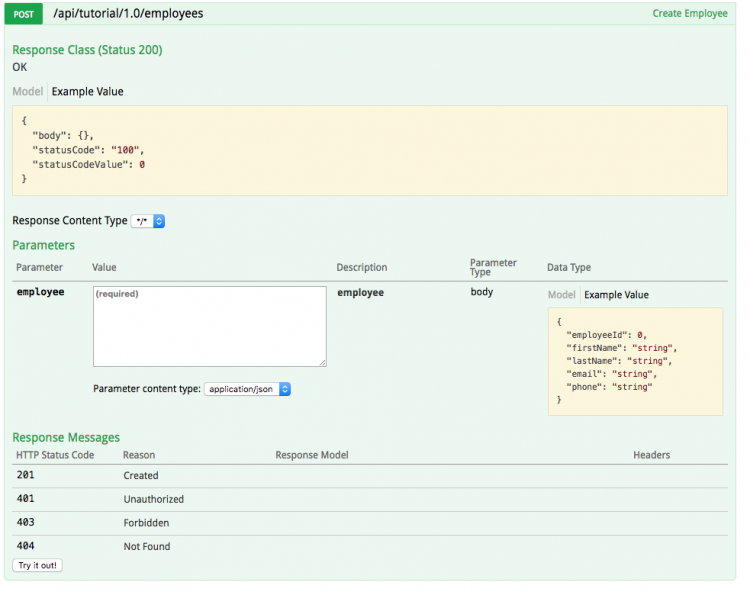
In the top right corner, we see the API method name, Create Employee. This is documentation Swagger extracts from the application code. Many REST Servers use Swagger or a similar web application to document their APIs.
Next, we see information about how the method responds to requests. A successful request will yield an HTTP Created response code. This is a standard convention for REST APIs.
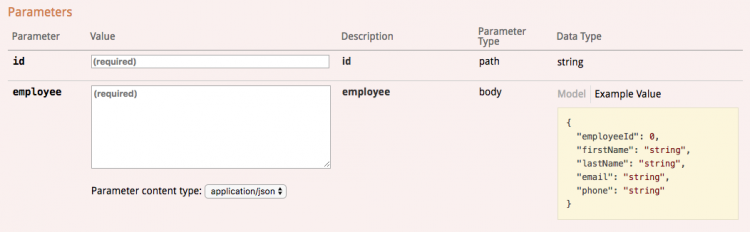
Under the response information are the request parameters. This API expects a JSON employee record. There’s an example in the box on the right.
Click on the example, and the page will populate the value box on the left for you.
Let’s edit the example.
{
  “employeeId”: 99,
  “firstName”: “Steve”,
  “lastName”: “Rogers”,
  “email”: “[email protected]”,
  “phone”: “212–555–1212”
}
Now, click the Try it out! button.

First, at the top of the response, Swagger tells us how we could make the same request using a command line tool called curl. If you are comfortable with the command line, you can try it out. I am going to omit that part of the responses going forward to save space.
Next, we see details about the request we made.
Then we see the request headers and the response. The response was empty. If this API was more user-friendly, it might return the employee id instead of making us specify it.
Finally, we see the important part. The response code was 201, which corresponds to Created. The request succeeded!
Let’s go back to the request for all records. Click on the blue GET box on the top again. Then, click on the Try it out! button.
The response body for this request is the list of employee records the server currently has. Click in the box and you can scroll.
Here are the results:
[
  {
    "employeeId": 1,
    "firstName": "John",
    "lastName": "Doe",
    "email": "[email protected]",
    "phone": "555-1212"
  },
  {
    "employeeId": 2,
    "firstName": "Jenny",
    "lastName": "Doe",
    "email": "[email protected]",
    "phone": "867-5309"
  },
  {
    "employeeId": 3,
    "firstName": "Clark",
    "lastName": "Kent",
    "email": "[email protected]",
    "phone": "555-1213"
  },
  {
    "employeeId": 99,
    "firstName": "Steve",
    "lastName": "Rogers",
    "email": "[email protected]",
    "phone": "212-555-1212"
  }
]
The last record in the list is the new one we added.
Let’s try to add another employee.
Enter this in the value box:
{
  "employeeId": 99,
  "firstName": "Anthony",
  "lastName": "Stark",
  "email": "[email protected]",
  "phone": "203-123-4567"
}
Then click Try it out! again.
Our response code this time was 403, which corresponds to Forbidden. We can’t add an employee with the same id number.
Here again, a more friendly API might generate ids for us, but this example illustrates how a service enforces data integrity via response codes.
Now click on the POST box again to collapse it and click on the second blue one that says GET.
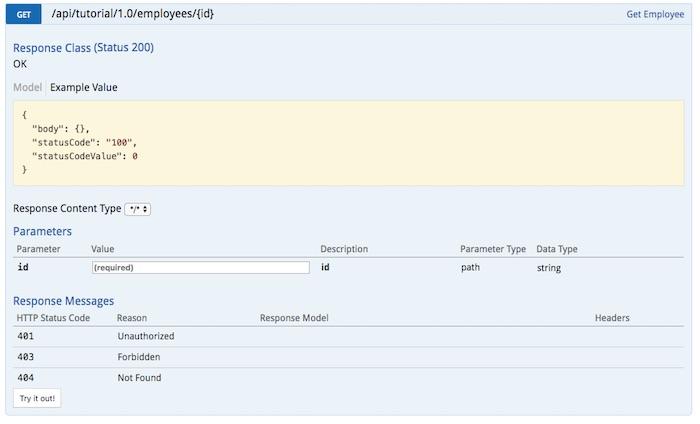
This is the API method for retrieving individual employee records.
First, let’s take a look at that URL: /api/tutorial/1.0/employees/{id}
It has the same base URL as the one for creating employees. All of the URLs in the API contain /api/tutorial/1.0/employees.
HTTP methods are what define operations in well-formed REST APIs, not the URLs. URLs should not contain verbs.
The difference now is that the id of the employee is part of the URL.
You can think of the URLs as forming an index for the records.
There are four records in the server right now:
So when we want to retrieve, modify, or delete a record, we operate on its URL using the correct HTTP method.
If we want to retrieve all records or add to the set, we operate on the top-level URL: /api/tutorial/1.0/employees.
REST URLs usually include versions. I’ve set up this API to be version 1.0: /api/tutorial/1.0/employees
This convention provides a migration path for applications. A server can offer two different API versions via different URLs. Client applications can migrate to the new API incrementally or all at once.
Now let’s request an employee. Enter 99 in the value box and click the Try it out! button.
We get back our new employee and a successful response code.
{
  "employeeId": 99,
  "firstName": "Steve",
  "lastName": "Rogers",
  "email": "[email protected]",
  "phone": "212-555-1212"
}
Let’s try an invalid id.
So enter 122 and click the button.
Now we get an error document, and the response code is 500?
{
  "timestamp": 1534557371879,
  "status": 500,
  "error": "Internal Server Error",
  "exception": "java.lang.NullPointerException",
  "message": "No message available",
  "path": "/api/tutorial/1.0/employees/122"
}
500 means Internal Server Error. The error document shows that our server threw a NullPointerException. The service has a bug!
Well-designed REST APIs will handle errors gracefully. In this case, we received a code that makes it clear there is a problem. But if we try another request, the service will respond.
We’ve been exchanging small JSON documents with our server.
Let’s change the contents a bit.
First, go back to the POST area.
Then, enter this in the value text area:
{
  "employeeId": 122,
  "firstName": "Anthony",
  "lastName": "Stark",
  "email": "[email protected]"
}
And submit it.
It worked! The server will accept employees with no phone number.
Scroll back up to the first GET box where we can retrieve a list of employees and click the Try it out! button.
The result includes the new record.
[
  {
    "employeeId": 1,
    "firstName": "John",
    "lastName": "Doe",
    "email": "[email protected]",
    "phone": "555-1212"
  },
  {
    "employeeId": 2,
    "firstName": "Jenny",
    "lastName": "Doe",
    "email": "[email protected]",
    "phone": "867-5309"
  },
  {
    "employeeId": 3,
    "firstName": "Clark",
    "lastName": "Kent",
    "email": "[email protected]",
    "phone": "555-1213"
  },
  {
    "employeeId": 99,
    "firstName": "Steve",
    "lastName": "Rogers",
    "email": "[email protected]",
    "phone": "212-555-1212"
  },
  {
    "employeeId": 122,
    "firstName": "Anthony",
    "lastName": "Stark",
    "email": "[email protected]",
    "phone": null
  }
]
An important aspect of REST is the separation between client and server.
In CRUD, and therefore REST, the implementation of the client and server are independent. The data forms the demarcation point between the two applications.
In this example, we demonstrated that the server is forgiving when it comes to required and non-required fields in employee records. This is an example of loosely-coupled design.
But we can go further with the separation between client and server. I wrote this example server in Java. It could be replaced with one written in C#, Python, or Ruby. If the URLs and the document remain the same, the client doesn’t have to change.
Let’s remove our incomplete record. Close the POST box and open the DELETE area under it.
The DELETE API method looks a great deal like the GET method. The URL is the same, complete with the employee id. Only the HTTP operation differs.
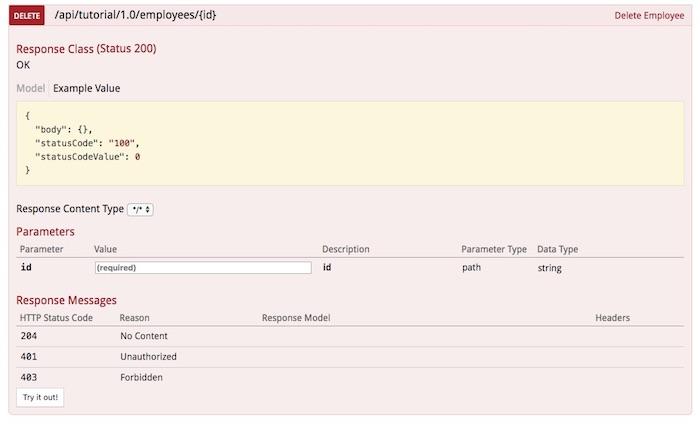
Enter 122 in the value text area and make a request. You should receive a 200 response code for success.
Scroll back up the first GET box. Then click the Try it out! button.
The result is the same list of employees we saw earlier.
[
  {
    "employeeId": 1,
    "firstName": "John",
    "lastName": "Doe",
    "email": "[email protected]",
    "phone": "555-1212"
  },
  {
    "employeeId": 2,
    "firstName": "Jenny",
    "lastName": "Doe",
    "email": "[email protected]",
    "phone": "867-5309"
  },
  {
    "employeeId": 3,
    "firstName": "Clark",
    "lastName": "Kent",
    "email": "[email protected]",
    "phone": "555-1213"
  },
  {
    "employeeId": 99,
    "firstName": "Steve",
    "lastName": "Rogers",
    "email": "[email protected]",
    "phone": "212-555-1212"
  }
]
Mr. Stark has left the building.
Now go back to the DELETE request area and try an invalid request. Enter 123 for the id.
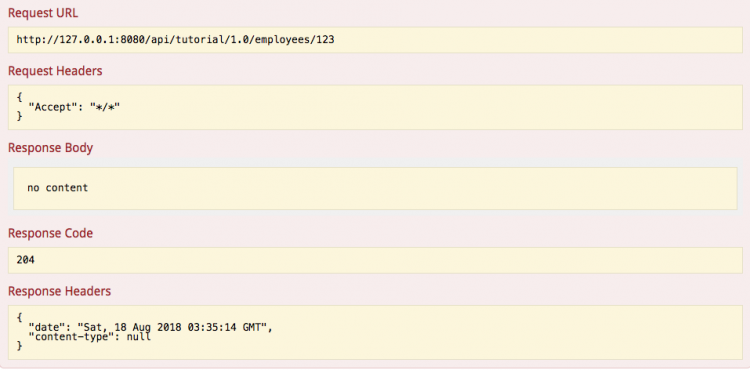
Response code 204 means no content. Nothing was deleted because we used an id that doesn’t exist.
REST APIs are stateless. The server does not need to know about the state of the client and vice versa.
The state of the data is transferred between the applications, just as the name indicates. We added an employee record. We deleted the record.
This decoupling between components has distinct advantages. Many modern web applications, including those on phones, use REST. The expense of keeping a connection open and synchronizing state between client and server is too great, especially for an application with thousands of users.
The disadvantage is that when you design your application, you have to be mindful of the possible synchronization issues between client and server.
Let’s add Anthony Stark back to the server again.
Now go back to POST and add this record.
{
  "employeeId": 122,
  "firstName": "Anthony",
  "lastName": "Stark",
  "email": "[email protected]"
}
The response code will be 201. So if you go and list all employees, the new record is there.
We’ll want to add a phone number for this record.
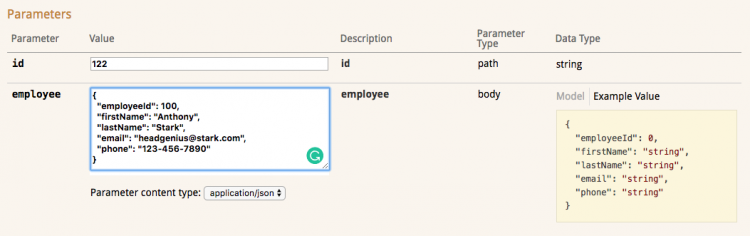
Got to the brown PUT option on the bottom. PUT requires two values, the id of the record to be updated and a document with the new values.
Enter 122 for the id.
Enter a complete record for the employee.
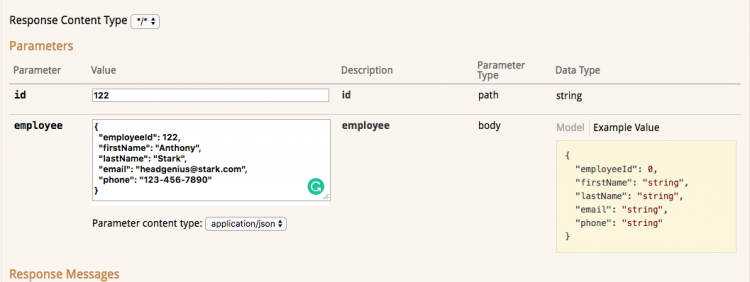
Click the button. The response code is 200.
If we list our records again, we see the phone number.
[
  ...
  {
    "employeeId": 122,
    "firstName": "Anthony",
    "lastName": "Stark",
    "email": "[email protected]",
    "phone": "123-456-7890"
  }
]
Since the id of the record to be updated is a parameter on the path, we can change a record’s id.
So let’s move Mr. Stark to record 100.
Next, click the button. The response code is 200.
Then, if we list our records again, we see the new id.
[
  ...
  {
    "employeeId": 100,
    "firstName": "Anthony",
    "lastName": "Stark",
    "email": "[email protected]",
    "phone": "123-456-7890"
  }
]
Now go back to the PUT area and enter the same request without any changes.
The response code is 204. We tried to modify record 122 again, and it no longer exists.
Submitting partial updates to records is a relatively new operation and is not supported in all APIs.
Some APIs support partial updates via the PUT method, but PATCH is the more technically correct method for partial updates.
So let’s add another incomplete record and then PATCH it.
Add this employee:
{
  "employeeId": 123,
  "firstName": "Donald",
  "email": "[email protected]"
}
Then, use GET to retrieve employee id 123.
{
  "employeeId": 123,
  "firstName": "Donald",
  "lastName": null,
  "email": "[email protected]",
  "phone": null
}
We have nulls for both the last name and phone. Let’s add this employee’s last name.
First, click on the PATCH box.
The options are identical to a PUT, but we can submit partial records.
Next, enter a record with only a last name. Then, add the employee id of 123.
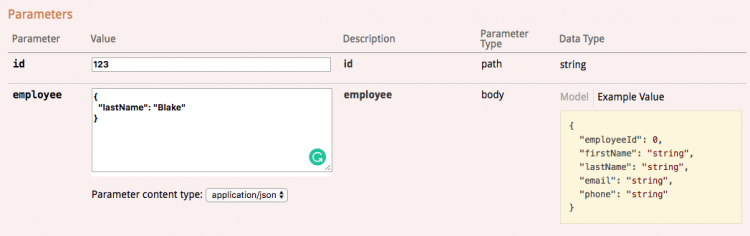
Finally, click the submit button. We will then receive a successful response code.
So let’s retrieve the record again.
{
  "employeeId": 123,
  "firstName": "Donald",
  "lastName": "Blake",
  "email": "[email protected]",
  "phone": null
}
We can update a record by only specifying the fields we wish to add with a PATCH.
As you can see, it’s critical for client applications to handle HTTP status codes correctly.
Response codes contain three digits. The HTTP standard divides them into ranges.
Codes that begin with 2 indicate success.
A code beginning with 4 means a client error.
A server error begins with 5.
| Response Code | Description |
| 200 | Success |
| 201 | Created |
| 204 | No content |
| 400 | Bad request |
| 403 | Forbidden |
| 404 | Not found |
| 500 | Internal server error |
The Created code is returned for a new record, while Success is returned for modifying, deleting, and retrieving records.
The Forbidden response code indicates a record can’t be created, while No content indicates a failed modification.
Well-architected APIs will document which code they return under each possible condition.
Try Stackify’s free code profiler, Prefix, to write better code on your workstation. Prefix works with .NET, Java, PHP, Node.js, Ruby, and Python.
We’ve used a simple API to examine how REST is used to exchange object state between a client and a server.
While we were adding, removing, updating, and retrieving records, we also looked at how APIs use HTTP methods and response codes to differentiate operations and results.
REST is the lingua franca of the modern web. It’s a protocol used for browsers, phones, and IOT devices. Now that you have a basic understanding of how to use it, you’re ready to build the next big thing.
Stackify’s Application Peformance Management tool, Retrace can help your applications running smoothly with APM, server health metrics, and error log integration. Download your free two week trial today!
Stackify's APM tools are used by thousands of .NET, Java, PHP, Node.js, Python, & Ruby developers all over the world.
Explore Retrace's product features to learn more.
If you would like to be a guest contributor to the Stackify blog please reach out to [email protected]