
What is Unit Testing, Tutorial and 14 Best Practices
When I started in this industry, only an avant-garde fringe unit wrote automated tests for their code. Over the last 15 years, however, that number has exploded, and the practice has become mainstream. But “mainstream” does not mean “universal.” Plenty of folks still do not have comfort with or even exposure to the unit testing practice. And yet, a form of peer pressure causes them to play that close to the vest.
So I reached out to these folks to say, “Hey, no worries. You can learn, and you don’t even have to climb too steep of a hill.” I’d like to revisit that approach again, here, today, and in the form of a blog post.
Let’s get started with unit testing in C#, assuming that you know absolutely nothing about it.
What Unit Testing Isn’t
First, let’s clear up any misconceptions by talking about what doesn’t count. Not every test you could conceivably write qualifies as a unit test.
If you write code that stuffs things into a database or that reads a file from disk, you have not written a unit test. Unit tests don’t deal with their environment and with external systems to the codebase. If it you’ve written something that can fail when run on a machine without the “proper setup,” you haven’t written a unit test.
Unit tests also don’t count as other sorts of tests. If you create some sort of test that throws thousands of requests for a service you’ve written, that qualifies as a smoke test and not a unit test. Unit tests don’t generate random data and pepper your application with it in unpredictable sequences. They’re not something that QA generally executes.
And, finally, unit tests don’t exercise multiple components of your system and how they act. If you have a console application and you pipe input to it from the command line and test for output, you’re executing an end-to-end system test — not a unit test.
Make no mistake — tests that do these things add value. They should be part of your general approach to code quality. They just don’t fall under the heading of unit tests.
What Unit Testing Is
With that out of the way, let’s consider what actually does qualify. Unit tests isolate and exercise specific units of your code. Okay. I’ll concede that I just punted by defining a term with a word in the term. But the creators of the term left the designation deliberately vague, presumably to cross language boundaries.
In C#, you can think of a unit as a method. You thus write a unit test by writing something that tests a method. Oh, and it tests something specific about that method in isolation. Don’t create something called TestAllTheThings and then proceed to call every method in a namespace.
Write better code on your workstation, try Stackify’s free code profiler, Prefix. Prefix works with .NET, Java, PHP, Node.js, Ruby, and Python.
That’s really it — all there is to it. You’ll notice that I haven’t mentioned a few things that might pop into your head, such as test-driven development (TDD), unit test frameworks, test runners, mocks, or other unit testing tools. Let’s not get ahead of ourselves. Forget TDD and mocks for another time, as those are separate topics. And forget test runners and frameworks for now. We will get to those, but they aren’t, strictly speaking, necessary to have a unit test.
For the rest of this post, I’m going to demonstrate unit testing with a hypothetical and fairly trivial calculator class. For now, let’s just have it do the following:
public class Calculator
{
    public int Add(int x, int y)
    {
        return x + y;
    }
}
That’s it. We have a single class, Calculator, in a class library project. Add looks pretty reliable at first glance, but so does all the code you write. You still need to test it, if only to prove your rightness to others.
To do that, let’s add a new console project and give it a reference to the project containing calculator, like so.
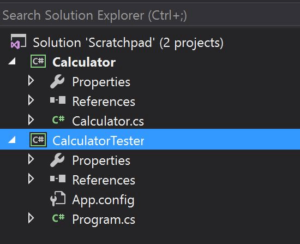
Now, let’s do the following in the main of the Calculator Tester.
class Program
{
    static void Main(string[] args)
    {
        var calculator = new Calculator();

        int result = calculator.Add(5, 6);

        if (result != 11)
            throw new InvalidOperationException();
    }
}
Congratulations! You’ve just written one extremely clunky unit test!
I’m sure you can pick out the flaw in this approach. While you might enjoy your newfound ability to verify that 5 + 6 does, indeed, return 11, you probably don’t want to create and run a new console project for each unit test that you write.
Now, you might think that you could create a method for each test and call it from the main in CalculatorTester. That would improve things over creating a project for each test, but only pain waits down that road (more than a decade ago, I used to test this way, before ubiquitous test runners existed). Adding a method and call for each test will prove laborious, and tracking the output will prove unwieldy.
Fortunately, you can do better. Since one or two other people have tried unit testing before you picked it up, some enterprising folks built frameworks to make it easier. Let’s take a look at how to do that.
First, I’m going to delete my short-lived CalculatorTester console project. Next, I’ll right-click on the solution to add a project, and choose the “Unit Test Project Template” after selecting “Test.”
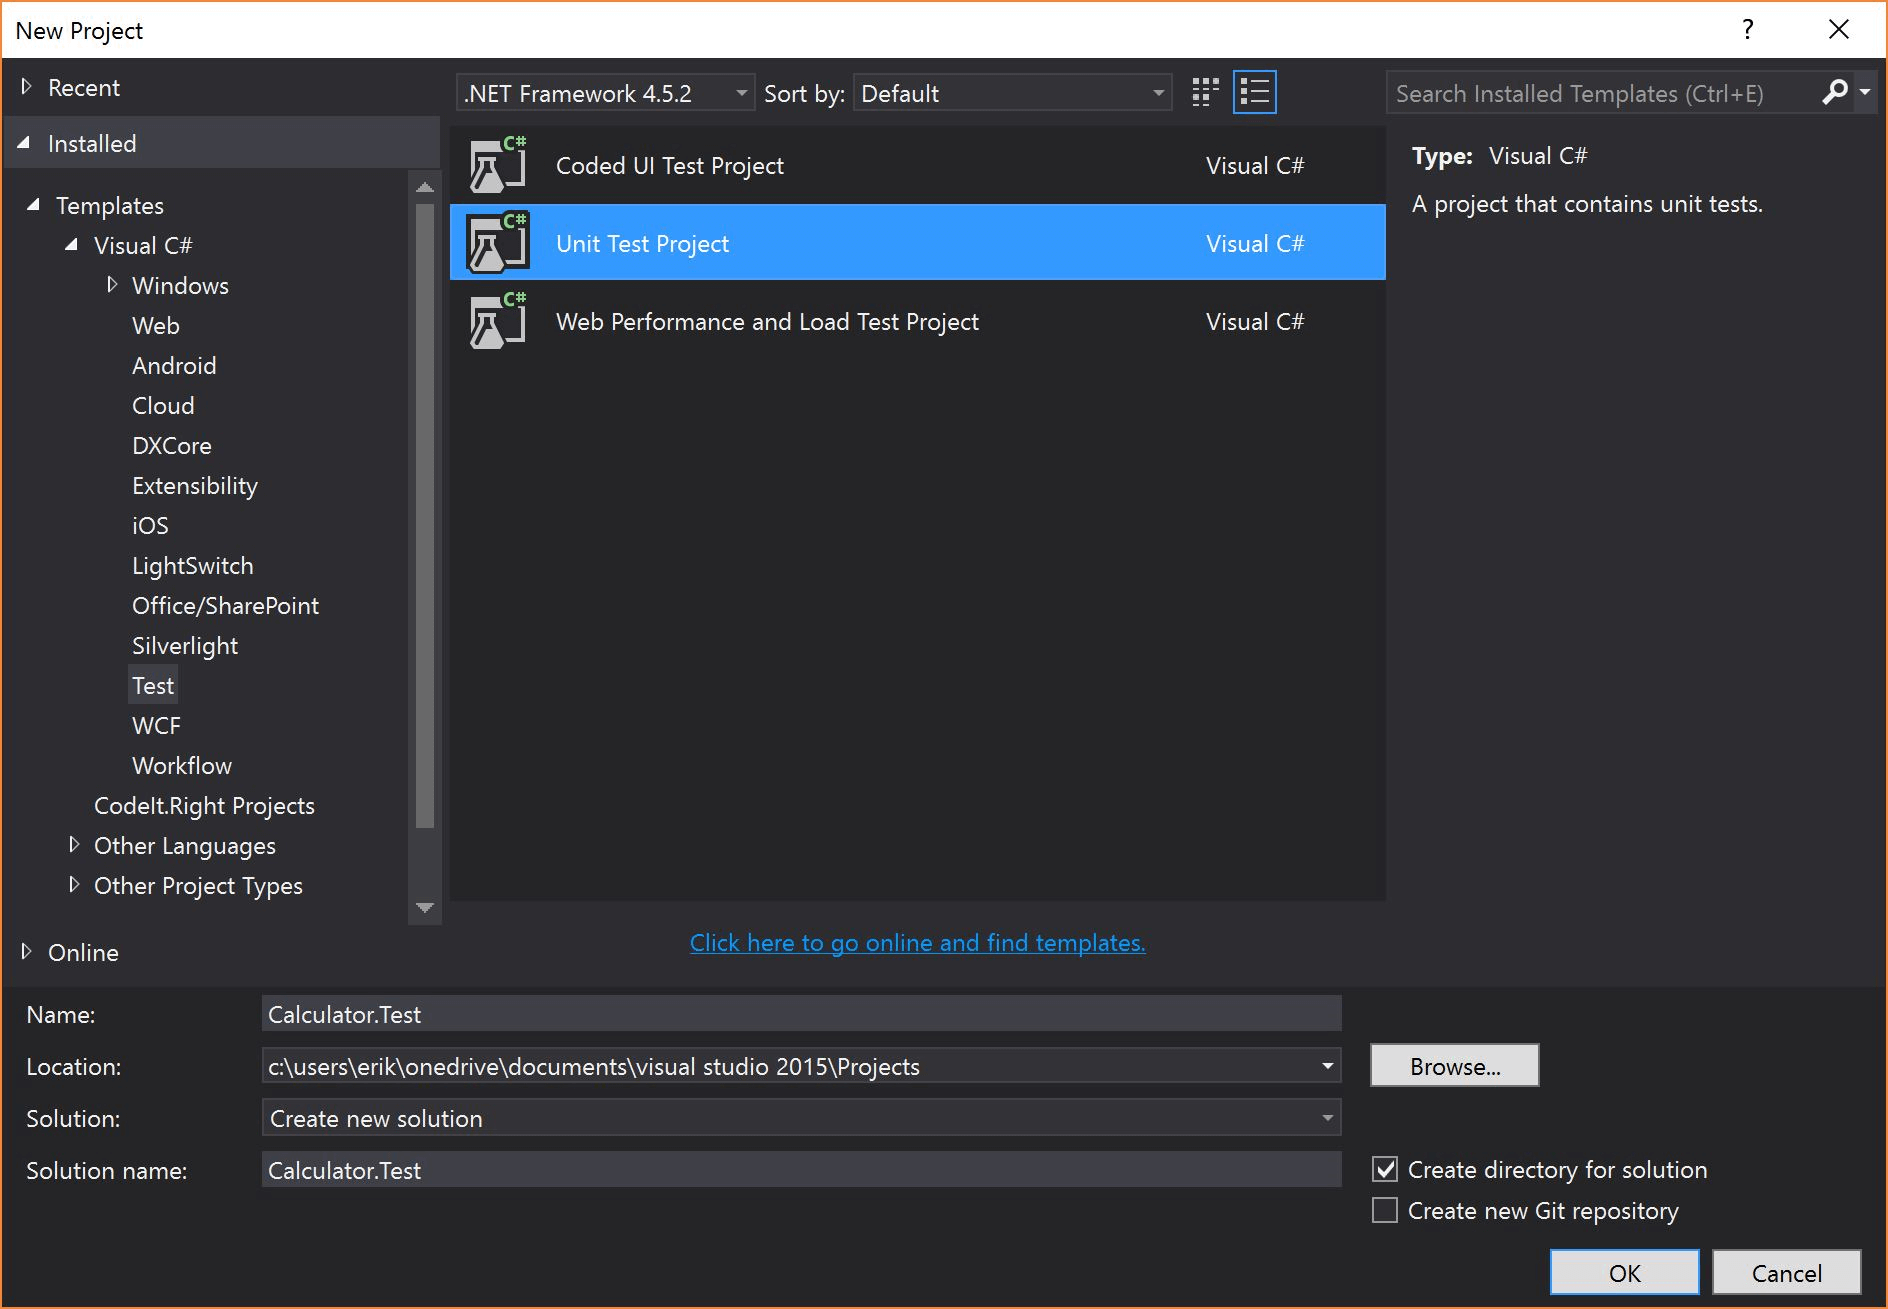
Add the project reference to Calculator again, and then take a look at the class it created for you, called “UnitTest1.” We’ll do a little better with the naming later, but let’s write our first, real test.
[TestClass]
public class UnitTest1
{
    [TestMethod]
    public void TestMethod1()
    {
        var calculator = new Calculator();

        int result = calculator.Add(4, 3);

        Assert.AreEqual(7, result);
    }
}
Now, we’ve got an actual unit test! Click Ctrl-R, T to run it, and look what happens.
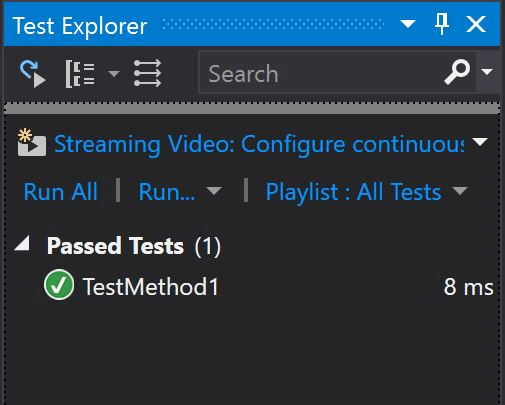
We can see that it ran, passed, and took 8 ms to execute. Much better out of the box than our erstwhile console application, eh?
Let’s do a brief post-mortem in the form of looking at the bits and pieces of this test. But first, let’s do a bit of renaming.
[TestClass]
public class CalculatorTests
{
    [TestMethod]
    public void Adding_4_And_3_Should_Return_7()
    {
        var calculator = new Calculator();

        int result = calculator.Add(4, 3);

        Assert.AreEqual(7, result);
    }
}
First off, we have a class called “CalculatorTests,” indicating that it will contain tests for the calculator class. (Other ways to conceptually organize your tests exist but consider that an advanced topic.) It gets an attribute called “TestClass” to tell Visual Studio’s default test runner and framework, MSTest, that this class contains unit tests.
Then, we have a method now called “Adding_4_And_3_Should_Return_7.” I’d say that title speaks for itself, and that’s kind of the idea. We want to name our test methods in a very descriptive way that indicates our hypothesis as to what inputs should create what outputs. Notice the TestMethod attribute above this method. This tells MSTest to consider this a test method. If you removed the attribute and re-ran the unit tests in the codebase, MSTest would ignore this method. You need to decorate any test classes and test methods this way to make MSTest execute them.
Finally, consider the static method Assert.AreEqual. Microsoft supplies a UnitTesting namespace with this Assert class in it. You use this class’s various methods as the final piece in the MSTest puzzle. Assertion passes and fails determine whether the test passes or fails as seen in the test runner. (As an aside, if you generate an unhandled exception in the test, that constitutes a failure, and if you never assert anything, that constitutes a pass.)
Here are some reasons why every developer should make unit testing a mandatory practice:
Now that we’ve understood what unit testing is and why it’s important, let’s look into some unit testing best practices.
Let’s now consider another sort of unit test anatomy. Here, I’m talking about the logical components of a good unit test. The test that I’ve written has them in their absolute most basic form. Perhaps not surprisingly, given the title of this section, those components are “arrange, act, assert.”
Lean heavily on the scientific method to understand the real idea here. Consider your test as a hypothesis and your test run as an experiment. In this case, we hypothesize that the add method will return 7 with inputs of 4 and 3.
To pull off this experiment, first, we arrange everything we need to run the experiment. In this case, very little needs to happen. We simply instantiate a calculator object. In other, more complex cases, you may need to seed an object with some variable values or call a particular constructor.
With the arranging in place, we act. In this case, we invoke the add method and capture the result. The “act” represents the star of the unit testing show. All of the arrangings lead up to it, and everything afterward amounts to retrospection.
Finally, we assert. The invocation of the Assert class probably gave that one away. But the assert concept in the unit test represents a general category of action that you cannot omit and have a unit test. It asserts the hypothesis itself. Asserting something represents the essence of testing.

Test with data that is similar to the data that the application will handle in the production environment. This approach can help identify issues that may not be apparent with small or simplistic test data. You should ensure that the test data covers a variety of scenarios, including edge cases and invalid input. You should also consider using real-world data whenever possible. For example, if an application is designed to process financial transactions, the test data should include realistic transaction amounts, dates, and customer information.
When testing with representative data, it’s important to avoid hard-coding data values in the test cases. This approach can make the test cases brittle and difficult to maintain.
I may catch some flak for this from unit-testing veterans of a certain testing philosophy, but so be it. Not everyone will necessarily agree with this, but I believe you should shoot for one assert per test method. Each test forms a hypothesis and asserts it. (The contrarian viewpoint would argue that multiple asserts can represent a single hypothesis).
I won’t go so far as to say that no test should ever contain a number of assertions other than one. But I will say that your unit test suite should have a test-to-assert ratio pretty darned near 1.
Unit testing newbies commonly make the mistake of testing all of the things in one test method. After all, more testing is better, right? This drives them to want to get the most bang for their buck with each test, asserting lots of stuff.
But, remember, hypothesis, experiment. Think of reading the output of the test in the test runner. If you assert 20 things, you still only see a single failure. How will you know at a glance what went wrong — which of your 20 assertions failed?
Each test should handle its own setup and tear down. The test runner will execute your stuff in whatever order it pleases and, depending on the specific runner you use (advanced topic), it might even execute them in parallel.
You, therefore, cannot count on the test suite or the class that you’re testing to maintain state in between tests. But that won’t always make itself obvious to you.
If you have two tests, for instance, the test runner may happen to execute them in the same order each time. Lulled into a false sense of security, you might come to rely on this. Weeks later, when you add a third test, it upsets this mix and one of your tests starts failing intermittently because of the ordering.
This will confuse and infuriate you. Avoid this interdependence at all costs.
Writing tests before writing code is a practice called Test Driven Development (TDD). This approach can help ensure that the code is testable, meets requirements, and is more maintainable.
With TDD, you create test cases before writing the actual code, and then write the code to pass those tests. This approach can also help you identify any gaps in the requirements or logic before writing any code. Additionally, TDD can help teams avoid the cost of fixing defects and bugs later in the development cycle.
I’ve trod this road before as well and felt the pain. Resist the impulse to abstract test setup (the “arrange”) to other classes, and especially resist the impulse to abstract it into a base class. I won’t say that you’ll never find this abstraction appropriate (though I’d argue base classes are never appropriate here), but look to avoid it.
The reasoning here is simple. When a test fails, you want to understand what went wrong. You thus want a test where all setup logic reveals itself to you at a glance. If you have logic strewn all over the class or residing in different classes, you’ll have a defect treasure hunt on your hands. That’s bad enough in prod code, but tests are supposed to help eliminate that. Make it easy on yourself.
Headless testing is a form of running tests without a user interface or browser window. This approach can be more efficient and reliable than running tests with a graphical interface, especially for tests that do not require visual interaction.
You can use tools such as PhantomJS or Headless Chrome to run tests in a headless environment. These tools can help reduce the overhead of running tests with a graphical interface and can allow tests to run more quickly and in a more consistent environment.
However, it’s important to note that not all tests are suitable for headless testing. Tests that involve visual interaction or rendering, such as tests for user interfaces or web page layout, may require a graphical interface to be properly tested. Therefore, you should carefully consider which tests are appropriate for headless testing and which require a graphical interface.
It’s important to test both the expected outcomes and unexpected outcomes of a function or method. Negative tests are especially important to ensure that error handling and edge cases are handled correctly.
Developers should also test for boundary conditions, such as the minimum and maximum values of input variables. By testing both positive and negative scenarios, you can ensure that the code is robust and can handle unexpected situations.
Mock objects can be used to simulate dependencies, such as databases or web services, which can make testing more reliable and faster. By using mock objects, developers can isolate the code being tested and focus on the behavior of the unit being tested. This approach can also help avoid issues with external systems, such as network connectivity or performance.
Ensuring compliance with industry standards involves verifying that the application meets the requirements set by relevant regulations or standards, such as HIPAA or PCI-DSS. Compliance testing can help ensure that the application is secure and that sensitive data is protected.
You should first identify the relevant standards or regulations that apply to your application. You should then create test cases that cover all relevant requirements. For example, if the application is required to encrypt all sensitive data in transit and at rest, the test cases should verify that the encryption is implemented correctly.
It’s important to document the compliance testing process thoroughly. This documentation can be used to demonstrate compliance with regulators or auditors.
Tests should be repeatable, meaning that they produce the same result every time they are run. This approach helps ensure that the tests are reliable and can be used to detect regressions. To ensure repeatability, you should use deterministic tests that don’t depend on external factors, such as the current time or the state of the system.
This involves identifying and addressing potential security issues in the application and can help ensure that the application is secure and can handle potential attacks.
You should consider testing for common vulnerabilities, such as SQL injection, cross-site scripting, or buffer overflows, and also use techniques such as fuzz testing to uncover potential issues. Fuzz testing involves sending random or malformed input to the application to see how it responds. This approach can help you identify unexpected behavior that could be exploited by attackers.
It’s important to test for security vulnerabilities throughout the development process, not just at the end. By testing early and often, you can identify and address potential issues before they become more difficult and expensive to fix.
For my second to last best practice mention, I’ll get a bit philosophical. Stick this one in the back of your head, but do not forget it.
When you first teach yourself to write unit tests, you’ll do so on toy codebases like my little calculator. It’ll take some real-world experience and some notches on your belt before you hit this, but you will hit it. And, when you do, remember my advice.
If you find that the “arrange” part of your unit test becomes cumbersome, stop what you’re doing. One of the most undercover powerful things about unit tests is that they provide excellent feedback on the design of your code — specifically its modularity. If you find yourself laboring heavily to get a class and method setup so that you can test it, you have a design problem.
When you create setup heavy tests, you create brittle tests. Tests carry a maintenance weight, just like production code. You thus want to avoid unwieldy tests like the plague — they’ll break and make you and everyone else hate them. So instead of going nuts on the setup, take a critical look at your design.
I’ll conclude the post with arguably the most important best practice. Since you’re early in your unit testing journey, get started on this one immediately when you only have a single test in your codebase.
If your team has a continuous integration build, add your new unit test suite’s execution to the build. If any tests fail, then the build fails. No exceptions, no ifs, ands or buts. Trust me on this one. If unit test failures don’t stop your team’s progress, your team will eventually start ignoring the failures when the pressure to deliver mounts. It’s not a question of if, but when.
Unit testing takes time to learn and even more time to master. Getting to that mastery will seem incredibly onerous at first, but you won’t ever get there if you don’t go all in. If you’re going to write ’em, make ’em count.
Since the topic of unit testing has grown in demand, I decided to write a book about unit testing.
Stackify's APM tools are used by thousands of .NET, Java, PHP, Node.js, Python, & Ruby developers all over the world.
Explore Retrace's product features to learn more.


