
Dependency injection is a programming technique that makes a class independent of its dependencies. It achieves that by decoupling the usage of an object from its creation. This helps you to follow SOLID’s dependency inversion and single responsibility principles.
As I explained in my previous articles about the SOLID design principles, their goal is to improve the reusability of your code. They also aim to reduce the frequency with which you need to change a class. Dependency injection supports these goals by decoupling the creation of the usage of an object. That enables you to replace dependencies without changing the class that uses them. It also reduces the risk that you have to change a class just because one of its dependencies changed.
The dependency injection technique is a popular alternative to the service locator pattern. A lot of modern application frameworks implement it. These frameworks provide the technical parts of the technique so that you can focus on the implementation of your business logic. Popular examples are:
You’ll soon learn more about how dependency injection (DI) works in practice. First, though, let’s cover its main benefits.
The primary benefit of DI, as already mentioned, is that it decouples classes from its dependencies. A given class, instead of depending on a concrete class, can depend on an abstraction, that represents, in a higher-level, the needed behavior. What does that accomplish?
Simple: the client that uses the dependency is “protected” from the changes to the concrete implementation. As long as the implementation follows the contract of the abstraction it implements, it can alter its internal implementation details as it wants. So, for instance: you can have a repository that’s injected as a dependency into a given class. The repository could change the way it generates database queries—in order to be more performant, for instance—and the client would be none the wiser about it.

Another major benefit of dependency injection is testability. And by “testability” I mean the ability of a given piece of code to be exercised by unit tests. By declaring the dependencies of your classes as injectable services, you gain the ability to replace said services with fake implementations during time of testing. That way, your unit tests can run fast and be completely independent of external factors, such as the database, HTTP services or the file system.
Least, but not last, a significant benefit of DI is that it enables parallel development. If you need service A but you’re currently working on client B that needs service A, you can delegate the implementation of service A to a different programmer or even team. As long as you both agree on the interface to be used by the service, you can declare the dependency as an abstraction, and work on the client while the other developer or team simultaneously work on the dependency’s implementation.
You can introduce interfaces to break the dependencies between higher and lower level classes. If you do that, both classes depend on the interface and no longer on each other. I explained this approach in great details in my article about the dependency inversion principle.
That principle improves the reusability of your code and limits the ripple effect if you need to change lower level classes. But even if you implement it perfectly, you still keep a dependency on the lower level class. The interface only decouples the usage of the lower level class but not its instantiation. At some place in your code, you need to instantiate the implementation of the interface. That prevents you from replacing the implementation of the interface with a different one.
The goal of the dependency injection technique is to remove this dependency by separating the usage from the creation of the object. This reduces the amount of required boilerplate code and improves flexibility.
But before we take a look at an example, I want to tell you more about the dependency injection technique.
If you want to use this technique, you need classes that fulfill four basic roles. These are:
You already implement three of these four roles by following the dependency inversion principle. The service and the client are the two classes between which the dependency inversion principle intends to remove the dependency by introducing an interface.
You can skip the interface role and inject the service object directly into the client. But by doing that, you break with the dependency inversion principle and your client has an explicit dependency on the service class. In some situations, this might be ok. But most often, it’s better to introduce an interface to remove the dependency between the client and the service implementation.

The injector is the only role that isn’t required by the dependency inversion principle. But that’s not an issue because you don’t need to implement it. All frameworks that I listed at the beginning of this article provide ready-to-use implementations of it.
As you can see, dependency injection is a great fit for applications that follow the dependency inversion principle. You already implement most of the required roles, and the dependency injection technique enables you to remove the last dependency to the service implementation.
I used the CoffeeApp example in my article about the dependency inversion principle. Let’s change it so that it uses the dependency injection technique.
This small application enables you to control different coffee machines, and you can use it to brew a fresh cup of filter coffee. It consists of a CoffeeApp class that calls the brewFilterCoffee method on the CoffeeMachine interface to brew a fresh cup of coffee. The class BasicCoffeeMachine implements the CoffeeMachine interface.
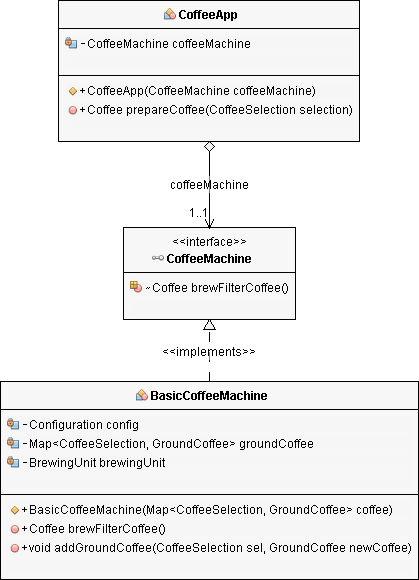
As you can see in the diagram, this application already follows the dependency inversion principle. It also provides three of the four roles required by the dependency inversion technique:
The only thing that’s missing is the injector. I will introduce an implementation of that role by using the Weld framework. It’s the reference implementation of Jakarta EE’s CDI specification. Since version 2.0, you can bootstrap it in a Java SE environment without adding a huge framework stack.
CDI 2.0 is part of all Jakarta EE 8 application servers. If you deploy your application into such a server, you don’t need to bootstrap the CDI container.
And if you’re using a different application framework, e.g., Spring, you should use the dependency injection implementation provided by that framework. It enables you to use the same concepts that I show you in the following example.
Try Stackify’s free code profiler, Prefix, to write better code on your workstation. Prefix works with .NET, Java, PHP, Node.js, Ruby, and Python.
Before you can use CDI’s dependency injection feature, you need to bootstrap a CDI container. But don’t worry, Weld makes that very simple. It provides a build-in main method which bootstraps a container for you. You can run it by executing the following command.
java org.jboss.weld.environment.se.StartMain
But bootstrapping the CDI container without an application doesn’t make much sense. You can add your application in two steps which require almost no code.
You need to add a dependency to weld-se to your application.
<dependency>
	<groupId>org.jboss.weld.se</groupId>
	<artifactId>weld-se-core</artifactId>
	<version>3.0.4.Final</version>
</dependency>
The next step is the only implementation task required to run your application in a CDI container. You need to write a method that observes the ContainerInitialized event. I did that in the CoffeeAppStarter class. Similar to the examples in my articles about the dependency inversion principle and the service locator pattern, this class starts the CoffeeApp.
@Singleton
public class CoffeeAppStarter {

	private CoffeeApp app;

	@Inject
	public CoffeeAppStarter (CoffeeApp app) {
		this.app = app;
	}

	public void startCoffeeMachine(@Observes ContainerInitialized event) {
		try {
			app.prepareCoffee(CoffeeSelection.FILTER_COFFEE);
		} catch (CoffeeException e) {
			e.printStackTrace();
		}
	}
}
Observing events in CDI is simple and powerful. You just need to annotate a method parameter with @Observes. The container will call this method as soon as someone fires an event for the type of the annotated parameter. Weld fires the ContainerInitialized event after it started the CDI container. So, this method will be called during application startup.

You probably already recognized the @Inject annotation in the previous code snippet. It tells the CDI container to inject a CoffeeApp object when the constructor of the CoffeeAppStarter class gets called. So, you can use the CoffeeApp app attribute in the startCoffeeMachine method to brew a cup of filter coffee.
This approach obviously doesn’t follow the dependency inversion principle because the interface is missing. But I think this is one of the rare occasions in which it is acceptable to inject the service implementation directly. The only task of the CoffeeAppStarter class is to start the coffee machine by calling the prepareCoffee method on the injected CoffeeApp object. I don’t see any need to add another abstraction to make the CoffeeApp replaceable.
But that’s not the case for the coffeeMachine attribute of the CoffeeApp class. In the future, this application will need to control different kinds of coffee machines. I want to make it as easy as possible to replace them. That’s why I introduced the CoffeeMachine interface in the previous articles. As you can see in the following code snippet, the CoffeeApp class only depends on the CoffeeMachine interface. It has no dependency on any interface implementation.
public class CoffeeApp {

	private CoffeeMachine coffeeMachine;

	@Inject
	public CoffeeApp(CoffeeMachine coffeeMachine) {
		this.coffeeMachine = coffeeMachine;
	}

	public Coffee prepareCoffee(CoffeeSelection selection)
			throws CoffeeException {
		Coffee coffee = this.coffeeMachine.brewFilterCoffee();
		System.out.println("Coffee is ready!");
		return coffee;
	}
}
In the previous articles, the CoffeeAppStarter class had to instantiate a specific implementation of the CoffeeMachine interface. It provided that object as a constructor parameter while instantiating a CoffeeApp object.
Constructor injection now enables you to replace the compile time dependency to a specific implementation class with a runtime dependency to any implementation class. That makes it very easy to replace the CoffeeMachine implementation. You only need to add a different implementation of the CoffeeMachine interface to your classpath when you start the application.
In addition to the Constructor Injection described above we have two additional types of dependency injection: Property Injection and Method Injection.
if we modify the example above by adding the @Inject annotation above the private variable “coffeeMachine” and do not pass it to the constructor we will still be able to use it in the “prepareCoffee” method. This injection allows us to to assign specific classes to class variables that are defined as interfaces.
The @Inject annotation can be applied to specific class methods as well. For example we can make “prepareCoffee” method to accept another parameter called “logger” of type “Logger” will be able to pass to it any SLF4J interface implementation:
public class CoffeeApp {
     @Inject
     public Coffee prepareCoffee(CoffeeSelection selection, Logger logger) throws CoffeeException {
         Coffee coffee = this.coffeeMachine.brewFilterCoffee();
         logger.info("logging the fact that cofee is ready");
         System.out.println("Coffee is ready!");
         return coffee;
     }
}
This will allow us to use any library that implements the SL4J interace. For instance, logback or Log4j2.
Are there situations in which DI isn’t the correct choice? Most of the time, no; DI is, for the majority of systems out there, one of the essential techniques you must use to accomplish a highly-decoupled, modular, highly testable application.
But keep in mind that DI, like any other approach, isn’t free: it has costs associated with it, since setting it up takes some time and it surely brings some complexity to the table. Most of the time, those costs are negligible, though, because the benefits that DI brings to the table result in a net positive.
However, there might be scenarios in which the benefits of DI aren’t worth the trouble. For instance, one of the main benefits of dependency injection, as you’ve seen earlier, is testability.
If you have an application that doesn’t really require unit testing—think of a CRUD-heavy application, devoid of any business domain layer—doesn’t look like unit tests have a place there. You’d probably better off with integration testing that touches a real database. In such a case, the testability benefit of DI isn’t that useful.
Another benefit that DI affords is the ability to protect your clients from changes that occur in its services. However, if your application is extremely small and unlikely to change, the extra overhead necessary for DI might be overkill.
Keep in mind, though, that situations like the two described above are exceptions rather than the norm. Nowadays, DI has become a first-class citizen in many of the most well-known frameworks. It’s never been easier to setup and utilize DI. As a result, the scenarios in which DI doesn’t make sense are the most fringe of cases.
SOLID’s dependency inversion principle introduces interfaces between a higher-level class and its dependencies. That decouples the higher-level class from its dependencies so that you can change the code of a lower-level class without changing the code that uses it. The only code that uses a dependency directly is the one that instantiates an object of a specific class that implements the interface.
The dependency injection technique enables you to improve this even further. It provides a way to separate the creation of an object from its usage. By doing that, you can replace a dependency without changing any code and it also reduces the boilerplate code in your business logic.
With APM, server health metrics, and error log integration, improve your application performance with Stackify Retrace. Try your free two week trial today
Stackify's APM tools are used by thousands of .NET, Java, PHP, Node.js, Python, & Ruby developers all over the world.
Explore Retrace's product features to learn more.


