The PHP Laravel framework is packaged with the Eloquent Object Relational Mapper (ORM), which provides an extremely easy way to communicate with a database. As developers need to create complex websites and other applications, they prefer a hassle-free and shorter development time. Laravel helps make development faster and provides an adequate solution to most problems encountered. Varying business requirements are addressed with faster development, as well as well-organized, reusable, maintainable and scalable code. It works with custom web applications as it can cater to multiple databases and perform common database operations.
Developers can work in Eloquent with multiple databases efficiently using an ActiveMethod implementation. It is an architectural pattern where the model created in the Model-View-Controller (MVC) structure corresponds to a table in the database. The advantage is for models to perform common database operations without coding lengthy SQL queries. Models allow data querying in your tables, as well as inserting new records into tables. The process of synchronizing multiple databases running on different systems is simplified. There is no need to write SQL queries at all. All you have to do is to define database tables and relations between them, and Eloquent will do the rest of the job.
To fully appreciate the utility of Eloquent ORM, understanding the ecosystem is a must. Here are the steps to get started:
Artisan Console is the name of the command-line interface packaged with Laravel. It provides a number of helpful commands to be used during the development of your application. It is driven by the powerful Symfony Console component.
To view a list of all available Artisan commands, you may use the list command:
php artisan list
All the commands come with a concise description of its arguments and options. This is shown in a “help” screen. To view a help screen, simply precede the name of the command with “help” as shown:
php artisan help migrate
Migration is a process of managing your database by writing PHP rather than SQL. Also it provides a way of adding version control to your database. Assuming that our database is up and running. To get started with migrations, you need to setup Laravel migration. Open the terminal and choose the correct path, and you can use artisan to create that migration table with this command:
php artisan migrate:install
To create a migration, just run the following command:
php artisan make:migration create_student_records
This creates the migration file. In your text editor, open the newly created file under the migration folder:
<?php
use IlluminateSupportFacadesSchema;
use IlluminateDatabaseSchemaBlueprint;
use IlluminateDatabaseMigrationsMigration;

class CreateStudentRecordsTable extends Migration
{
    /**
    * Run the migrations.
    *
    * @return void
    */
    public function up()
    {
        Schema::create('student__records', function (Blueprint $table) {
            $table->increments('id');
            $table->timestamps();
        });
    }

    /**
    * Reverse the migrations.
    *
    * @return void
    */
    public function down()
    {
        Schema::dropIfExists('student__records');
    }
}
The code is a class with the same name ‘create student records’, and has two methods: up and down. The up method should make changes to the database; so whenever you migrate your database, whatever code is in the up method will be run. On the other hand, the down method should revert those changes to the database; so whenever you rollback your migration, the down method should undo what the up method did. Inside the up method is the schema builder that is used to create and manipulate tables. What will happen if you undo some of your migrations? All you have to do is to implement the following command:
php artisan migrate:rollback
And it will retract the last migration that was being implemented. Also, you can completely reset the database by running:
php artisan migrate:reset
This will undo all your migrations.
After you are done with the migration of your database, the next process is the seeding. Eloquent comes into the picture since seeding is inserting records into our database. Thus you will need to create your models before you can seed the database. Each database table has a corresponding model that is used to interact with that table. Models allow you to query for data in your tables, as well as insert new records into the table. The easiest way to create a model instance is using the following command:
php artisan make:model Student
An example of a Student model is shown below, which can be used to retrieve and store information from our student’s database table:
<?php
namespace App;
use IlluminateDatabaseEloquentModel;

class Student extends Model
{
    //
}
When you generate a model and at the same time you want to generate a database migration, you can either use the –migration or -m option:
php artisan make:model Student --migration

php artisan make:model Student -m
Many get confused with seeders but it is simply a class that populates your database. The good thing with seeders is that they can be executed using a simple command to refresh your database. It helps in eradicating unreadable names such as “hjkahdkajshfkjsd” which may lead to overlooking some bugs.
The basic idea behind seeders is to help the problem of “dirty data” where one can develop a simple or even a powerful seeder. Overall seeders are a special set of classes that allow us to populate our database over and over with the same exact data. Let’s implement the following command:
php artisan make:seeder StudentsRecordSeeder
In the text editor, under the seeds folder, open the newly created file with filename: StudentsRecordSeeder.php. As you can see, this is just a very simple class with a single method called run().
<?php
use IlluminateDatabaseSeeder;

class StudentsRecordSeeder extends Seeder
{
    /**
    * Run the database seeds
    * @return void
    */

    public function run()
    {
        //
    }
}
The code is just a wrapper around a Console Command class, made specifically to help with the seeding task. Modify the code and then save it.
public function run()
{
    echo 'Seeding!';
}
And, will go back to the terminal:
php artisan db:seed --class=StudentsRecordSeeder
This is just purely calling the DB facade, but keep in mind that there’s no actual database interaction here. You can now populate the table with a few entries and run:
php artisan db:seed --class=class=StudentsRecordSeeder
Here you can keep deleting, adding, editing entries while you work, and then reset them with a simple command.
CRUD operations under the Eloquent object-relational mapper (ORM) make it easier for Laravel developers to work with multiple databases. It performs create, retrieve, update, and delete (CRUD) operations, as well as maps object models to database tables. It handles all the database interaction required for CRUD operations.
You can use the ::create method to insert a new record in the database.
student_record::create(array(
    'first_name' => 'John',
    'last_name'  => 'Doe',
    'student_rank' => 1
));
Aside from the simple create method shown above, you can also create a new object and assign different attributes to it. Then, you can call the save() function and execute the code. Methods such as firstOrCreate() or firstOrNew() are other options for creating records. These will enable finding a student with certain attributes; if that student is not found, then you will either create it in the database or instantiate a new instance.
Using Eloquent ORM, getting and finding records from the database is manageable and easy. The queries are simply built and offer a smooth flow. For creating ::where statements, you will use get() and first() methods. The first() method will return only one record, while the get() method will return an array of records that you can loop over. Also, the find() method can be used with an array of primary keys, which will return a collection of matching records. Here are a few examples:
$student = Students::all();
This code gets all the students. While the code below, finds a specific student by id:
$student = Students::find(1);
Also, as shown below, the code describes finding a student based on a specific attribute.
$JohnDoe = Students::where('name', '=', 'John Doe')->first();
For the get() method, this code shows how to find a student with a rank level greater than 5.
$rankStudents = Student::where('student_rank', '>', 5)->get();
Updating records using Eloquent is as easy. To update a record, just find the record you would like to update, change the attributes, and save. For example, to change the student rank level of John Doe to 5, first find the student and then execute the save method.
$JohnDoe = Bear::where('name', '=', 'John Doe')->first();
$JohnDoe->danger_level = 5;
$JohnDoe->save();
The save method may also be used to update models that already exist in the database.
Eloquent boasts its easy process of updating records, but it has the same story with deleting. There are two options: record pull-out and execute delete method, or simply use the destroy method. To find and delete a record, simply execute the following commands:
$student = Students::find(1);
$student->delete();
To delete a record and multiple records, the commands are executed:
Students::destroy(1);
Students::destroy(1, 2, 3);
Please note that the parameters of destroy are primary keys only unlike the delete method which can accept any database column.
To find and delete all students with rank level that is greater than 10.
Students::where('student_rank', '>', 10)->delete();
Writing a web application in PHP, developers have the option to choose from a rich list of PHP frameworks. The ongoing demand combined with several usage statistics posted from communities suggest that Laravel is currently more popular than other PHP frameworks. However, seasoned web developers never choose a PHP framework based on its popularity or hype. There are pros and cons to consider. A lot of developers tend to downplay the popularity of PHP, but keep in mind that you must choose a PHP framework that fits all the project requirements. Also as a developer, it is important to use a PHP framework, as Laravel helps you reduce web application development cost.
The robust features and tools provided by Eloquent inside Laravel make it easier for developers to build custom web applications following specified business requirements. This article has given you a primer on how to use the basic features of Eloquent ORM. Keep in mind that some features often impact the performance of any Laravel application. Hence you have to implement a number of performance optimization techniques to boost the application’s speed and user experience. But Laravel has been evolving consistently to meet emerging web application development trends. You can always accelerate custom web application development by using the new features and enhancements included in the latest version of Laravel. Learn more about Eloquent and Laravel through its detailed documentation.
In a very competitive world of custom web applications, the health and well-being of the application are synonymous with business. This article discussed how Eloquent efficiently provide an effortless way to communicate with a database. The SQL queries from your application to the database are very critical. For example, a company may have a standard concerning the SQL query execution time. If a query is above 50 ms and according to their standard that is considered a slow query then a developer needs to perform optimization of the query as soon as possible. Time is very critical in this scenario, so a developer needs help in finding where and what causes the slow query. Thus Retrace can truly help developers by answering the where and what questions.
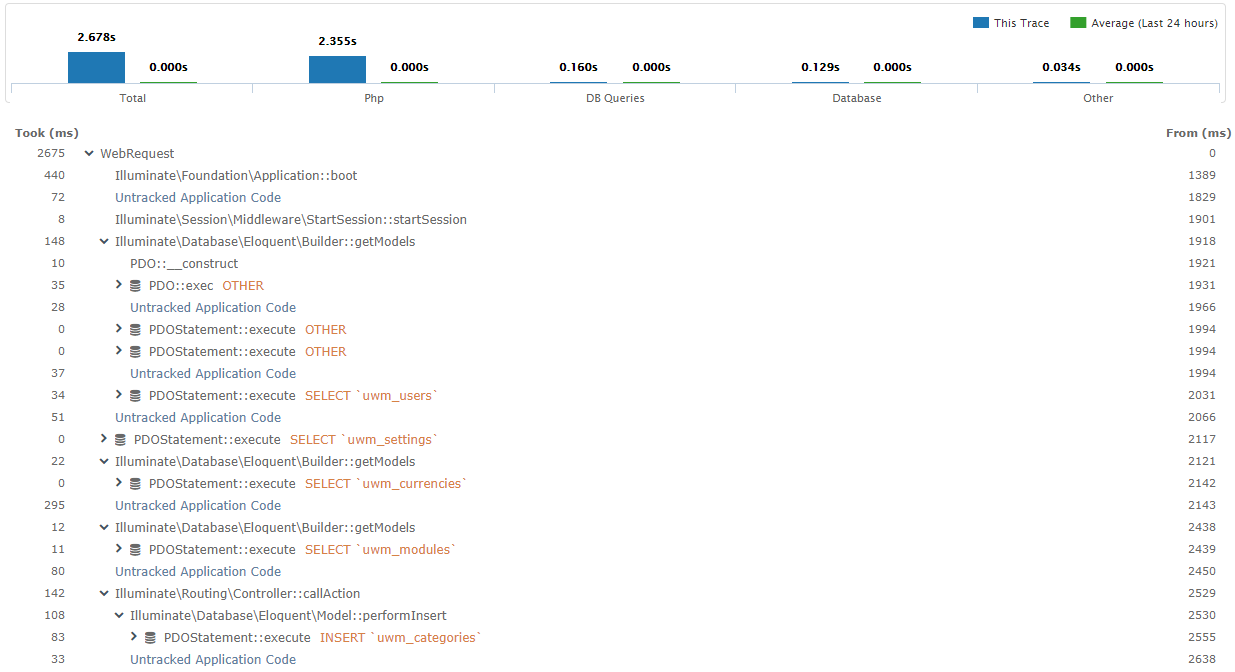
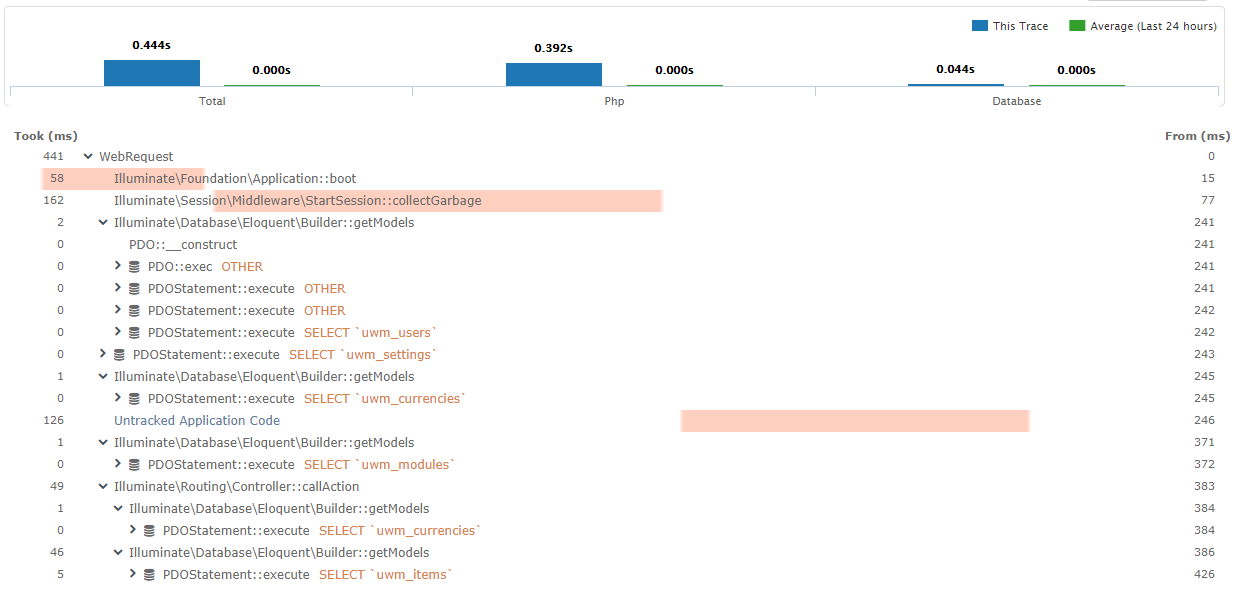
Slow queries can be tracked in milliseconds under the Took (ms) column and each duration is accompanied by the Web Requests. Thus when a slow query is detected, its corresponding attributes are directly pinpointed.
PHP is a powerful language. Laravel is considered a famous and robust PHP framework. Laravel with Eloquent provides competitive technology for web applications. And Retrace from Stackify is a powerful tool for tracing the performance of applications built in PHP. It provides an efficient way of tracking SQL queries. Not just tracking, but providing information on specific queries provides a lot more help to developers.
Use Stackify’s free code profiler, Prefix, to write better code on your workstation. Prefix works with .NET, Java, PHP, Node.js, Ruby, and Python.
Sign up for a free trial and start using these Stackify products today!
The Stackify blog provides articles that will help you with PHP and performance tuning that might be helpful in your PHP applications.
Stackify's APM tools are used by thousands of .NET, Java, PHP, Node.js, Python, & Ruby developers all over the world.
Explore Retrace's product features to learn more.


