
Java 9, one of the more noticeable releases of the Java platform in recent years – coming out with a number of prominent features:
This article focuses on the Module System and Reactive Streams; you can find an in-depth description of JShell here, and of the Stack Walking API here.
Naturally, Java 9 also introduced some other APIs, as well as improvements related to internal implementations of the JDK; you can follow this link for the entire list of Java 9 characteristics.
The Java Platform Module System (JPMS) – the result of Project Jigsaw – is the defining feature of Java 9. Simply put, it organizes packages and types in a way that is much easier to manage and maintain.
In this section, we’ll first go over the driving forces behind JPMS, then walk you through the declaration of a module. Finally, you’ll have a simple application illustrating the module system.
Up to Java 8, applications face two issues related to the type system:
This is where the Java module system comes to the rescue. Mark Reinhold, Oracle’s Java platform chief architect, described the goals of the module system:
Java 9 allows you to define modules with module descriptors.
Module descriptors are the key to the module system. A descriptor is the compiled version of a module declaration – specified in a file named module-info.java at the root of the module’s directory hierarchy.
A module declaration starts with the module keyword, followed by the name of the module. The declaration ends with a pair of curly braces wrapping around zero or more module directives.
You can declare a simple module with an empty body like this:
module com.stackify { }
Here are the directives you can lay out in a module declaration:
The following sample application illustrates all these directives.
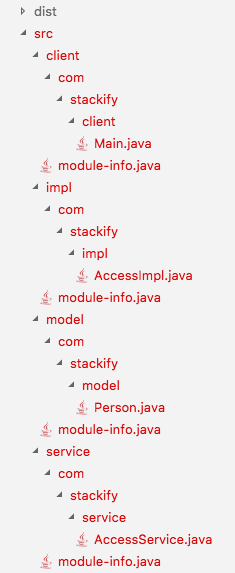 The sample application you’ll be going through consists of four modules – namely model, service, impl, and client. In a real-world project, you should name modules with the reverse domain name pattern to avert name conflicts. This article uses simple names to avoid lengthy commands, making them easier to grasp.
The source code of each module is included in its directory, which is located inside the src root directory. The dist directory for the compiled files at the top of the attached image will be generated during compilation. That mean there’s no need to create it manually.
Let’s start with the model module. This module has only one package with a single class:
package com.stackify.model;

public class Person {
    private int id;
    private String name;

    public Person(int id, String name) {
        this.id = id;
        this.name = name;
    }
}
And here’s the declaration of the module:
module model {
    exports com.stackify.model;
    opens com.stackify.model;
}
This module exports the com.stackify.model package and opens it for introspection.
Next comes the service module – defining a service interface:
package com.stackify.service;

import com.stackify.model.Person;

public interface AccessService {
    public String getName(Person person);
}
Since the service module makes use of the com.stackify.model package, it must require access to the model module:
module service {
    requires transitive model;
    exports com.stackify.service;
}
Notice the transitive keyword in the declaration. This indicates that all modules requiring the service module will automatically gain access to the model module. To make AccessService available for other modules, you must export its package via the exports directive.
The impl module provides the access service with an implementation:
package com.stackify.impl;

import com.stackify.service.AccessService;
import com.stackify.model.Person;
import java.lang.reflect.Field;

public class AccessImpl implements AccessService {
    public String getName(Person person) {
        try {
            return extract(person);
        } catch (Exception e) {
            throw new RuntimeException(e);
        }
    }

    private String extract(Person person) throws Exception {
        Field field = person.getClass().getDeclaredField("name");
        field.setAccessible(true);
        return (String) field.get(person);
    }
}
Thanks to the opens directive in the declaration of the model module, AccessImpl can introspect the Person class.
This is the declaration of the impl module:
module impl {
    requires service;
    provides com.stackify.service.AccessService with com.stackify.impl.AccessImpl;
}
The import of model into the service module is transitive, thus impl just needs to require service to have access to both of those modules.
The provides … with directive signals that the impl module provides an implementation for the AccessService interface. That implementation is the AccessImpl class.
And here’s how the client module consumes AccessService – with this module declaration:
module client {
    requires service;
    uses com.stackify.service.AccessService;
}
Here’s how a client uses the access service:
package com.stackify.client;

import com.stackify.service.AccessService;
import com.stackify.model.Person;
import java.util.ServiceLoader;

public class Main {

    public static void main(String[] args) throws Exception {
        AccessService service = ServiceLoader.load(AccessService.class).findFirst().get();
        Person person = new Person(1, "John Doe");
        String name = service.getName(person);
        assert name.equals("John Doe");
    }
}
You can see that the Main class doesn’t use the AccessImpl implementation class directly. Instead, the module system locates that implementation automatically at runtime based upon the uses and provides … with directives in the module descriptor.
This subsection presents the steps to compile and execute the modular application you have just seen. Note that you must run all the commands in the root directory of the project – the parent directory of src – in the order, they show up.
This command compiles the model module and places the generated class files into the dist directory:
javac -d dist/model src/model/module-info.java src/model/com/stackify/model/Person.java
Since the service module requires the model module, you must specify the location of that dependency module in the -p option – which denotes the module path – when compiling the service module:
javac -d dist/service -p dist src/service/module-info.java src/service/com/stackify/service/AccessService.java
Likewise, the following are how to compile the impl and client modules:
javac -d dist/impl -p dist src/impl/module-info.java src/impl/com/stackify/impl/AccessImpl.java
javac -d dist/client -p dist src/client/module-info.java src/client/com/stackify/client/Main.java
The Main class uses an assert statement, hence you need to enable assertions when executing the program:
java -ea -p dist -m client/com.stackify.client.Main
Notice that you must precede the main class with the name of its module – before passing to the -m option.
When the application runs, you won’t see any error, implying that it works as expected.
Before Java 9, all packages were declared without any idea about modules. However, that doesn’t keep you from deploying those packages on the new module system. All you need to do is simply add them to the classpath as you would on Java 8; the packages in the classpath will then become part of the unnamed module.
The unnamed module reads all the other modules – whether they are in the classpath or module path. As a result, an application that compiles and runs on Java 8 will work the same way on Java 9. Nevertheless, a module with an explicit declaration doesn’t have access to the unnamed module. This is where you need another kind of modules – automatic modules.
You can convert a legacy JAR file – which doesn’t have a module descriptor – to an automatic module by placing it in the module path.
This will define a module whose name is derived from the name of the JAR file. Such an automatic module has access to all the other modules in the module path and exposes all of its packages, enabling seamless interoperations between packages with and without an explicit module.
Reactive Streams is a programming paradigm – allowing for processing asynchronous data streams in a non-blocking manner with back-pressure. Essentially, this mechanism puts the receiver in control, enabling it to determine the amount of data to be transferred, while not having to wait for the response after each request.
The Java platform has integrated Reactive Streams as part of Java 9. This integration permits you to leverage Reactive Streams in a standard way, whereby various implementations can be working together.
The Java API wraps all the interfaces for Reactive Streams – including Publisher, Subscriber, Subscription, and Processor – inside the Flow class.
A Publisher produces items and related control messages. This interface defines a single method – namely subscribe – which adds a subscriber that will be listening for data the publisher transmits.
A Subscriber receives messages from a publisher; this interface defines four methods:
A Subscription controls the communication between a publisher and a subscriber. This interface declares two methods: request and cancel. The request method asks the publisher to send a specific number of items, whereas the cancel method causes the subscriber to unsubscribe.
Sometimes you may want to perform operations on the data items while they are transferring from the publisher to the subscriber. This is where a Processor comes into play. This interface extends both Publisher and Subscriber, enabling it to act as a subscriber from the publisher’s perspective, and as a publisher from the subscriber’s.
The Java platform provides an implementation for the Publisher and Subscription interface out of the box. The implementation for Publisher is a class named SubmissionPublisher.
In addition to the method defined in the Publisher interface, this class has some others, including:
The Subscription implementation of the platform is a private class – which is intended to be used by SubmissionPublisher only. When you call the subscribe method on a SubmissionPublisher with a Subscriber argument, a Subscription object is created and passed to the onSubscribe method of that subscriber.
With Publisher and Subscription implementations in hand, you only need to declare a class implementing the Subscriber interface to have a Reactive Streams application. This class expects messages of the String type:
public class StringSubscriber implements Subscriber<String> {
    private Subscription subscription;
    private StringBuilder buffer;

    @Override
    public void onSubscribe(Subscription subscription) {
        this.subscription = subscription;
        this.buffer = new StringBuilder();
        subscription.request(1);
    }

    public String getData() {
        return buffer.toString();
    }

    // other methods
}
As you can see, a StringSubscriber object stores the Subscription it takes when subscribing to a publisher in a private field. Also, it uses the buffer field to keep the received String messages. You can retrieve the value of this buffer using the getData method.
Apart from initializing private fields, the onSubscribe method requests the publisher to issue a single data item.
Here’s the definition of the onNext method:
@Override
public void onNext(String item) {
    buffer.append(item);
    if (buffer.length() < 5) {
        subscription.request(1);
        return;
    }
    subscription.cancel();
}
This method demands the publisher to send a new string upon the arrival of the previous one. After getting five items, the subscriber stops receiving.
The two other methods – onError and onComplete – are trivial:
@Override
public void onError(Throwable throwable) {
    throwable.printStackTrace();
}

@Override
public void onComplete() {
    System.out.println("Data transfer is complete");
}
This quick test verifies our implementation class:
@Test
public void whenTransferingDataDirectly_thenGettingString() throws Exception {
    StringSubscriber subscriber = new StringSubscriber();
    SubmissionPublisher<String> publisher = new SubmissionPublisher<>();
    publisher.subscribe(subscriber);

    String[] data = { "0", "1", "2", "3", "4", "5", "6", "7", "8", "9" };
    Arrays.stream(data).forEach(publisher::submit);

    Thread.sleep(100);
    publisher.close();

    assertEquals("01234", subscriber.getData());
}
In the above test, the sleep method does nothing but to wait for the asynchronous data transmission to complete.
Let’s make our sample application a bit more complicated with a processor. This processor transforms published strings into integers, throwing an exception if the conversion fails. After the transformation, the processor forwards the resulting numbers to the subscriber.
The following is the new Subscriber implementation class:
public class NumberSubscriber implements Subscriber<Integer> {
    private Subscription subscription;
    private int sum;
    private int remaining;

    @Override
    public void onSubscribe(Subscription subscription) {
        this.subscription = subscription;
        subscription.request(1);
        remaining = 1;
    }

    public int getData() {
        return sum;
    }

    // other methods
}
The fields and methods you have just seen are pretty much the same as those of the custom StringSubscriber class – except for the existence of the remaining field. You can use this field to control the requests to the publisher:
@Override
public void onNext(Integer item) {
    sum += item;
    if (--remaining == 0) {
        subscription.request(3);
        remaining = 3;
    }
}
Rather than asking for items one by one, the subscriber now solicits three at once. It only sends a new demand after collecting all the unfulfilled items.
The onError and onComplete methods are the same as before, hence we’ll leave it off for simplicity.
The last piece of the application is a Processor implementation:
public class StringToNumberProcessor extends SubmissionPublisher<Integer> implements Subscriber<String> {
    private Subscription subscription;

    @Override
    public void onSubscribe(Subscription subscription) {
        this.subscription = subscription;
        subscription.request(1);
    }

    // other methods
}
The processor class, in this case, extends SubmissionPublisher, thus only needs to implements abstract methods of the Subscriber interface. Here are the three other methods:
@Override
public void onNext(String item) {
    try {
        submit(Integer.parseInt(item));
    } catch (NumberFormatException e) {
        closeExceptionally(e);
        subscription.cancel();
        return;
    }
    subscription.request(1);
}

@Override
public void onError(Throwable throwable) {
    closeExceptionally(throwable);
}

@Override
public void onComplete() {
    System.out.println("Data conversion is complete");
    close();
}
Note that when the publisher is closed, the processor should also be closed, issuing an onComplete signal to the subscriber. Likewise, when an error occurs – whether on the processor or the publisher – the processor itself ought to inform the subscriber of that error.
You can implement that notification flow by calling the close and closeExceptionally methods.
Here’s a test confirming the accuracy of our application:
@Test
public void whenProcessingDataMidway_thenGettingNumber() throws Exception {
    NumberSubscriber subscriber = new NumberSubscriber();
    StringToNumberProcessor processor = new StringToNumberProcessor();
    SubmissionPublisher<String> publisher = new SubmissionPublisher<>();

    processor.subscribe(subscriber);
    publisher.subscribe(processor);

    String[] data = { "0", "1", "2", "3", "4", "5", "6", "7", "8", "9" };
    Arrays.stream(data).forEach(publisher::submit);

    Thread.sleep(100);
    publisher.close();

    assertEquals(45, subscriber.getData());
}
The applications you have gone through should provide a better understanding of Reactive Streams. They by no means serve as a guideline for you to build a reactive program from scratch, however.
Implementing the Reactive Streams specification isn’t easy since the problem it resolves isn’t simple at all. You should leverage a library available out there – such as RxJava or Project Reactor – to write an effective application.
In the future, when many Reactive libraries support Java 9, you can even combine various implementations from different tools to get the most out of the API.
This article went over the new Module System as well as Reactive Streams – two of the core technologies in Java 9.
The module system is new and not expected to be widely adopted soon. However, the movement of the whole Java world into modular systems is inevitable, and you should certainly prepare yourself for that.
On the contrary, Reactive Streams has been around for a while. The introduction of Java 9 helped standardize the paradigm, which may speed up its adoption.
With APM, server health metrics, and error log integration, improve your application performance with Stackify Retrace. Try your free two week trial today
Stackify's APM tools are used by thousands of .NET, Java, PHP, Node.js, Python, & Ruby developers all over the world.
Explore Retrace's product features to learn more.


