
Azure has plenty of services for hosting your applications and their components. It also has extensive options for deploying to these services. Barry Luijbregts introduces four of the primary options for hosting apps in his article, “Which Azure Deployment Model Should You Use? 4 Ways to Deploy.” In that post, Luijbregts covers where to deploy on Azure; in this post, I’m going to talk about how.
As you’ll see, there are several options to choose from. Picking the right tools to handle the deployment will depend on your environment. We’ll have a look at the options available. Since there are so many ways to deploy to Azure services, we won’t be able to get into the weeds, but I will cover enough so that you can hopefully find the right deployment solution for you.

Before going into deployment, I want to start with some prerequisites and get into a shared mental model. If you aren’t already doing so, you should separate your build from your deployment. They should be separated both mentally and physically. Build is the first step; deployment comes after. Consider this a practice in separation of concerns (SoC) in that building the application is a separate concern from deploying the application.
Consider that an application will typically be deployed to more than one environment — development, test, staging, production. Also consider that we won’t want to alter the compiled/transpiled application for each environment. However, we will want to alter the configurations for each environment.
What we want is to build once, store the build, and deploy it whenever (and wherever) we choose. When we store the build, we will need to be able to reference it by a unique identifier. This can be a build number, a version, or a version + build number. We also want certain people to be able to deploy to certain environments. It might be the same person for all environments, or perhaps we might want QA engineers to be able to pull the build into their environment when they’re ready to test it. Either way, we want options. We also might want to automate much of our deployment and testing.
Keep in mind these principles of separation of concern and pulling releases as we look at the options.
Now that we’ve established a shared mental model, let’s get into how we can build our app, service, or function.
If you’re using Visual Studio Team Services (VSTS) for building, then you’ve got deployment to Azure integrated in the online platform. You can bring your own build tools as well. You can build locally on your development machine or on your own build server. And since Azure can be used to deploy apps written on just about any platform, how you package your application can vary greatly.
No matter how you build your application, the goal is to produce build artifacts. Build artifacts are all the parts of the application that you need to deploy. On the build step, you store them in an artifact repository, which is where your packaged application will live before it gets deployed. The deployment tool will pick it up from there and deliver it to its destination, whether that’s to the cloud or on-premise.
Also read-https://stackify.com/ansible-vs-jenkins/
 When you’re deploying to Azure, you could be deploying from a source hosted on Azure (or VSTS), from an external repository, or from somewhere local (or on-premises). There isn’t anything more complicated about any of these scenarios; in fact, they’re all relatively straightforward. What can get a little complicated is figuring out what your options are, since the choices are vast. Here is a breakdown of many of the ways you can accomplish this without going outside the Azure ecosystem.
I’ve already mentioned VSTS. I’m a fan because it gives you coordination for releases and a visual representation. What’s more, you can pull releases into each environment along your value stream. Developers check in their work, VSTS builds it, then it gets deployed in any number of ways.
One way is to auto-deploy to your continuous integration (CI) environment for some automated testing. Once that’s complete, QA can pick it up by clicking a button whenever they’re ready. Product managers can pull it into a demo environment when they’re ready to review it with business stakeholders. Once the build is approved for release, it can be pulled into production at will. Depending on how sophisticated your environment is, you can deploy to production whenever as soon as the build is ready or whenever it’s convenient.
Perhaps you use a specific release cycle such as a maintenance window. Your release engineer can deploy with a single action. Just click the button to release to production, and all the steps in the release will execute and put all the pieces into place.

With a DevOps Project, you have choices. You can choose from a number of languages and platforms for hosting your apps. It still gives you a visual representation of the development-to-deployment process. The difference is that it’s more lightweight compared to setting up using VSTS. In fact, DevOps Project actually creates the deployment process in VSTS; it just makes things easier for you.
If you want continuous integration, most Azure services have that capability built in. Configure the service with the code repository URL and set up permissions with a service user account. The service will update itself whenever there is a commit to the repository.
CI can be set up in VSTS to deploy nearly anything from Service Fabric apps to SQL. It’s just a matter of having it linked to your source repository and having the right deployment tasks in the release definition.
Kudu runs on the server that hosts your web app or function. It allows you to manage certain aspects of the server. You can manage the web server processes and use its online command-line to perform tasks. Kudu gives you access to deployment history, web hooks, and web jobs, and it has a nice set of extensions you can add.
Kudu is worth mentioning since it powers the CI deployments from git. Usually, you don’t have to think about it much. But sometimes, you will want to think about it since you can use the Kudu console to install dependencies for Azure Function apps. Or maybe you want to deploy using a zip file using the REST endpoint exposed by Kudu.
 The Kudu web UI.
Many Azure services expose REST APIs for management. You can use the REST API to deploy new services to the cloud. You might use a REST API to create or update an IoT Hub, for example, or to create a queue for a new feature.
If you’re interested in creating your own deployment tool on the .NET platform, then you can use the .NET API. This API can perform the same tasks as the REST API. It uses the REST API in the end and it basically wraps up everything in a fairly standard .NET interface. There are a couple pain points, but it’s mostly straightforward to use.
You might also like to use something like the C# or F# interactive shell to run deployment scripts. If that’s something you’re interested in, you can use the .NET API from within your csx or fsx scripts. For some real fun, why not run those in Azure Functions? How meta would that be?!
The good old CLI is here to stay! Actually it’s there, too…in the UI. Right there on the main page of your Azure portal, if you click the >_ icon at the top, you’ll activate the online shell. You can use a Bourne Again SHell (Bash) or PowerShell. The shell requires a small of amount of storage in order to run. You’ll have to create that, but it’s easy to do.
You can also use either of those options on your local environment so long as you’ve installed and configured them. The CLI is available for Windows, macOS, and Linux from here. The PowerShell version is available here. When you install either, you’ll have to configure with your account.
The PowerShell plugin uses the standard syntax— Connect-AzureRmAccount—to configure the first time. A list of samples for deployment can be found here.
I find myself doing a ton of service management directly from the CLI; it just seems more straightforward sometimes. Keep a set of scripts handy for the operations you end up using again and again.
The CLI version gives you a simple az command to start everything off. az login gets you stared in the CLI. Everything else pretty much follows that pattern. There are some good samples on this page to get you started. Just to give you a taste:
az group create --name hello-fun -l eastus

/*
{
    "id": "/subscriptions/***/resourceGroups/hello-fun",
    "location": "eastus",
    "managedBy": null,
    "name": "hello-fun",
    "properties": {
        "provisioningState": "Succeeded"
    },
    "tags": null
}
*/

az storage account create -n hellofunstore -l eastus \
--resource-group hello-fun --sku Standard_LRS

/*
{
    ...
    "primaryLocation": "eastus",
    "provisioningState": "Succeeded",
    "resourceGroup": "hello-fun",
    "secondaryEndpoints": null,
    "secondaryLocation": null,
    "sku": {
        "capabilities": null,
        "kind": null,
        "locations": null,
        "name": "Standard_LRS",
        "resourceType": null,
        "restrictions": null,
        "tier": "Standard"
    },
    "statusOfPrimary": "available",
    "statusOfSecondary": null,
    "tags": {},
    "type": "Microsoft.Storage/storageAccounts"
}
*/

az functionapp create -n hellofun --storage-account hellofunstore \
--consumption-plan-location eastus --resource-group hello-fun
And that will set up a function app running on Windows. Go to the given URL and you’ll see this:

They have a bit of a sense of humor—the smiley is animated. But the real function app isn’t accessible from this page, and you’ll need a token to access it.
Say what you will about the blades, I find them refreshing! Sure, they’re a bit atypical when compared to the vertical scrolling pages. And yes, I’ve had trouble navigating them from time to time. I’ve also had bits of relevant information cut off from the screen. I’m still a fan, though, because they’ve been consistent in their UX design.
But let’s get back to business. Many of the aforementioned deployment options are configurable through the Azure portal. Not only can you configure the options in the UI, you can even edit your code there; there are built-in code editors for editing web apps and function apps. You commit your edits to source control from those editors. If you’ve set up continuous deployment, then your newly edited code will be deployed when you commit. Depending on whether you are testing in production or not, you may not want your deployment going straight to production. You can set the CI to deploy to a testing environment or to a deployment slot instead if you need a more sophisticated deployment strategy. Remember: a deployment slot is for staging your deployment.
The Serverless Framework is an organized way to centrally manage your serverless applications and resources. There are two requirements for deploying via the Serverless Framework:
If you’ve ever needed to stage a build and validate it once it’s in production but before it goes live, then you might recognize the need for deployment slots. Deployment slots give you a way to stage your release, check it out, and then swap it into production once you’re confident everything is green for going live. There are three benefits here:
Let’s say you have a hybrid environment in which some of your infrastructure and services are hosted on Azure and some are on-premises. Even if you don’t have a fully integrated hybrid environment (via a VPC), if you are using VSTS, then you can still deploy your projects on your own servers. Or you can mix and match—deploy some components on-premises and some to Azure or wherever else. All you need to do is install agents on your target servers (or on a build/deploy worker inside your environment).
The agent will connect to VSTS over https and listen for new events. When it receives a build command, it will get the specified version of source code and start building. When it gets a deploy command, it will get the build artifacts and deploy them to your targets. You can use built-in cloud agents for building and on-premises agents for deployment. There’s enough flexibility to service most environments. The agent is available for Windows, macOS, and some Linux distros.
We’ve already touched on various ways to trigger deployments, but I want to summarize those methods in one place and add a few more general comments.
Some deployments are triggered by a commit to the repository. Others are fully manual. You may want to build some gates into your pipeline as well. You can also trigger deployments from a specific branch, such as a release or hotfix branch.
For example, you could have a CI branch that builds and tests every commit, but use a release branch to deploy. Submit a pull request into the release once a feature branch is tested and deploy the release branch whenever something is merged (thus committed). You would essentially be deploying every commit to the release branch, just never committing directly to it. This is a slight divergence from GitFlow. If you are using the GitFlow pattern, you would do CI deployments from your develop branch, then create release branches to stabilize a release.
Another fancy configuration is deploying each feature branch to containers. Set up continuous deployment on those branches so that they can be deployed to containers (using naming conventions to control the whole process). This way, each feature can be tested in isolation. However, you may want to leave it to the testers to pull a feature into the test environment so as to reduce unnecessary resource consumption. Remember, containers rack up bills while they’re running regardless of whether they’re being used by customers, whereas the serverless stuff only racks up bills when it’s actually being used.
Two topics that are bound to come up when considering cloud deployment are management and security. Both concerns are adequately addressed by Azure, given the appropriate configurations. As always, use the principal of least privilege when giving access.
This primer is a good introduction to Azure security, which uses a role-based access model. Roles are assigned to users, groups, or service principles. Those roles give the assigned access to specified resources. Users and groups are managed via Azure Active Directory. Roles are applied on each resource or per resource group. For example, a user in the Website Contributor role may deploy a website.
In contrast, let’s imagine a user, Bob, who is a member of the user group The Bobs. And let’s say there’s a resource group named hello-fun. The Bobs are in the Log Analytics role for the resource group hello-fun. Bob has read access to a whole lot of things, including Stackify Retrace, but he cannot do a deployment for the hello-fun-app, which is in in the hello-fun resource group.
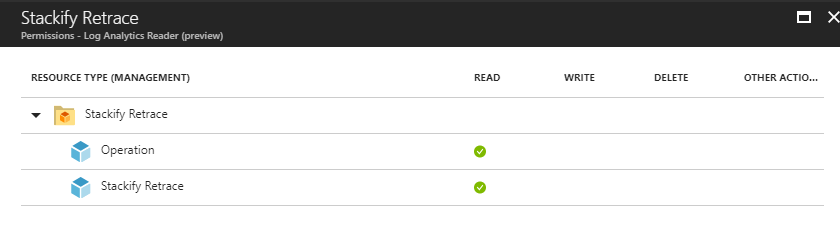 Bob’s permissions to Stackify Retrace as granted by the Log Analytics role.
So, there you have it: methods for end-to-end deployments on Azure, from build to deploy. Hopefully you’re doing end-to-end testing or have a good test-in-production methodology to go along with all these cool tools and techniques you are now privy to. As I was once told long ago by a mentor, why not go for the best? Decide which tools and techniques are best for your environment and happy DevOps-ing!
Stackify's APM tools are used by thousands of .NET, Java, PHP, Node.js, Python, & Ruby developers all over the world.
Explore Retrace's product features to learn more.


