
There are numerous database systems that take a non-tabular NoSQL approach to handle data management. One of the most popular is MongoDB, which is used in various industries. While MongoDB is only the playground for Ruby on Rails or Node.js developers, using MongoDB with a modern Java framework like Spring Boot results in a powerful tool in the problem-solving arsenal.
In this article, we’ll learn how to incorporate MongoDB into our Java applications while we create a simplified todo application that uses an embedded MongoDB database, Spring Boot, Spring Data, and Thymeleaf.
You may be wondering why someone would use a NoSQL database like MongoDB over a traditional relational database. It really depends. A NoSQL approach requires that you denormalize data. That is, you need to store all the data about a particular object in what MongoDB calls a Document. NoSQL databases also use unstructured data. In addition, there is no schema that needs to be created. This makes adding additional attributes or changing data types much easier than in a relational database. Finally, if you have a very large database, MongoDB will be a great fit for your needs. It provides excellent scalability and performance.
If you don’t want to create a project from scratch, the completed application developed in this article is available on GitHub.
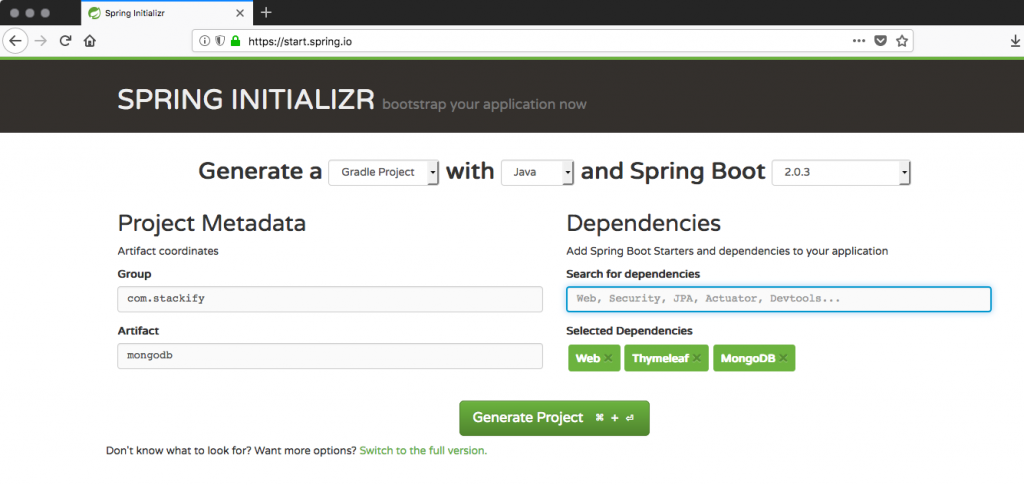
For this article, we’ll start with a Gradle project created using the online Spring Initializr. Use the screenshot below as a reference and create a Gradle project with the Web, Thymeleaf, and MongoDB dependencies.
After generating the Gradle project, we’ll need to add the following two dependencies to our build.gradle file to make use of the embedded MongoDB instance:
compile('cz.jirutka.spring:embedmongo-spring:1.3.1')
compile('de.flapdoodle.embed:de.flapdoodle.embed.mongo')
When you’ve done that, check that your build.gradle file looks like this:
buildscript {
    ext {
        springBootVersion = '2.0.3.RELEASE'
    }

    repositories {
        mavenCentral()
    }

    dependencies {
        classpath("org.springframework.boot:spring-boot-gradle-plugin:${springBootVersion}")
    }
}

apply plugin: 'java'
apply plugin: 'eclipse'
apply plugin: 'org.springframework.boot'
apply plugin: 'io.spring.dependency-management'

group = 'com.stackify'
version = '0.0.1-SNAPSHOT'
sourceCompatibility = 1.8

repositories {
    mavenCentral()
}

dependencies {
    compile('org.springframework.boot:spring-boot-starter-data-mongodb')
    compile('org.springframework.boot:spring-boot-starter-thymeleaf')
    compile('org.springframework.boot:spring-boot-starter-web')
    compile('cz.jirutka.spring:embedmongo-spring:1.3.1')
    compile('de.flapdoodle.embed:de.flapdoodle.embed.mongo')

    testCompile('org.springframework.boot:spring-boot-starter-test')
}
When first running the application it will take a few minutes longer than normal. This is because the MongoDB dependencies are being downloaded and configured. The console output will indicate that the embedded instance of MongoDB is up and running once this is all done:
2018-07-23 10:16:32.259 INFO 77820 --- [ Thread-7] o.s.b.a.mongo.embedded.EmbeddedMongo : 2018-07-23T10:16:32.259-0400 I NETWORK [initandlisten] waiting for connections on port 56691
2018-07-23 10:16:32.259 INFO 77820 --- [ main] d.f.embed.process.runtime.Executable : start de.flapdoodle.embed.mongo.config.MongodConfigBuilder$ImmutableMongodConfig@4eb45fec
2018-07-23 10:16:32.284 INFO 77820 --- [ main] org.mongodb.driver.cluster : Cluster created with settings {hosts=[localhost:56691], mode=MULTIPLE, requiredClusterType=UNKNOWN, serverSelectionTimeout='30000 ms', maxWaitQueueSize=500}
2018-07-23 10:16:32.284 INFO 77820 --- [ main] org.mongodb.driver.cluster : Adding discovered server localhost:56691 to client view of cluster
2018-07-23 10:16:32.294 INFO 77820 --- [ Thread-7] o.s.b.a.mongo.embedded.EmbeddedMongo : 2018-07-23T10:16:32.294-0400 I NETWORK [initandlisten] connection accepted from 127.0.0.1:56721 #1 (1 connection now open)
2018-07-23 10:16:32.298 INFO 77820 --- [localhost:56691] org.mongodb.driver.connection : Opened connection [connectionId{localValue:2, serverValue:1}] to localhost:56691
2018-07-23 10:16:32.299 INFO 77820 --- [localhost:56691] org.mongodb.driver.cluster : Monitor thread successfully connected to server with description ServerDescription{address=localhost:56691, type=STANDALONE, state=CONNECTED, ok=true, version=ServerVersion{versionList=[3, 2, 2]}, minWireVersion=0, maxWireVersion=4, maxDocumentSize=16777216, logicalSessionTimeoutMinutes=null, roundTripTimeNanos=713015}
2018-07-23 10:16:32.300 INFO 77820 --- [localhost:56691] org.mongodb.driver.cluster : Discovered cluster type of STANDALONE
2018-07-23 10:16:32.769 INFO 77820 --- [ main] o.s.j.e.a.AnnotationMBeanExporter : Registering beans for JMX exposure on startup
2018-07-23 10:16:32.992 INFO 77820 --- [ main] o.s.b.w.embedded.tomcat.TomcatWebServer : Tomcat started on port(s): 8080 (http) with context path ''
2018-07-23 10:16:33.001 INFO 77820 --- [ main] com.stackify.mongodb.MongodbApplication : Started MongodbApplication in 291.956 seconds (JVM running for 292.809)
2018-07-23 10:20:25.962 INFO 77820 --- [nio-8080-exec-1] o.a.c.c.C.[Tomcat].[localhost].[/] : Initializing Spring FrameworkServlet 'dispatcherServlet'
2018-07-23 10:20:25.963 INFO 77820 --- [nio-8080-exec-1] o.s.web.servlet.DispatcherServlet : FrameworkServlet 'dispatcherServlet': initialization started
2018-07-23 10:20:25.998 INFO 77820 --- [nio-8080-exec-1] o.s.web.servlet.DispatcherServlet : FrameworkServlet 'dispatcherServlet': initialization completed in 34 ms
Currently, our project is missing a controller to handle Web requests. Let’s take care of this by creating a controller and corresponding Thymeleaf view. This will give us a good starting place for further work.

Before doing anything else, we’re going to create a controller to handle our application’s Web requests and routing to our view. Create the following Spring controller in src/main/java/com/stackify/mongodb/controllers named TodoController:
package com.stackify.mongodb.controllers;
import org.springframework.stereotype.Controller;
import org.springframework.web.bind.annotation.GetMapping;

@Controller
public class TodoController {
    @GetMapping("/")
    public String index(){
        return "index";
    }
}
This controller creates a URL mapping for the “/” endpoint to our index.html template, which we’ll create next. Create a new file named index.html in src/main/resources/templates and add the following HTML to it:
<!DOCTYPE html>
<html lang="en" xmlns:th="http://www.thymeleaf.org">
<head>
  <title>Todos</title>
  <meta http-equiv="Content-Type" content="text/html; charset=UTF-8"/>
</head>

<body>
  <h1>Todos</h1>
</body>
</html>
There’s really nothing going on with our view other than a bit of static boilerplate HTML. We’ll be updating this to pull data dynamically from our MongoDB instance in a later section. For now, let’s just test to make sure we set everything up correctly. Execute the following Gradle command to launch our Spring Boot application:
$ ./gradlew bootRun
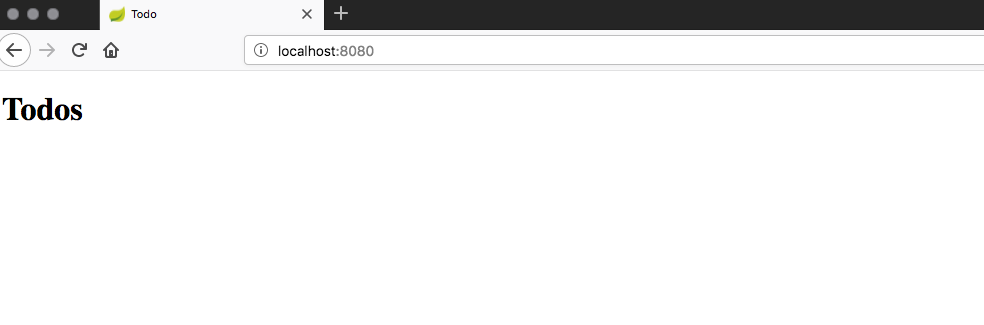
Next, open a browser to http://localhost:8080 and you’ll see the following, which indicates that our controller and view have been successfully wired together:
This isn’t very exciting. Let’s now configure our application to use Mongo and create a few todos.
One of the nice things about Spring Boot is its utilization of Spring annotations. This alleviates the pain of having to configure our application using XML. Using the appropriate annotations, Spring Boot will handle all the configuration and setup for us. We’ll make use of this feature to configure our embedded MongoDB instance. Go ahead and create the following MongoConfig class in the src/main/java/com/stackify/mongodb/config package:
package com.stackify.mongodb.config;
import com.mongodb.MongoClient;
import cz.jirutka.spring.embedmongo.EmbeddedMongoFactoryBean;
import org.springframework.context.annotation.Bean;
import org.springframework.context.annotation.Configuration;
import org.springframework.data.mongodb.core.MongoTemplate;
import java.io.IOException;

@Configuration
public class MongoConfig {
    private static final String MONGO_DB_URL = "localhost";
    private static final String MONGO_DB_NAME = "embedded_db";

    @Bean
    public MongoTemplate mongoTemplate() throws IOException {
        EmbeddedMongoFactoryBean mongo = new EmbeddedMongoFactoryBean();
        mongo.setBindIp(MONGO_DB_URL);
        MongoClient mongoClient = mongo.getObject();
        return new MongoTemplate(mongoClient, MONGO_DB_NAME);
    }
}
This configuration creates a new EmbeddedMongoFactoryBean, binds MongoDB to localhost, and then creates a connection to the embedded_db database for us. Each time we run our application, we’ll start with an empty database. We’ll preload some data into the database instance after our application starts up so we can have data to work with.
If you’ve used Spring Data before, you’ll be familiar with the @Entity annotation. This tells Spring Data to treat the class as a domain object mapped to a row in a database. As mentioned earlier, MongoDB doesn’t use tables. Instead, it creates objects as documents, and multiple documents are known as a collection. In MongoDB, a domain object is mapped to a single document. It’s natural, then, to have a corresponding @Document annotation to use with our MongoDB domain objects to differentiate them from the domain objects used in a relational database mapping. Create the following Todo class in the src/main/java/com/stackify/mongodb/domain package and add the following code to it:
package com.stackify.mongodb.domain;
import org.bson.types.ObjectId;
import org.springframework.data.annotation.Id;
import org.springframework.data.mongodb.core.mapping.Document;

@Document
public class Todo {
    @Id
    private ObjectId id;
    private String name;
    private Boolean completed;

    public Todo(String name) {
        this.name = name;
        this.completed = Boolean.FALSE;
    }

    public ObjectId getId() {
        return id;
    }

    public void setId(ObjectId id) {
        this.id = id;=
    }

    public String getName() {
        return name;
    }

    public void setName(String name) {
        this.name = name;
    }

    public Boolean getCompleted() {
        return completed;
    }

    public void setCompleted(Boolean completed) {
        this.completed = completed;
    }

    @Override
    public String toString() {
        return "Todo{" +
            "id=" + id +
            ", name='" + name + ''' +
            ", completed=" + completed +
            '}';
    }
}
You’ll notice we used the @Document annotation, indicating this is a MongoDB document. You’ll also notice we’re using the standard @Id annotation that you’ll be familiar with from prior Spring Data work. However, here we have declared the id property with the ObjectId datatype. In MongoDB, documents do not use sequential numeric values for identifiers. Instead, they use a 12-byte hexadecimal value composed from the following pieces of data:
This results in our objects having identifiers that resemble the following:
ObjectId(5b5615914434ad438bf3ea43)
When we need to work with an ObjectId as a string value, we can use the toHexString method or the overloaded toString method of ObjectId.

The next bit of our application that we’ll tackle is to create our TodoRepository. Here, we’re using the Repository design pattern to handle our domain and data mapping. Having this in place allows us to create a couple of todo objects and save them to the database. We’ll then update the view to query the MongoDB database and display them.
Go ahead and create the TodoRepository interface in src/main/java/com/stackify/mongodb/repositories:
package com.stackify.mongodb.repositories;
import com.stackify.mongodb.domain.Todo;
import org.springframework.data.repository.CrudRepository;

public interface TodoRepository extends CrudRepository<Todo, String> {
}
As you can see, there’s not a whole lot to this interface. Due to the magic of the CrudRepository, all of our generic create, read, update, and delete (CRUD) operations are implemented for us. We don’t need to add anything else to our interface.
Let’s give this a try by creating a couple of todo objects and persisting them. There are various ways we could preload data into our database, but to keep things simple we’ll create an implementation of the Spring ApplicationListener interface. By creating a component that implements this interface, we can run code before the application finishes loading.
So, create the following ApplicationStartup component in src/main/java/com/stackify/mongodb/components. We’ll use this to create a couple of todo items using our new TodoRepository:
package com.stackify.mongodb.components;
import com.stackify.mongodb.domain.Todo;
import com.stackify.mongodb.repositories.TodoRepository;
import org.slf4j.Logger;
import org.slf4j.LoggerFactory;
import org.springframework.beans.factory.annotation.Autowired;
import org.springframework.boot.context.event.ApplicationReadyEvent;
import org.springframework.context.ApplicationListener;
import org.springframework.stereotype.Component;

@Component
public class ApplicationStartup implements ApplicationListener {
    private static final Logger logger = LoggerFactory.getLogger(ApplicationStartup.class);

    @Autowired
    private TodoRepository todoRepository;

    @Override
    public void onApplicationEvent(final ApplicationReadyEvent event) {
        seedData();
    }

    private void seedData() {
        Todo todo1 = todoRepository.save(new Todo("Pay car insurance"));
        logger.info("Created ToDo " + todo1);

        Todo todo2 = todoRepository.save(new Todo("Play more Skyrim"));
        logger.info("Created ToDo " + todo2);
    }
}
Notice that we’ve used the @Autowired annotation so that Spring will handle the instantiation of our TodoRepository for us. The console will show the log messages for each created todo item:
2018-07-23 12:07:28.573 INFO 51272 --- [ main] o.s.b.w.embedded.tomcat.TomcatWebServer : Tomcat started on port(s): 8080 (http) with context path ''
2018-07-23 12:07:28.581 INFO 51272 --- [ main] com.stackify.mongodb.MongodbApplication : Started MongodbApplication in 10.911 seconds (JVM running for 11.488)
2018-07-23 12:07:28.689 INFO 51272 --- [ main] org.mongodb.driver.connection : Opened connection [connectionId{localValue:3, serverValue:2}] to localhost:58434
2018-07-23 12:07:28.765 INFO 51272 --- [ main] c.s.m.components.ApplicationStartup : Created ToDo Todo{id=5b55fd404434adc84861bae6, name='Pay car insurance', completed=false}
2018-07-23 12:07:28.768 INFO 51272 --- [ main] c.s.m.components.ApplicationStartup : Created ToDo Todo{id=5b55fd404434adc84861bae7, name='Play more Skyrim', completed=false}
Next, let’s update the view to display this data instead of the empty page we left off with.
While we could use our TodoRepository interface directly in our controller to work with our todo objects, good design dictates that we create a service class to serve as an intermediary between the models and views. Doing so enables us to create more complex functionality around our domain objects without polluting the TodoRepository interface, leaving it for the CRUD operations.
Start by creating the TodoService interface in the src/main/java/com/stackify/mongodb/services package:
package com.stackify.mongodb.services;
import com.stackify.mongodb.domain.Todo;

public interface TodoService
    Iterable listAll();
}
Here we’ve added a single listAll method that will return a collection of Todo objects. Create the corresponding implementation alongside our interface in src/main/java/com/stackify/mongodb/services called TodoServiceImpl and add the following code to it:
package com.stackify.mongodb.services;
import com.stackify.mongodb.domain.Todo;
import com.stackify.mongodb.repositories.TodoRepository;
import org.springframework.beans.factory.annotation.Autowired;
import org.springframework.stereotype.Service;

@Service
public class TodoServiceImpl implements TodoService {
    @Autowired
    private TodoRepository todoRepository;

    @Override
    public Iterable listAll() {
        return todoRepository.findAll();
    }
}
Note that this class is annotated with @Service to indicate to Spring that it is a service that will be auto-wired somewhere else. We’re also using the @Autowired annotation here to have Spring handle instantiating the TodoRepository for us. We use the todo repository’s auto-implemented findAll method to retrieve all our existing todo items. We now only have a couple of additional changes to make to show the todo items in the view. Speaking of the view, let’s update that now.
Originally we created a simple HTML file that didn’t have any dynamic data in it. Now, we’ll use the Thymeleaf templating language to create a table that displays the name of our todo item as well as its completion status. The finished index.html looks like this:
<!DOCTYPE html>
<html lang="en" xmlns:th="http://www.thymeleaf.org">
<head>
  <title>Todo</title>
  <meta http-equiv="Content-Type" content="text/html; charset=UTF-8"/>
</head>

<body>
<h3>Todos</h3>
<div th:if="${not #lists.isEmpty(todos)}">
  <table>
    <tbody>
      <tr>
        <th>Name</th>
        <th>Completed</th>
      </tr>
      <tr th:each="todo : ${todos}">
        <td th:text="${todo.name}"></td>
        <td th:text="${todo.completed}"></td>
      </tr>
    </tbody>
  </table>
</div>
</body>
</html>
We use an “if” statement to check that the todos property is not empty. If this property is not empty, we then create a table and use a Thymeleaf loop to iterate over each item in the todos collection. Each item in the collection will have a row in the table with its name and completion status.
Now, if you’re wondering where that todos property came from and how it got into our view, this is because we haven’t modified the TodoController yet. Open up the TodoController that we created at the beginning of the article. We need to update our index method to add the todos attribute to the model used by the view. We also need to auto-wire our TodoService into the controller. Make these changes to arrive at the following controller updates:
package com.stackify.mongodb.controllers;
import com.stackify.mongodb.services.TodoService;
import org.springframework.beans.factory.annotation.Autowired;
import org.springframework.stereotype.Controller;
import org.springframework.ui.Model;
import org.springframework.web.bind.annotation.GetMapping;

@Controller
public class TodoController {
    @Autowired
    private TodoService todoService;

    @GetMapping("/")
    public String index(Model model){
        model.addAttribute("todos", todoService.listAll());
        return "index";
    }
}
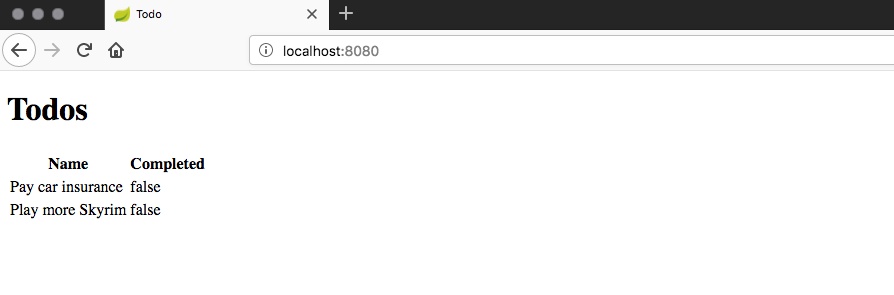
In our updated index method, we call our todo service’s listAll method and map this collection to the todos key. This is how we pass the listing of our todo domain objects into our view. Restart the application and refresh the browser. Our todo items are now displayed on our index page:
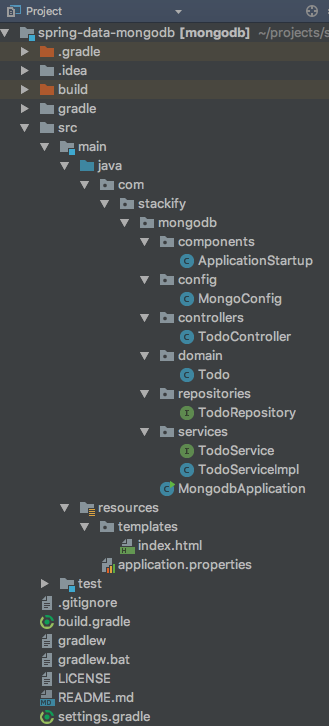
While it’s nothing fancy, it’s a successful test that we have all of our code working. At this point we’ve created and updated quite a few files. For reference, this is the project structure we should have now:
We’ve covered a lot of ground in this article. Now that we have all this plumbing in place, it’d be a shame to just call it quits here. Let’s add one more piece of needed functionality. A todo system isn’t very effective if we don’t have a way of marking items as done. Let’s add the ability to mark our todo items as completed and see how we update MongoDB domain objects.
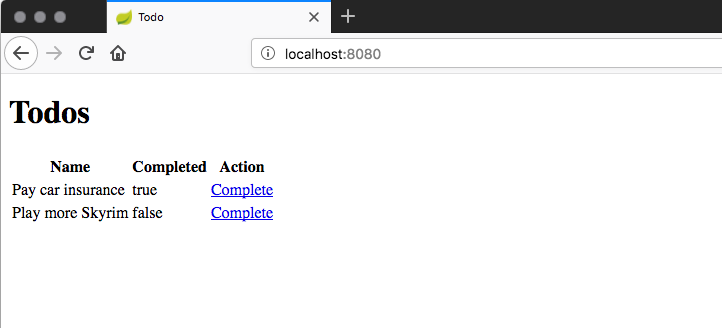
Thankfully, we won’t be creating any new files here. We just need to update the view, controller, and service. First, let’s start by updating the view. Let’s keep it simple and just use a link to mark the todo as completed. The following index.html file is our updated view, which includes a new column for an action link that each row will have to the /todo/complete endpoint. Go ahead and update the view now:
<!DOCTYPE html>
<html lang="en" xmlns:th="http://www.thymeleaf.org">
<head>
  <title>Todo</title>
  <meta http-equiv="Content-Type" content="text/html; charset=UTF-8"/>
</head>

<body>
<h3>Todos</h3>
<div th:if="${not #lists.isEmpty(todos)}">
  <table>
    <tbody>
      <tr>
        <th>Name</th>
        <th>Completed</th>
        <th>Action</th>
      </tr>
      <tr th:each="todo : ${todos}">
        <td th:text="${todo.name}"></td>
        <td th:text="${todo.completed}"></td>
        <td>Complete</td>
      </tr>
    </tbody>
  </table>
</div>
</body>
</html>
Here, we’re using the toHexString property on the Todo domain object to pass the todo item’s identifier to our /todo/complete URL endpoint. We now need to update our controller with a new method to handle this URL action. Open up TodoController and replace it with the following:
package com.stackify.mongodb.controllers;
import com.stackify.mongodb.domain.Todo;
import com.stackify.mongodb.services.TodoService;
import org.springframework.beans.factory.annotation.Autowired;
import org.springframework.stereotype.Controller;
import org.springframework.ui.Model;
import org.springframework.web.bind.annotation.GetMapping;
import org.springframework.web.bind.annotation.PathVariable;

@Controller
public class TodoController {
    @Autowired
    private TodoService todoService;

    @GetMapping("/")
    public String index(Model model) {
        model.addAttribute("todos", todoService.listAll());
        return "index";
    }

    @GetMapping("/todo/complete/{id}")
    public String complete(@PathVariable String id) {
        Todo todo = todoService.getById(id);
        if (todo != null) {
            todo.setCompleted(Boolean.TRUE);
            todoService.saveOrUpdate(todo);
        }
        return "redirect:/";
    }
}
The @GetMapping indicates this endpoint will only respond to HTTP GET requests and expects an identifier to be passed to it. We use the yet-to-be-implemented getById method on our TodoService to retrieve the todo object that has the corresponding identifier. If one is found, we set its completed property to True and then call the saveOrUpdate service method and pass it the updated todo object. We need to implement both of these methods to finish our functionality.
Start by updating the TodoService interface with the two new methods, getById and saveOrUpdate. Ensure they have the following method signatures:
package com.stackify.mongodb.services;
import com.stackify.mongodb.domain.Todo;

public interface TodoService {
    Iterable listAll();
    Todo getById(String id);
    Todo saveOrUpdate(Todo todo);
}
Now, update the corresponding implementation class TodoServiceImpl:
package com.stackify.mongodb.services;
import com.stackify.mongodb.domain.Todo;
import com.stackify.mongodb.repositories.TodoRepository;
import org.slf4j.Logger;
import org.slf4j.LoggerFactory;
import org.springframework.beans.factory.annotation.Autowired;
import org.springframework.stereotype.Service;

@Service
public class TodoServiceImpl implements TodoService {
    private static final Logger logger = LoggerFactory.getLogger(TodoServiceImpl.class);

    @Autowired
    private TodoRepository todoRepository;

    @Override
    public Iterable listAll() {
        return todoRepository.findAll();
    }

    @Override
    public Todo getById(String id) {
        return todoRepository.findById(id).orElse(null);
    }

    @Override
    public Todo saveOrUpdate(Todo todo) {
        todoRepository.save(todo);
        logger.info("Updated Todo: " + todo);
        return todo;
    }
}
Thanks to the auto-wiring and Spring Data CRUD magic, we haven’t had to write any code to actually deal with the MongoDB database. As long as we’re dealing with everyday CRUD operations, these are all implemented for us. In our application, we can now click the complete link for a particular todo item. This will update its completed attribute and redirect us back to the listing.
We can verify the update in the console by looking at the log messages. Here we can verify that the todo item has been updated:
2018-07-23 12:44:25.385 INFO 74792 --- [ main] o.s.b.w.embedded.tomcat.TomcatWebServer : Tomcat started on port(s): 8080 (http) with context path ''
2018-07-23 12:44:25.391 INFO 74792 --- [ main] com.stackify.mongodb.MongodbApplication : Started MongodbApplication in 10.35 seconds (JVM running for 11.15)
2018-07-23 12:44:25.525 INFO 74792 --- [ main] org.mongodb.driver.connection : Opened connection [connectionId{localValue:3, serverValue:2}] to localhost:58872
2018-07-23 12:44:25.594 INFO 74792 --- [ main] c.s.m.components.ApplicationStartup : Created ToDo Todo{id=5b5605e94434ad242848fef8, name='Pay car insurance', completed=false}
2018-07-23 12:44:25.597 INFO 74792 --- [ main] c.s.m.components.ApplicationStartup : Created ToDo Todo{id=5b5605e94434ad242848fef9, name='Play more Skyrim', completed=false}
2018-07-23 12:44:31.027 INFO 74792 --- [nio-8080-exec-1] o.a.c.c.C.[Tomcat].[localhost].[/] : Initializing Spring FrameworkServlet 'dispatcherServlet'
2018-07-23 12:44:31.028 INFO 74792 --- [nio-8080-exec-1] o.s.web.servlet.DispatcherServlet : FrameworkServlet 'dispatcherServlet': initialization started
2018-07-23 12:44:31.068 INFO 74792 --- [nio-8080-exec-1] o.s.web.servlet.DispatcherServlet : FrameworkServlet 'dispatcherServlet': initialization completed in 40 ms
2018-07-23 12:44:40.699 INFO 74792 --- [nio-8080-exec-2] c.s.mongodb.services.TodoServiceImpl : Updated Todo: Todo{id=5b5605e94434ad242848fef8, name='Pay car insurance', completed=true}
At this point, we’ve created a very simplistic todo application using Spring Boot and an embedded instance of MongoDB. While it won’t be winning any design awards, our application is a good starting point for further experimentation. For example, the ability to delete a todo or edit an existing one would be a great way to familiarize yourself with Spring Data and MongoDB. As an added bonus, all of this code will continue to work with a full-blown MongoDB installation. You just have to change the configuration.
MongoDB isn’t a solution to every problem. You need to take application requirements into consideration before switching to an entirely different database implementation. MongoDB is a great fit if you’re working with extremely large data sets, as well as when you’re scaling and clustering. However, if your application uses highly structured data, it may be better to stick with a relational database system.
As mentioned at the beginning of this article, all of this code can be found at GitHub if you have any problems or just want to clone it and play around.
Stackify’s Application Peformance Management tool, Retrace can help keep your applications running smoothly with APM, server health metrics, and error log integration. Download your free two week trial today!
Stackify's APM tools are used by thousands of .NET, Java, PHP, Node.js, Python, & Ruby developers all over the world.
Explore Retrace's product features to learn more.


