Once upon a time, when dinosaurs roamed the earth, servers had to be built. A development team requested an environment for their code to run in, and a system administrator or infrastructure engineer plugged in a server and spent hours or days getting it ready to run code. Oh, and by the way, that was only one server of many required to run a web application—and this only happened after budgets were decided and forms were filled out. It was a process that could take months.
The DevOps movement has changed all of that. DevOps joins development and operations teams and pulls them in the same direction. All is well with the world, for now servers are built in minutes instead of weeks or months. Simply call an API and a server is built.
Tools like Puppet and Ansible allow for repeatable and fast setup of any server with everything you need. However, that’s not the end of the story. Going from servers in months to servers in minutes is a major improvement. But have you ever thought of executing code with no servers? Here, you will learn about serverless, why it matters, and how to go serverless with AWS Lambda.
What Does Serverless Mean?
Does serverless mean literally no servers? Well, not really. There still has to be some runtime executing your code, and that runtime has to execute on a server. However, the details of creating and running the environment are abstracted away from you. With serverless, you write code and upload it to a serverless provider platform ( like AWS Lambda, for example). Your code runs when an event triggers it. The provider creates the environment for you when you need it and then tears it down when you don’t. Therefore, serverless doesn’t really mean no servers; it simply means that you don’t need to worry about them yourself.
Why Does Serverless Matter?
Serverless computing provides many benefits to development teams. First, your code is up and running very quickly. Write your code, then upload it to be executed on demand. This means quick turnaround times for new functionality and fast changes when needed. There’s no deployment or build process to go through, so changes are essentially instant. This fits well with agile and lean methodologies, where speed and fast feedback are key to success.
Another benefit of serverless computing is the operational cost savings. For instance, AWS Lambda charges you only while the function you create is executing. Functions that don’t execute for long won’t cost much. Compare this to purchasing a physical server. This entails expending large amounts of capital to buy a huge server that might be used at a fraction of its full capacity. Even with cloud servers like EC2, you pay when they’re up and running, whether or not they’re actually processing anything. Serverless technologies like AWS Lambda provide a pay-as-you-go service for computing.
Finally, serverless technologies allow for easy scaling. The promise of services like AWS Lambda is that if your code needs more resources or if multiple invocations of your code happen at once, AWS scales for you automatically. You don’t have to worry about peak times killing your application servers. This makes AWS Lambda and other serverless technologies a great choice for microservice architecture.
Challenges of Serverless Computing
Serverless computing certainly has many benefits. However, any technology has pitfalls that you should be aware of before you depend on it too heavily. Let’s take a look at some challenges you may encounter on your path to serverless architecture.
One challenge is the “cold start” that often occurs on the first call to the function. In practice, the first time a function is called, an environment will need to be created dynamically, which takes some time. If the function hasn’t been called in a while, the environment will be shut down. If you see a noticeable slowdown, it helps to periodically send requests to the function to keep the environment up and running.
Another challenge is that long-running functions are usually not as efficient as quick functions. Remember that you’ll pay when the function is executing. Keep your functions small to keep your costs down. Use server instances for long-running and computationally-intense applications.
In serverless, you don’t own the servers, but the functions are yours. These functions generate logs and metrics, which are crucial for debugging and visibility. An easy-to-use interface for visualizing your logs in serverless apps can be difficult without the use of advanced monitoring tools like retrace.
Finally, be aware that testing your functions locally can be difficult. There isn’t much support except from some third-party tools. Otherwise, you may need to test using the age-old methods of console messages and log files. You likely will have to just execute the function and check that it works.
AWS Lambda
Now, let’s begin the journey of serverless computing by actually building a function and executing it to see it work. After that, we’ll look at what a realistic serverless architecture looks like.
We’ll be using AWS Lambda for our example. To get started, create an AWS account and choose the free tier. Lambda is a serverless computing environment that allows you to upload or write code and then connect it to an event. When the event fires, your code will execute. You can also put Lambda functions behind a REST API, which we’ll see how to do momentarily.
Lambda supports many different languages and execution environments. For this example, we’ll be using Node.js since it’s pretty simple to get a Lambda function up and running with that environment. You can also use Python, Go, Ruby, C#, and Java. Let’s create our first Lambda function!
Creating Your First Lambda Function
Choose Lambda from the “Services” menu in the top left. You can also type “Lambda” in the search box and select it.
Once you’re on the Lambda screen, click the “Create a Function” button to begin the process of creating your first function. Fill out the form as you see it below:
The role field refers to the permissions you want your Lambda function to have within AWS. You can further research AWS Identity and Access Management, but we won’t cover that here. For our purposes, we’ll create a role for our function based on the “Simple Microservice” permissions.
Click the “Create function” button to navigate to the Lambda function creation screen. This screen looks busy at first, so we’ll walk through it piece by piece and set what we need as we go along. For now, close the “Designer” section of the page by clicking on the section header. We’ll come back to that piece when we integrate our code with another AWS service to make it available for use. Your screen should look like this:
In the “Function code” section, you’ll see an integrated code editor for you to use. We’ll keep the example simple to make sure you understand how the plumbing works with AWS Lambda. So replace the code you see in the editor now with this:
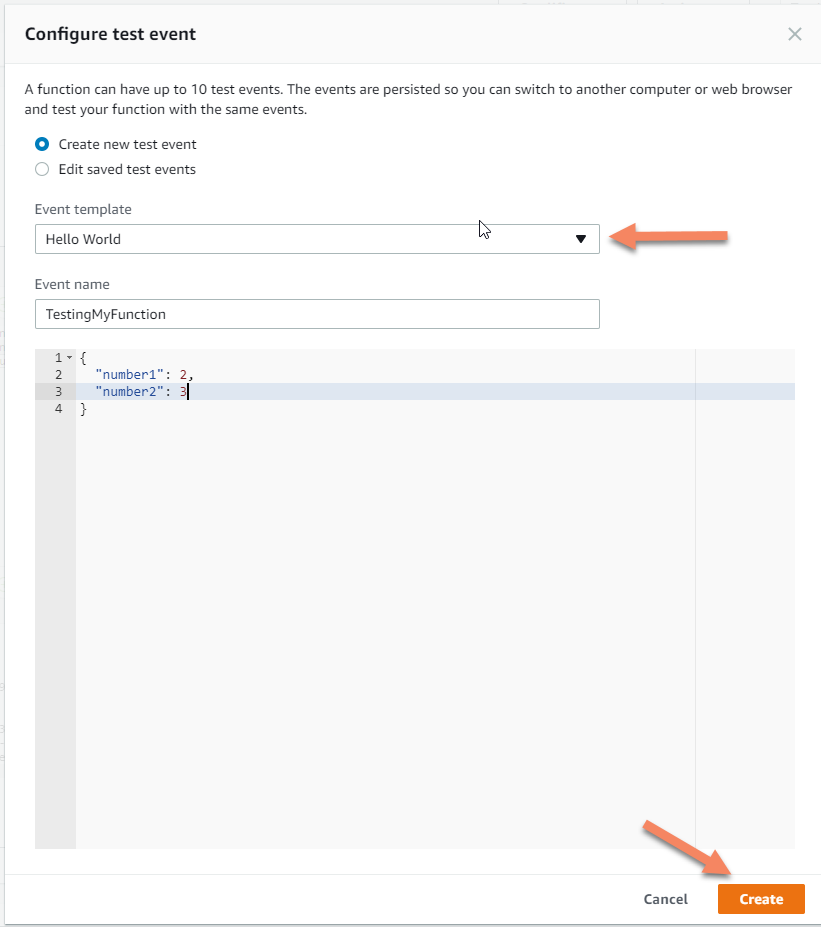
Now we need to test our Lambda function to make sure it’s going to do what we want it to do. The Lambda interface gives us a way to do just that. In the upper right corner, there’s a dropdown next to the “Test” and “Save” buttons. Click on that dropdown and choose “configure test events.” (Note: “configure test events” will be your only option.)
Once in the “Configure Test Event” dialog box, choose “Hello World” as the template and update the JSON inside the box to the following:
{
    "number1": 2,
    "number2": 3
}
Once done, your screen should look like this:
Click the “Create” button, and you’re ready to test. What we just did was create a test input to our function. Now we can execute the function and make sure the result is what we expect.
Click the “Save” button if it’s active. Make sure your new test function is selected in the dropdown and click the “Test” button. Your function will execute, and you’ll see the results displayed at the bottom of the page. In this case, the result returned from the function should be 5.
Congratulations! We’ve created a Lambda function and successfully tested it so we can be confident it will do what we think it will do.
API Gateway
We have a Lambda function ready for use, but how do we actually invoke it? Events, also called triggers, cause Lambda functions to execute. That event can be many different things, such as database records being updated or files being uploaded to an S3 bucket. In our case, we’ll use API Gateway to create a REST endpoint for our Lambda function. This method is very effective in a microservice architecture where your Lambda functions are the microservices.
Create the REST Service
To get started, open up the “Designer” section that we closed earlier. This lists all the available triggers that can invoke your Lambda function. Click on the API Gateway trigger to add it to the designer.
Fill out the form as you see below. This is the most basic setup to get you up and running and calling your Lambda function through an API.
Click the “Add” button below to create the API in API Gateway, then click Save to save your Lambda function configuration. You now have a REST endpoint that will invoke your Lambda function if someone sends an HTTP call to it. Your Lambda configuration screen should look like this:
Configure the REST Service
This is not the end, however. By default, your REST endpoint won’t accept any URL or body parameters. We’ll have to set that up before we can use it. Click on the “ServerlessQuickStartAPI” link to go to the API Gateway console.
You’ll see your new API there. The “ANY” link will be selected by default to show you the path of execution. The “ANY” designation means that the API accepts any HTTP verb (GET, PUT, POST, etc.). You can restrict these verbs, but we won’t for now since we’re concentrating on executing our Lambda function.
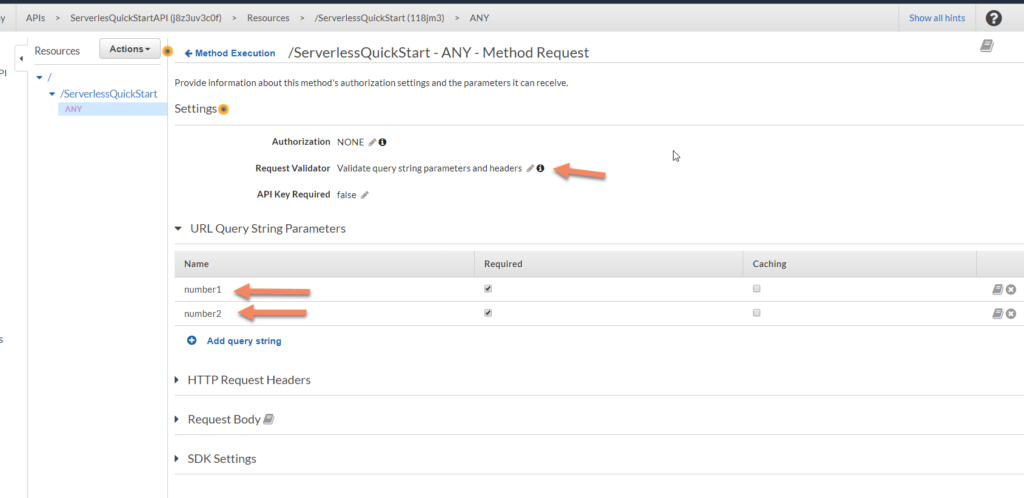
Now click the “Method Request” link.
This takes you to a screen where you can set up the parameters and other settings for your request. Create two query string parameters: number1 and number2. Make them required. The event object holds the value of the query parameters.
Next, click the pencil icon at the end of the line that starts with “Request Validator.” Set the value to “Validate String Parameters and Headers.”
See the screenshot below for what your final result should look like.
We need to update the Lambda function to use query parameters that the API Gateway will provide. Change the Lambda function code to this:
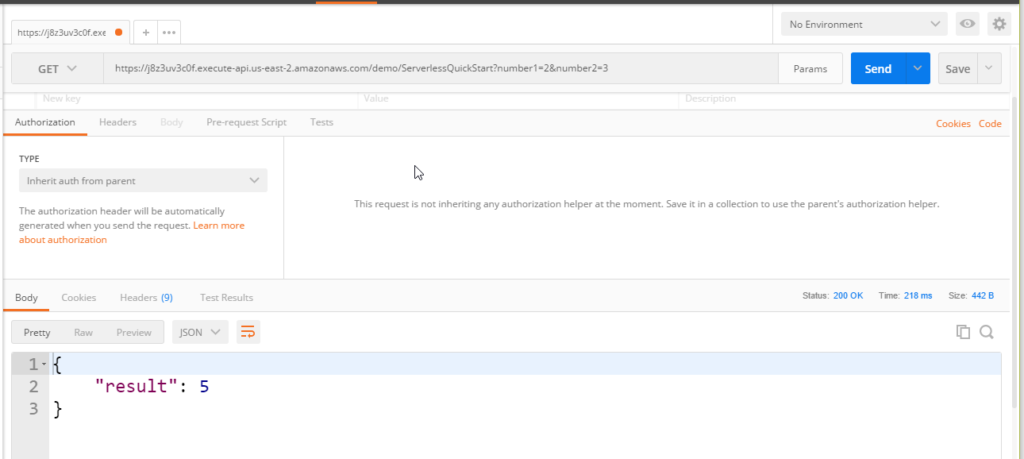
You’ll also notice a specific response object. This is necessary for the API Gateway to read your response. Now we should be able to pull up Postman and send a request to the API Gateway and get a response from our Lambda function. To retrieve the URL, click the “Stages” link on the left of the API Gateway screen. Click the “demo” stage and then the “GET” method to see the Invoke URL.
Now we call that URL in Postman with the parameters we set up, and we see the result of our function.
What Does a Serverless Architecture Look Like?
So far, we’ve created a Lambda function and executed it in a test. Then we created a REST API endpoint and integrated it with the Lambda function so we can execute it remotely. You’ve seen how quickly you can get a Lambda function up and running and connect it with other AWS services. However, that’s only the beginning of the serverless journey.
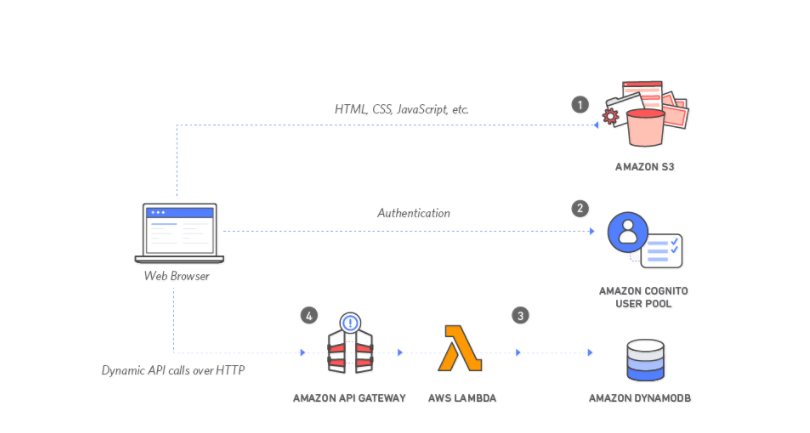
Let’s take a quick glance at what a fully serverless application would look like. Serverless architectures use a mixture of services that allow developers to deploy quickly without standing up servers first. These services include AWS Lambda, Amazon S3, Amazon Cognito, API Gateway, and Amazon DynamoDB. These services allow developers to stand up an entire web application without one EC2 instance or Puppet script.
Take this architecture as an example:
S3 stores the HTML, CSS, and JavaScript so that web browsers can access them. Amazon Cognito provides identity services for the visitors of your site. Any API calls that the JavaScript makes go through API Gateway. Lambda processes the requests. Amazon DynamoDB stores the data. It’s a fully functional website without servers.
Where to Start With Serverless
We’ve played with the technology, but where can you go from here? I suggest that you don’t rewrite your most critical applications as serverless. However, there are some ways to introduce serverless architectures into your environment in low-risk but high-value ways. For instance, do you have any applications that process files or manipulate data and don’t require user interaction? Take, for example, an application that takes media files and transforms them into different formats for consumption. Or take processing data that’s placed into an S3 bucket for data analysis. These are great candidates for serverless architectures. Over time, you can branch out into creating new serverless applications that users interact with.
DevOps is about speed. AWS Lambda and serverless architectures allow you to develop and deliver faster than ever before. When used effectively, they can lower your costs and allow you to embrace DevOps with ease.
Stackify's APM tools are used by thousands of .NET, Java, PHP, Node.js, Python, & Ruby developers all over the world. Explore Retrace's product features to learn more.
 Once upon a time, when dinosaurs roamed the earth, servers had to be built. A development team requested an environment for their code to run in, and a system administrator or infrastructure engineer plugged in a server and spent hours or days getting it ready to run code. Oh, and by the way, that was only one server of many required to run a web application—and this only happened after budgets were decided and forms were filled out. It was a process that could take months.
The DevOps movement has changed all of that. DevOps joins development and operations teams and pulls them in the same direction. All is well with the world, for now servers are built in minutes instead of weeks or months. Simply call an API and a server is built.
Tools like Puppet and Ansible allow for repeatable and fast setup of any server with everything you need. However, that’s not the end of the story. Going from servers in months to servers in minutes is a major improvement. But have you ever thought of executing code with no servers? Here, you will learn about serverless, why it matters, and how to go serverless with AWS Lambda.
Once upon a time, when dinosaurs roamed the earth, servers had to be built. A development team requested an environment for their code to run in, and a system administrator or infrastructure engineer plugged in a server and spent hours or days getting it ready to run code. Oh, and by the way, that was only one server of many required to run a web application—and this only happened after budgets were decided and forms were filled out. It was a process that could take months.
The DevOps movement has changed all of that. DevOps joins development and operations teams and pulls them in the same direction. All is well with the world, for now servers are built in minutes instead of weeks or months. Simply call an API and a server is built.
Tools like Puppet and Ansible allow for repeatable and fast setup of any server with everything you need. However, that’s not the end of the story. Going from servers in months to servers in minutes is a major improvement. But have you ever thought of executing code with no servers? Here, you will learn about serverless, why it matters, and how to go serverless with AWS Lambda.

 Once you’re on the Lambda screen, click the “Create a Function” button to begin the process of creating your first function. Fill out the form as you see it below:
 The role field refers to the permissions you want your Lambda function to have within AWS. You can further research AWS Identity and Access Management, but we won’t cover that here. For our purposes, we’ll create a role for our function based on the “Simple Microservice” permissions.
Click the “Create function” button to navigate to the Lambda function creation screen. This screen looks busy at first, so we’ll walk through it piece by piece and set what we need as we go along. For now, close the “Designer” section of the page by clicking on the section header. We’ll come back to that piece when we integrate our code with another AWS service to make it available for use. Your screen should look like this:
The role field refers to the permissions you want your Lambda function to have within AWS. You can further research AWS Identity and Access Management, but we won’t cover that here. For our purposes, we’ll create a role for our function based on the “Simple Microservice” permissions.
Click the “Create function” button to navigate to the Lambda function creation screen. This screen looks busy at first, so we’ll walk through it piece by piece and set what we need as we go along. For now, close the “Designer” section of the page by clicking on the section header. We’ll come back to that piece when we integrate our code with another AWS service to make it available for use. Your screen should look like this:
 In the “Function code” section, you’ll see an integrated code editor for you to use. We’ll keep the example simple to make sure you understand how the plumbing works with AWS Lambda. So replace the code you see in the editor now with this:
 Once in the “Configure Test Event” dialog box, choose “Hello World” as the template and update the JSON inside the box to the following:
 Click the “Create” button, and you’re ready to test. What we just did was create a test input to our function. Now we can execute the function and make sure the result is what we expect.
Click the “Save” button if it’s active. Make sure your new test function is selected in the dropdown and click the “Test” button. Your function will execute, and you’ll see the results displayed at the bottom of the page. In this case, the result returned from the function should be 5.
Click the “Create” button, and you’re ready to test. What we just did was create a test input to our function. Now we can execute the function and make sure the result is what we expect.
Click the “Save” button if it’s active. Make sure your new test function is selected in the dropdown and click the “Test” button. Your function will execute, and you’ll see the results displayed at the bottom of the page. In this case, the result returned from the function should be 5.
 Congratulations! We’ve created a Lambda function and successfully tested it so we can be confident it will do what we think it will do.
 Fill out the form as you see below. This is the most basic setup to get you up and running and calling your Lambda function through an API.
 Click the “Add” button below to create the API in API Gateway, then click Save to save your Lambda function configuration. You now have a REST endpoint that will invoke your Lambda function if someone sends an HTTP call to it. Your Lambda configuration screen should look like this:

 You’ll see your new API there. The “ANY” link will be selected by default to show you the path of execution. The “ANY” designation means that the API accepts any HTTP verb (GET, PUT, POST, etc.). You can restrict these verbs, but we won’t for now since we’re concentrating on executing our Lambda function.
Now click the “Method Request” link.
You’ll see your new API there. The “ANY” link will be selected by default to show you the path of execution. The “ANY” designation means that the API accepts any HTTP verb (GET, PUT, POST, etc.). You can restrict these verbs, but we won’t for now since we’re concentrating on executing our Lambda function.
Now click the “Method Request” link.
 This takes you to a screen where you can set up the parameters and other settings for your request. Create two query string parameters: number1 and number2. Make them required. The event object holds the value of the query parameters.
Next, click the pencil icon at the end of the line that starts with “Request Validator.” Set the value to “Validate String Parameters and Headers.”
See the screenshot below for what your final result should look like.
This takes you to a screen where you can set up the parameters and other settings for your request. Create two query string parameters: number1 and number2. Make them required. The event object holds the value of the query parameters.
Next, click the pencil icon at the end of the line that starts with “Request Validator.” Set the value to “Validate String Parameters and Headers.”
See the screenshot below for what your final result should look like.
 We need to update the Lambda function to use query parameters that the API Gateway will provide. Change the Lambda function code to this:
 Now we call that URL in Postman with the parameters we set up, and we see the result of our function.

 S3 stores the HTML, CSS, and JavaScript so that web browsers can access them. Amazon Cognito provides identity services for the visitors of your site. Any API calls that the JavaScript makes go through API Gateway. Lambda processes the requests. Amazon DynamoDB stores the data. It’s a fully functional website without servers.


