
Java agents are a special type of class which, by using the Java Instrumentation API, can intercept applications running on the JVM, modifying their bytecode. Java agents aren’t a new piece of technology. On the contrary, they’ve existed since Java 5. But even after all of this time, many developers still have misconceptions about this feature—and others don’t even know about it.
In this post, we remedy this situation by giving you a quick guide on Java agents. You’ll understand what Java agents are, what are the benefits of employing them, and how you can use them to profile your Java applications. Let’s get started.
Java agents are part of the Java Instrumentation API. So to understand agents, we need to understand what instrumentation is.
Instrumentation, in the context of software, is a technique used to change an existing application, adding code to it. You can perform instrumentation both manually and automatically. You can also do it both at compiling time and runtime.
So, what is instrumentation good for? It’s meant to allow you to change code, altering its behavior, without actually having to edit its source code file. This can be extremely powerful and also dangerous. What you can do with that is left to you. The possibilities are endless. Aspect-Oriented Programming? Mutation testing? Profiling? You name it.
With that out of the way, let’s focus again on Java agents. What are these things, and how do they relate to instrumentation?
In short, a Java agent is nothing more than a normal Java class. The difference is that it has to follow some specific conventions. The first convention has to do with the entry point for the agent. The entry point consists of a method called “premain,” with the following signature:
public static void premain(String agentArgs, Instrumentation inst)
If the agent class doesn’t have the “premain” method with the signature above, it should have the following, alternative method:
public static void premain(String agentArgs)
As soon as the JVM initializes, it calls the premain method of every agent. After that, it calls the main method of the Java application debugging as usual. Every premain method has to resume execution normally for the application to proceed to the startup phase.
The agent should have yet another method called “agentmain.” What follows are the two possible signatures for the method:
 public static void agentmain(String agentArgs, Instrumentation inst)
 public static void agentmain(String agentArgs)
Such methods are used when the agents are called not at JVM initialization, but after it.

A java agent, in practice, is a special type of .jar file. As we’ve already mentioned, to create such an agent, we’ll have to use the Java Instrumentation API. Such an API isn’t new, as we’ve also mentioned before.
The first ingredient we need to create our agent is the agent class. The agent class is just a plain Java class that implements the methods we’ve discussed in the previous section.
To create our Java agent, we’re going to need a sample project. So, we’re going to create a silly, simple app that does just one thing: print the n first numbers of the Fibonacci sequence, n being a number supplied by the user. As soon as the application is up and running, we’re going to use a little bit of Java instrumentation to perform some basic profiling.
For this project, I’m going to use the free community edition of the IntelliJ IDEA, but feel free to use whatever IDE or code editor you feel most comfortable using. So, let’s begin.
Open the IDE and click on “Create New Project,” as you can see in the following picture:

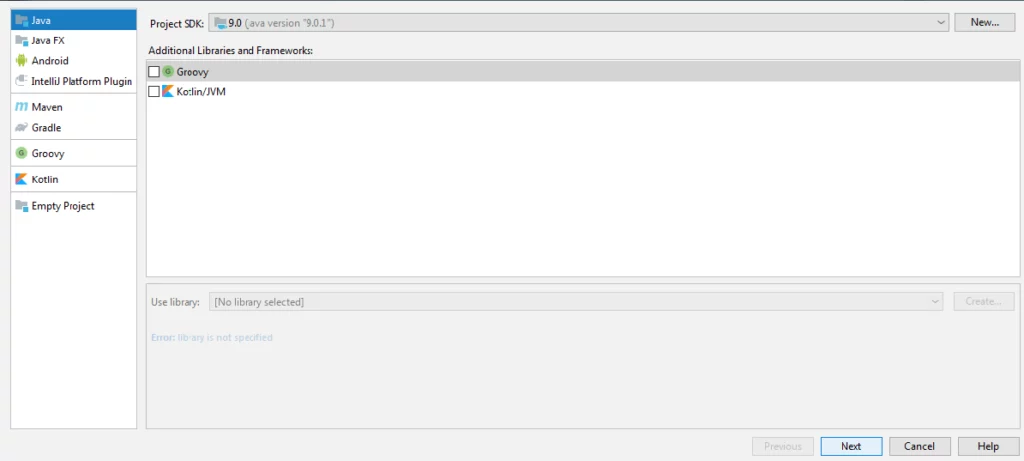
In the “create new project” window, select “Java” as the type of the project and click on “Next:”
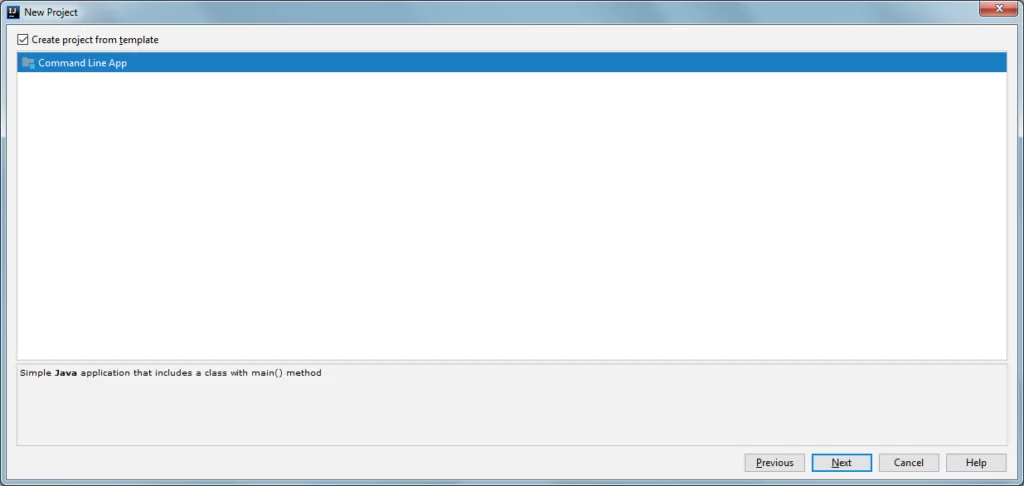
Then, on the next screen, mark the “Create project from template” box, select the “Command Line App” template for the application and click on “Next” again:
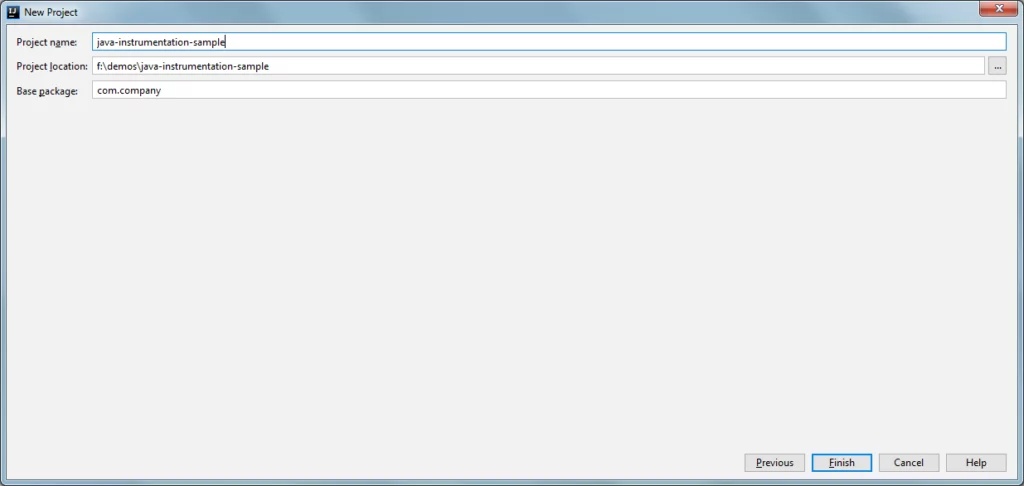
After that, the only thing that’s left is to configure the name and location for the project and click on “Finish:”
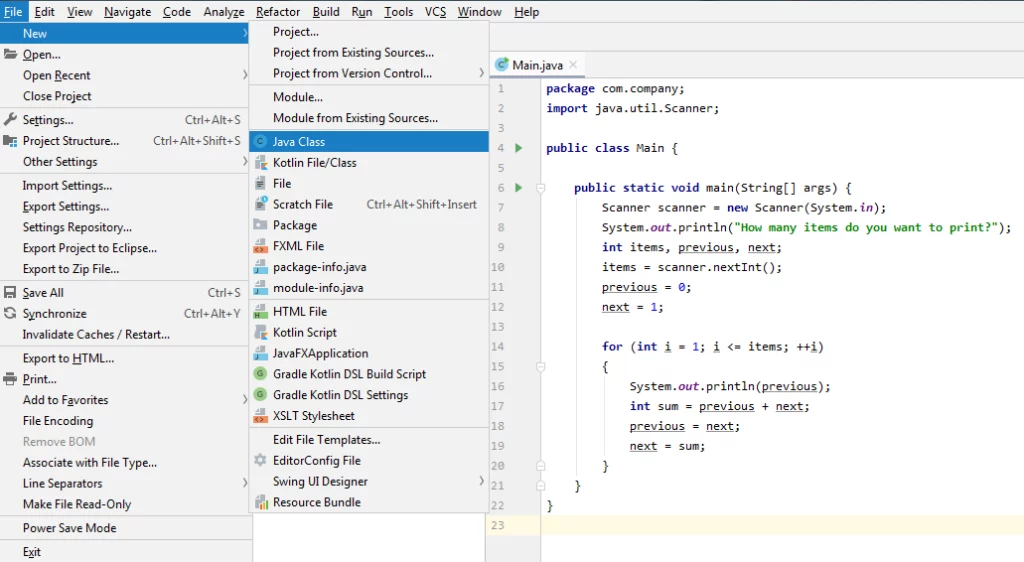
With our project created, let’s create the Fibonacci logic. Copy the following content and paste on your main class:
 package com.company;
 import java.util.Scanner;

 public class Main {

     public static void main(String[] args) {
         Scanner scanner = new Scanner(System.in);
         System.out.println("How many items do you want to print?");
         int items, previous, next;
         items = scanner.nextInt();
         previous = 0;
         next = 1;

         for (int i = 1; i <= items; ++i)
         {
             System.out.println(previous);
             int sum = previous + next;
             previous = next;
             next = sum;
         }
     }
 }
The application is super simple. It starts asking the user for the number of items they wish to print. Then, it generates and prints the Fibonacci sequence with as many terms as the number the user informed.
Of course, the application is very naive. It doesn’t check for invalid items, for one. Another problem is that if the user enters a large enough value, it causes the program to overflow the upper limit of int. You could use long or even the BigInteger class to handle larger inputs. None of that matters for our example, though, so feel free to add those improvements as an exercise, if you wish to do so.
Our sample application is up and running, so we’re ready to create our Java agent. Repeat the process of creating a new project. Call it “MyFirstAgentProject.”
Create a new class by going to File > New Java Class, like in the following image:
Then, name the class “MyFirstAgent” and press enter. After that, replace the content of the created file with what follows:
 package com.company;
 import java.lang.instrument.Instrumentation;

 public class MyFirstAgent {

     public static void premain(String agentArgs, Instrumentation inst) {
         System.out.println("Start!");
     }
 }
Now we’ll have to create a custom manifest. Let’s start by adding Maven support to our project. Right-click on the “MyFirstAgentProject” module. Then, click on “Add Framework Support.”
On the “Add Frameworks Support” window, check “Maven” and click on OK. After that, IntelliJ will create a pom.xml file and open it so you can edit. Add the following content to the pom.xml file and save it:
 <build>
         <plugins>
             <plugin>
                 <groupId>org.apache.maven.plugins</groupId>
                 <artifactId>maven-jar-plugin</artifactId>
                 <version>3.2.0</version>
                 <configuration>
                     <archive>
                         <manifestFile>src/main/resources/META-INF/MANIFEST.MF</manifestFile>
                     </archive>
                 </configuration>
             </plugin>
         </plugins>
     </build>
 <properties>
         <maven.compiler.source>1.6</maven.compiler.source>
         <maven.compiler.target>1.6</maven.compiler.target>
     </properties>
In the code above, we add the “maven-jar-plugin” plugin to our pom file, as well as configuring the location for our manifest file. Now we need to create it. To do that, copy the following content, paste it on a new file, and save it as “src/main/resources/META-INF/MANIFEST.MF.”
 Manifest-Version: 1.0
 Premain-Class: com.company.javaagent.helloworldagent.MyFirstAgent
 Agent-Class: com.company.javaagent.helloworldagent.MyFirstAgent
We’re almost there! With the manifest creation out of the way, let’s now perform a maven install. On the “Maven” tool window, expand the “Lifecycle” folder, right-click on install and then check the “Execute After Build” option.
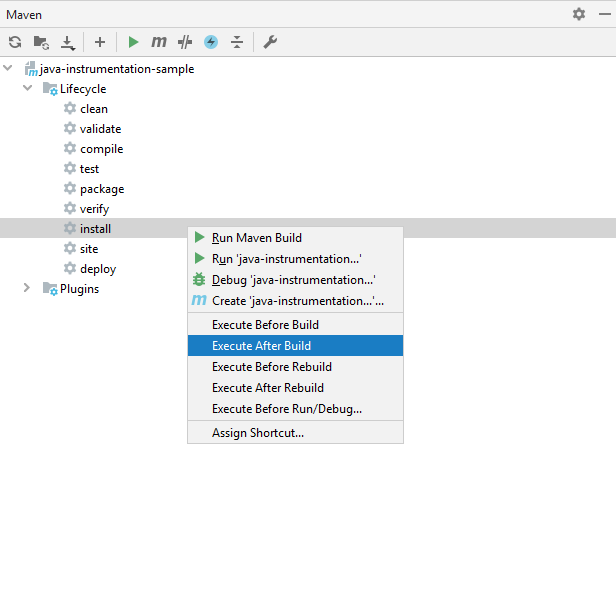
With that setting, the IDE will perform a maven install every time we build the application. So, let’s build it! Go to Build > Build Project, or use the CTRL + F9 shortcut. If everything went well, you should be able to find the resulting jar file, under “target.”
We’ve successfully finished creating the jar file for our first Java agent. Now, let’s test it!
We’re now going to use our agent, and to do that, we need to load it. There are two ways to load a Java agent, and they are called static and dynamic loading. Static loading happens before the application runs. It invokes the premain method, and it’s activated by using the -javaagent option when running the application. Dynamic loading, on the other hand, is activated with the application already running, which is done using the Java Attach API.
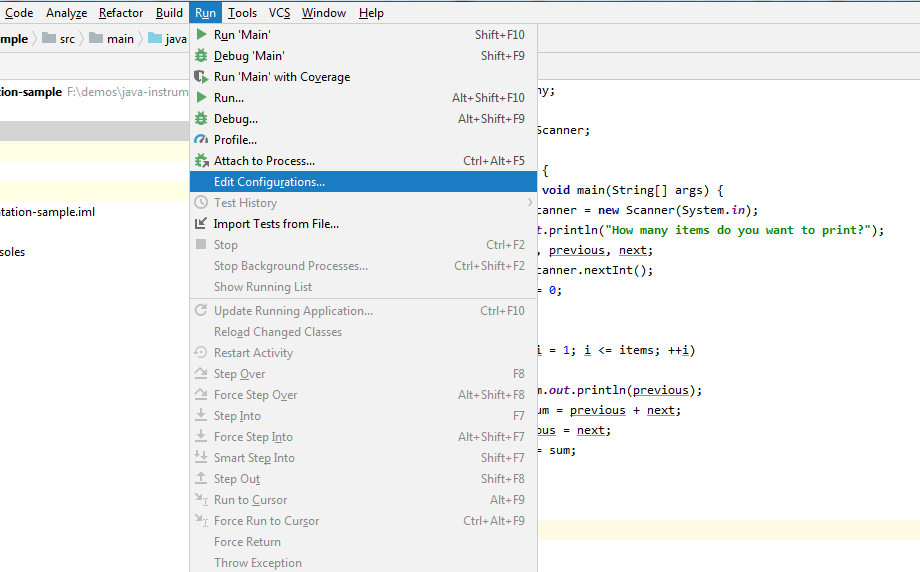
Here we’re going to use static loading. With the sample application open in IntelliJ IDEA, go to Run > Edit Configurations…, as you can see in the image below:
A new window will be shown. There, you can, as the name suggests, configure many different options regarding the running and debugging of the application. What you have to do now is to add the -javaagent option to the VM options field, passing the path to the agent’s jar file as an argument to it.
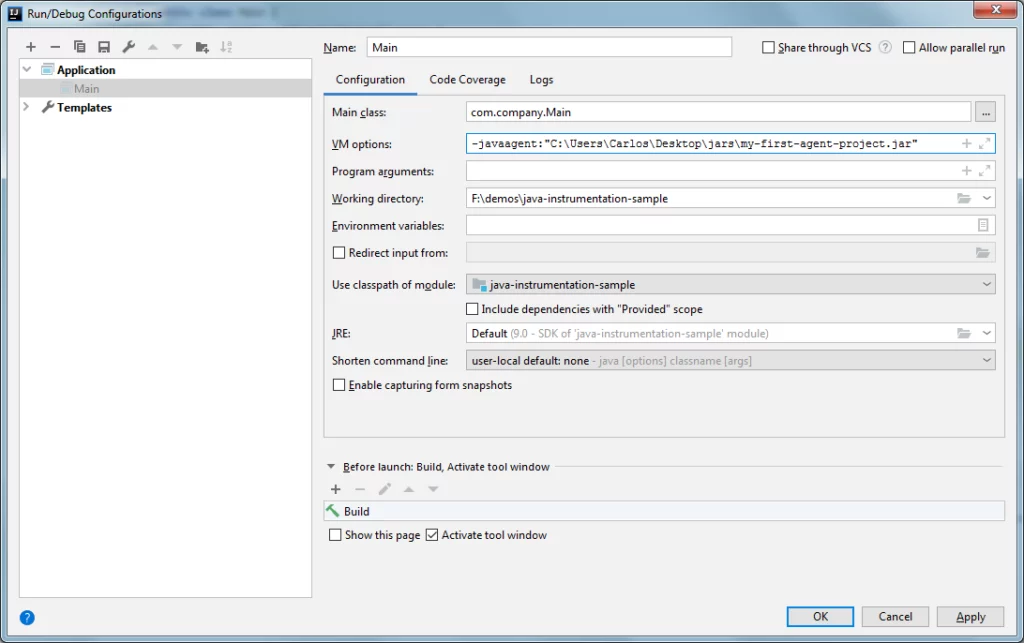
After configuring the path, you can click on OK and then run the project as usual. If everything went right, that’s the output you should see:
As you can see, the message “Start!” that we’ve defined using the premain method, was printed just before the main method of the application being run. That means that our agent was successfully loaded.
 Start!
 How many items do you want to print?
 10
 0
 1
 1
 2
 3
 5
 8
 13
 21
 34

 Process finished with exit code 0
You might wonder if all that we’ve seen is too much trouble for little result. The answer to that is a firm “no.” First, you must keep in mind that our example here is the equivalent of a “Hello world” for Java agents. Things can get—and they do get—a lot more complex than this. As we’ve already mentioned, there are very sophisticated tools that make use of the Java Instrumentation API.
Secondly, keep in mind that there are many additional tools one can use to really extend the power of Java instrumentation to new levels and allow you to do things like bytecode manipulation, for instance.Also, consider that much of the heavy lifting has already been done for you, regarding profiling. There are a lot of powerful tools out there, coming in different types that cater to virtually all profiling needs you might have.
Stackify's APM tools are used by thousands of .NET, Java, PHP, Node.js, Python, & Ruby developers all over the world.
Explore Retrace's product features to learn more.


