AWS Lambda is a service that confuses many people. For that reason, you may be wondering just how it works, and how you’d use it to build a highly scalable event-driven application. As someone who’s presumably no stranger to the internet, you must have seen the terms serverless, function-as-a-service, or AWS Lambda thrown across your screen a few times. Perhaps you’re looking to learn more.
If so, you’re in luck. In this post, you’ll learn about AWS Lambda, serverless, and how to build a scalable image processing app using AWS Lambda and Node.js.
First, let me take you back to the time when applications were hosted on physical machines in server rooms. Back then, companies built their own data centers. The process was tedious, difficult, and very demanding.
Recently, a new era paved the way for running an application in the cloud. You no longer needed to entertain the idea of building your own data centers anymore.
After all, why would you?
In just minutes, you could spin up servers in multiple regions and deploy applications in seconds. However, server provisioning, scaling, and monitoring was still a difficult task.
Now, a shift in cloud computing known as serverless, or function-as-a service, has emerged in parallel. There is no need for server provisioning, monitoring, logging, or managing the underlying infrastructure. Instead, the focus is on your business logic, broken down into smaller, single-purpose functions like so:

Serverless doesn’t mean an absence of servers, because there actually are servers. It only means the burden of managing these servers is taken away from you.
One of the entities responsible for taking care of these servers is Amazon Web Services.
Amazon Web Service, or AWS, is a leader in cloud computing platforms.
According to their website, AWS provides a “highly reliable, scalable, low-cost infrastructure platform and powers hundreds of thousands of businesses in 190 countries around the world.” According to Canalys’ 2018 report, AWS holds 32.6% of the market share. That’s more than what’s held by any other provider.
With that established, now’s the time to hold onto your hat. That’s because you’re going to learn something cool—no, something mind-blowing.
As I said in the beginning, Lambda is a computing service offered by AWS. It allows you to run code without having to deal with servers in the cloud. An event triggers a Lambda function and dies after execution.
The Lambda function only does one thing. It could be something as simple as retrieving a blog post, creating a blog post, or even sending an email.
There are three ways you could create a Lambda function on AWS:
Try Stackify’s free code profiler, Prefix, to write better code on your workstation. Prefix works with .NET, Java, PHP, Node.js, Ruby, and Python.
Every Lambda function is preceded by an AWS account, so you’ll need to have one. The requirements for an account are simple.
Don’t worry; you don’t need to pay anything. AWS offers a free tier account. With this plan, you can use almost all of AWS’s services without paying a dime for one year.
To set up your free account,
We’re going to use the Serverless framework, a CLI tool written in Node.js that lets you write and deploy Lambda functions. It supports many providers like AWS, Microsoft Azure, IBM OpenWhisk, Google Cloud Platform, Kubeless, Spotinst, and more.
The Serverless framework is easy to install. First, you need a Node.js runtime. Now, I must remind you to install a version of Node.js supported by AWS Lambda. I’ll stick to Node.js 8.10 runtime in this post.
You’ll also want to ensure your local environment is as close to the production environment as possible. This includes the runtime.
If you have other versions installed already, you can use NVM to install Node.js 8.10 runtime or switch between versions of Node.js.
$ nvm install v8.10
If you want to switch between versions of Node.js, you’d do this:
$ nvm use 8.10
Now that you have Node.js runtime, proceed to install the Serverless framework:
$ npm install -g serverless
Check that the Serverless framework was installed.
$ serverless --version
1.40.0
Your Lambda function won’t live on your local environment forever. It needs to get into an AWS environment before the magic can happen. I refer to this process as deployment. The Serverless framework needs a way to access AWS resources and deploy your functions on your behalf.
For this purpose, you’ll need a programmatic user account. This account won’t be able to log in to AWS console. Rather, it’ll access AWS resources through API calls using access keys we’ll create shortly.
I’ve provided easy steps to create a programmatic user below.
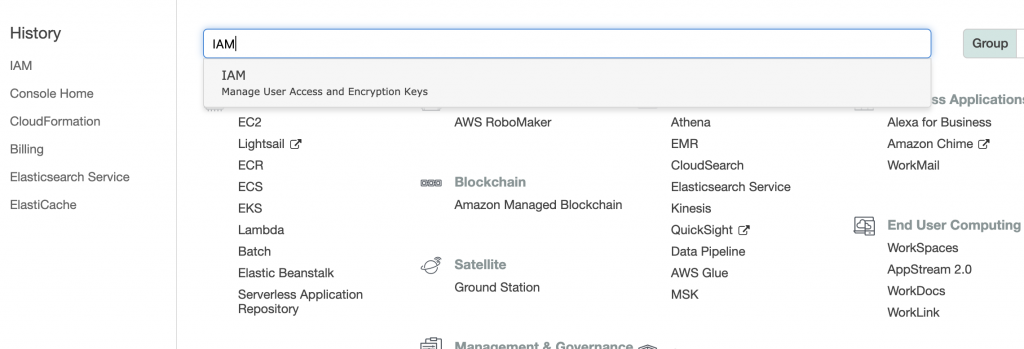
1. Login to AWS console and go to IAM user:
2. Click on Add user to begin the user creation process:

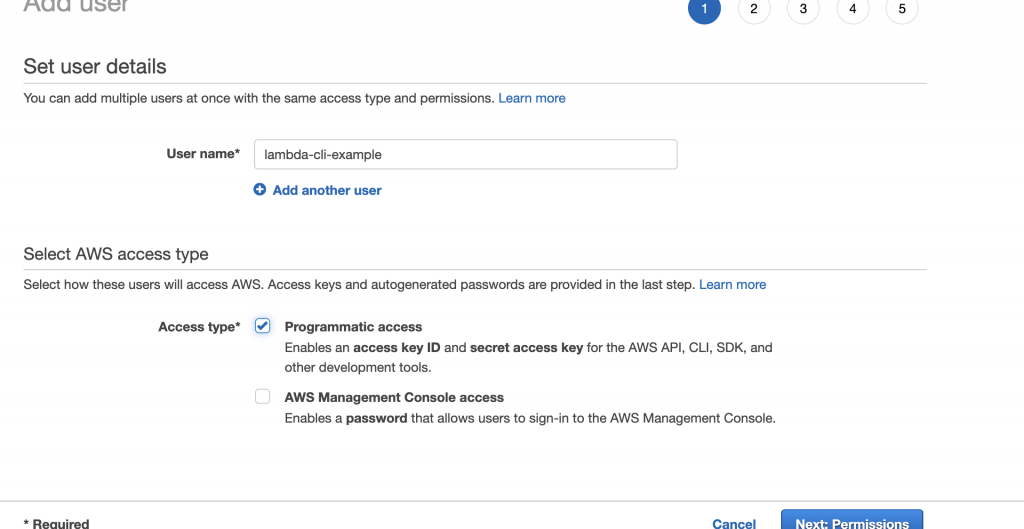
3. Type in lambda-example-cli as the user name, enable programmatic access by checking the checkbox, and click on Next: permissions to proceed.
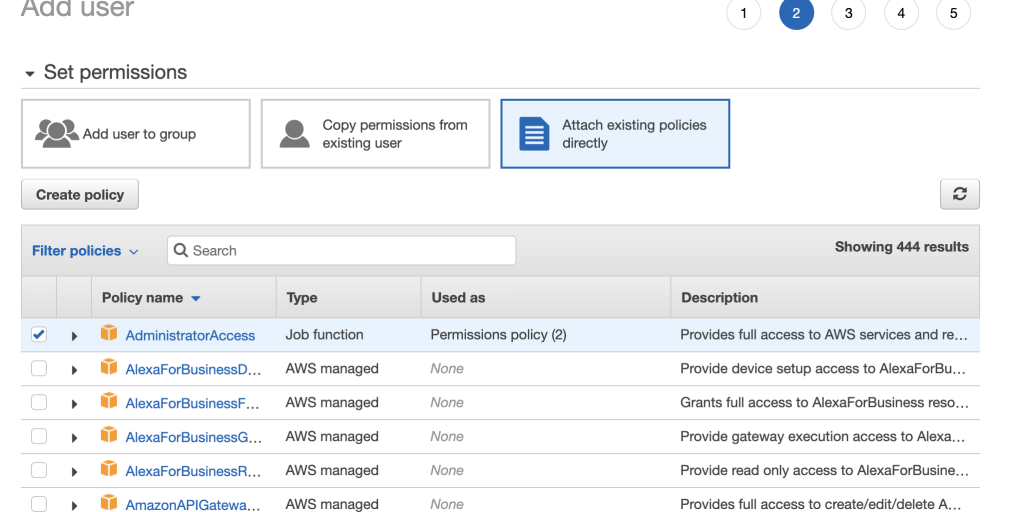
4. Click on Attach existing policy directly and search for Administrator access. Select AdministratorAccess by checking the box. A policy is an object in AWS that defines the permissions of a user, role, or group.
5. Review your choices and then click on the Create user button. You should see this screen.
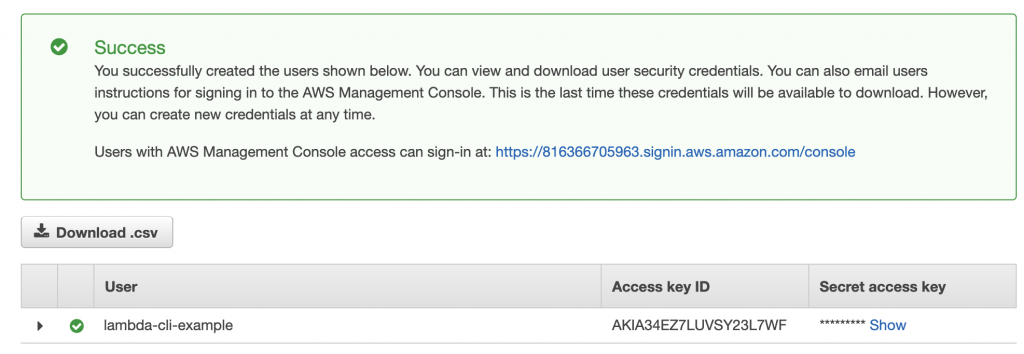
7. Copy or download a CSV file containing your access key ID and access key secret. You need to keep this secure.
I repeat, keep it safe.
Anyone with access to these keys can make API calls like you would. They can control and use your AWS account.
8. Configure serverless CLI with your AWS credentials. This is necessary for deployment.
serverless config credentials --provider aws --key <your_access_key_id> --secret <your_access_key_secret>
Now, we’ll create a simple hello world app. Then, we’ll create a more advanced app that downloads an image from a URL, resizes it, and then uploads it to AWS S3, which is a highly scalable object storage service.
First, we’ll start by using the Serverless CLI tool to bootstrap our project:
$ serverless create --template hello-world
If you ran the command above successfully, you should already have two files created for you.
.
├── handler.js
└── serverless.yml
We supplied the –template argument to let Serverless CLI know our choice of templates. There are dozens of templates the Serverless CLI tool supports. You can find them in this repository.
Now, handler.js is the Lambda function. This is where your logic stays.
'use strict';
module.exports.helloWorld = (event, context, callback) => {
...
This function accepts three arguments: event, context, and a callback.
The event argument contains event data. There are different event types, and each often contains different attributes. Understanding how Lambda functions work can be a bit hard to grasp at first.
The first thing to note is that a Lambda function has to be triggered by a service and cannot run on its own. You’ll find a list of services that are capable of invoking Lambda functions here.
Use the context argument to pass the runtime parameter to the Lambda function.
Use the callback argument to return responses to the caller.
The file serverless.yml contains your API definition and other resources. These are the services your application depends on to work as expected. Later in this post, we’ll need an S3 bucket to store images.
Let’s make some modifications to serverless.yml. We’ll change the runtime property to nodejs8.10. Then, we’ll add a new property, region, to the provider object which will deploy the app to the region we specify. This is completely optional, and AWS will default to us-east-1 if not specified. It’s important to choose regions close to your users in production because of latency.
service: serverless-hello-world
# The `provider` block defines where your service will be deployed
provider:
  name: aws
  runtime: nodejs8.10
  region: eu-west-1
....
We deploy the app with a deploy argument. From the console, execute the command below:
$ serverless deploy
On completion, you’ll see the output in your console. The important thing to note here is the endpoint.
...
api keys:
  None
endpoints:
  GET - https://ss7n639ye3.execute-api.eu-west-1.amazonaws.com/dev/hello-world
functions:
  helloWorld: serverless-hello-world-dev-helloWorld
...
If you access the endpoint from your browser, you should see your request printed back to you. Congratulations! You just built your first Lambda app.
The famous hello world app we built in a previous section was pretty simple. Now, it’s time to go a little further by building something more advanced.
We’ll build a Lambda app that gets images from a URL, resizes them on the fly, and uploads them to an S3 bucket, as I said earlier. You can modify the previous hello world app or start a new project from scratch.
We’ll make changes to serverless.yml as follows:
# filename: serverless.yml
service: ImageUploaderService

# The `provider` block defines where your service will be deployed
custom:
  bucket: getting-started-lambda-example
provider:
  name: aws
  runtime: nodejs8.10
  region: eu-west-1
  stackName: imageUploader
  iamRoleStatements:
    - Effect: "Allow"
      Action:
        - "s3:PutObject"
      Resource:
        - "arn:aws:s3:::${self:custom.bucket}/*"

# The `functions` block defines what code to deploy
functions:
  UploadImage:
    handler: uploadImage.handler
    # The `events` block defines how to trigger the uploadImage.handler code
    events:
      - http:
        path: upload
        method: post
        cors: true
    environment:
      Bucket: ${self:custom.bucket}
resources:
  Resources:
    StorageBucket:
      Type: "AWS::S3::Bucket"
      Properties:
        BucketName: ${self:custom.bucket}
What we have here is a custom object in the YAML file where we define the bucket’s name of the bucket. You should choose a different bucket name; you won’t be able to use the bucket name I used in this example unless I delete it. The AWS documentation says, “an Amazon S3 bucket name is globally unique, and the namespace is shared by all AWS accounts. This means that after a bucket is created, the name of that bucket cannot be used by another AWS account in any AWS Region until the bucket is deleted.”
If you look further, you’ll see that we defined the stackName as ImageUploader. A stack is a collection of AWS resources that one can manage as a single unit. We also specified a global IamRoleStatement. A Lambda function needs permissions to access other AWS resources. In our case, we need permission to write to an S3 bucket. This permission is provided in the IAM role statements.
Below the Lambda function UploadImage, we added a new object called environment. With this, we can set environment variables that we can get via the process.env object during execution. Please take note of the handler’s name.
Finally, we wrapped it up by defining an S3 bucket resource where the images will be stored.
You don’t have to reinvent the wheel. You can use your favorite npm packages in Lambda apps. They’ll be packaged along with your functions on deployment.
We’ll use an npm package called uuid to generate unique names for images, and we’ll use jimp for manipulating uploaded images.
First, we need a package.json file.
npm init
You’ll be asked some questions. Just go ahead and answer them.
npm install jimp uuid
Now, let’s update the handler function. Don’t forget to rename the function to uploadImage.js. It’s a good idea to name your function after what it does.
// filename: uploadImage.js

"use strict";

const AWS = require("aws-sdk");
const uuid = require("uuid/v4");
const Jimp = require("jimp");
const s3 = new AWS.S3();
const width = 200;
const height = 200;
const imageType = "image/png";
const bucket = process.env.Bucket;

module.exports.handler = (event, context, callback) => {
    let requestBody = JSON.parse(event.body);
    let photoUrl = requestBody.photoUrl;
    let objectId = uuid();
    let objectKey = `resize-${width}x${height}-${objectId}.png`;

    fetchImage(photoUrl)
        .then(image => image.resize(width, height)
            .getBufferAsync(imageType))
        .then(resizedBuffer => uploadToS3(resizedBuffer, objectKey))
        .then(function(response) {
            console.log(`Image ${objectKey} was uploaed and resized`);
            callback(null, {
                statusCode: 200,
                body: JSON.stringify(response)
            });
        })
        .catch(error => console.log(error));
};

/**
* @param {*} data
* @param {string} key
*/
function uploadToS3(data, key) {
    return s3
        .putObject({
            Bucket: bucket,
            Key: key,
            Body: data,
            ContentType: imageType
        })
        .promise();
}

/**
* @param {url}
* @returns {Promise}
*/
function fetchImage(url) {
    return Jimp.read(url);
)
If you look at uploadImage.js, you can see we have method fetchImage responsible for getting the image from a URL.
You can read more about jimp package’s inner workings in their readme file.
After a resize, we upload to our S3 bucket using the putObject method in the AWS SDK.
Logging gives visibility into how applications run in production. It can save you a lot of time when troubleshooting a problem.
While there are many log aggregating services, like Retrace, AWS Cloudwatch and Lambda functions work well together.
Out of the box, AWS Lambda monitors functions on your behalf and reports metrics through Amazon CloudWatch. These metrics include total requests, duration, and error rates. Aside from the monitoring and logging provided, you can also log an event from your code with console.log:
console.log('An error occurred')
In our handler function (that is, uploadImage.js), we log to AWS CloudWatch when an image is processed successfully and when an error occurs.
Whether you’re updating an existing application or deploying a new application, you deploy with the serverless deploycommand:
serverless deploy
Your output will be similar to the one shown below (and please do take note of the endpoint):
.....
  None
endpoints:
  POST - https://0sdampzeaj.execute-api.eu-west-1.amazonaws.com/dev/upload
functions:
  UploadImage: ImageUploaderService-dev-UploadImage
layers:
If you make a curl request to this endpoint with the right request body, the image is downloaded from the URL, resized, and uploaded to S3 bucket. Remember to change the post endpoint to the one in your console.
curl -H "Content-type: application/json" -d '{"photoUrl":"https://www.petmd.com/sites/default/files/what-does-it-mean-when-cat-wags-tail.jpg"}' 'https://0sdampzeaj.execute-api.eu-west-1.amazonaws.com/dev/upload'
You can now see the logs in CloudWatch and your images in the S3 bucket.
Today, you learned about AWS and how to create an AWS account with access keys. You also built your first hello world app running in the cloud, and you learned so much about the Serverless framework! You even proceeded to create a photo processing app.
That’s a lot of ground to cover for a beginner.
To build on this knowledge, consider learning more about Serverless framework and how to test for Lambda functions. You should take a look at a post called “Serverless Local Development” by Gareth McCumskey, a web and Serverless developer. And if you want to take a look at the code, you can find it on the Git repository.
From there, you should be well on your way to a complete understanding of AWS Lambda with Node.js!
Stackify's APM tools are used by thousands of .NET, Java, PHP, Node.js, Python, & Ruby developers all over the world.
Explore Retrace's product features to learn more.


